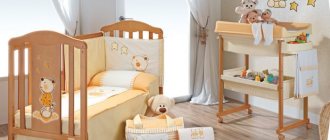
When a crib for a newborn has already been purchased, all that remains is to arrange it. Many people will think that this is quite easy to do. Yes, it's not difficult. But you should remember that everything needs to be done thoughtfully. After all, you need your child to not only sleep here, but also be protected from:
- room dust;
- drafts;
- mosquitoes and flying insects;
- direct sunlight;
- other irritants.
To do this, attach a canopy to the crib. It is made of lightweight material and mesh that protect babies while allowing plenty of fresh air into the crib. Despite the fact that many parents are in no hurry to buy this device, it is still quite useful.
If you don’t want to spend money on a ready-made version, you can sew it yourself, which is not difficult. You will only have to pay for the materials. Mounting hardware for this product is sold separately.
Having decided on the design and quality of the product, parents will have to figure out how to attach the canopy to the crib. This is a more difficult task. But you can also cope with it, guided by well-written instructions.
Photo from the site: Sosedi-online.ru
Canopy functions
Having looked at the definition of the term in different dictionaries, we can conclude that a canopy is an elegant stationary or portable canopy used for various purposes. More than a century has passed since the appearance of the first prototypes. During this time, the curtains have undergone a lot of changes. Their design has changed, the variety of fabrics used has increased significantly, and the methods of fastening have changed.
The first portable models were used in Ancient Babylon to protect rulers from the scorching sun while they were moving along the street. Nowadays it is almost impossible to find such structures, except on a film set or at a carnival. Most people associate a canopy exclusively with decoration above the bed and perceive it as a luxury item.
From a practical point of view, a canopy is a good protection against annoying insects, drafts, and does not allow dust to pass through. From an aesthetic point of view, it acts as a decoration. Allows you to transform a room and make it exclusive. This item gives the room solemnity and romance; it can be located around the perimeter of the entire bed, or decorate only the headboard.
The canopy is used not only in the bedroom, but also in the living room and attic. They cover sofas, armchairs, ottomans. With its help, you can perform zoning of the room, for example, combining an office and a bedroom in one room. This technique is perfect for decorating a studio apartment.
Do it yourself
Despite the availability of holders and their low cost, many parents decide to independently arrange a sleeping place for their children.
To do this, you will need a hollow tube (preferably white or chrome) and a rigid metal cord that holds its shape. It is inserted into the drawstring and bent. Then the top of the tube is determined and the connected tendrils of the cord are inserted into it. A homemade canopy frame is also suitable for an adult bed.
A canopy can be made from a camera tripod, an old floor lamp, or an LED ring light.
Advantages and disadvantages of a canopy bed
The canopy allows you to make the bed the accent of the bedroom, which attracts the eye. It can be installed in any room, and its price range is accessible to almost everyone. Having become interested in this decorative element, many are trying to find out more information about it and evaluate all the pros and cons. To make the task easier, let’s look at its main advantages:
- provides protection from insects;
- creates an atmosphere of comfort and security, helps fight insomnia;
- increases privacy, hides the sleeping area and the sleeping person from prying eyes, especially important for bedrooms without doors and studio apartments;
- a product made of dense fabric muffles sounds, protects against the penetration of sunlight, and allows you to enjoy daytime sleep;
- protects from drafts;
- traps dust and filters air;
- makes it possible to reduce the ceiling height;
- decorates the interior, giving it a refined, original look;
- Thanks to the large range of models, you can choose a design that matches any style.
4 more unusual ways to use a canopy in a baby's room
Game Zone
Hang a canopy over a mini pool with balls - and a compact play area for your baby is ready! The little ones will be delighted with such a corner in the room.
Over the table
Place a textile tent over your desk - it will help you create a simple and stylish area for learning, reading and developmental activities.
Above the storage basket
A basket for toys or other important things can also be supplemented with a canopy, visually highlighting the storage area.
Decorative element
A textile tent can serve as an independent decorative element, without being tied to the functional areas of the baby’s room. It's a quick and easy way to add extra texture or a pop of color to your nursery, or elegantly fill an empty corner.
Photo: Instagram childcanopy
Photo: Instagram angusanddudleycollections
Photo: Instagram hope_and_jade
Photo: Instagram missnmasteronline
Location options and types of holders
The canopy over the bed can be placed in three ways: at the head, in the center, around the perimeter. In the first case, the product is used exclusively for decorative design of the bed. The second and third options allow you to enjoy all the functions of the item and use it for practical purposes. The type of fastening depends on the installation location. For these purposes the following can be used:
- frame;
- frame;
- cornice;
- barbell;
- holder.
The last of these are most often used for cribs; they are divided into:
- Beds. There are special models that attach directly to the crib ledges.
- Wall-mounted. Round products that are attached to vertical partitions.
- Ceiling. This variety can have a round or square shape and allows you to hang fabric of any length.
- Floor-standing. The mobile version moves freely around the room, can be taken outside, or installed above the playpen.
Making a canopy over a crib
The second step is to choose and make your own mount for the canopy on the crib. There are several practical and convenient options.
Regardless of the mounting method, to make a canopy you will need:
- screwdriver and drill;
- fastening fittings;
- roulette;
- pencil.
For manufacturing you will need fabric, fastening fittings and tools.
The canopy can be made from a single piece of fabric: in this case, you just need to process it along the edges (overlock or sew on ribbon), and sew on loops if necessary. Another option is a canopy made of several wedges. It is suitable for attaching a hoop.
Arched canopy
This type of canopy is used on cradles and cribs for babies.
An arc (metal or wood) is attached to the wall at the head of the crib. The fabric is thrown over it and secured. The lower part of the canopy can be attached to the bottom of the crib with loops or fall freely onto it.
The fabric is hung on an arc that is attached to the wall above the bed.
Canopy on frame
Traditionally, the canopy is attached to a rigid frame, which is an extension of the bed itself. You can make it yourself from metal pipes or wooden beams. The structure is attached to the base of the bed with self-tapping screws.
The classic way to attach a canopy is to a frame.
How to make a canopy:
- take 4 identical pieces of fabric (75-100 cm wide), the length of which will be equal to the distance from the top rod to the floor;
- process the cuts, sew loops to the upper edges;
- fasten with loops to the crossbar.
Cuts of fabric are fixed to the crossbars of the frame.
Canopy on a horizontal rod
To make such a canopy, you will need to make a rod from a metal pipe. Its size should match the width of the bed or be slightly larger. Suspended mounts are made on the ceiling, and a crossbar is mounted to them.
A rod is made from a metal pipe onto which the canopy is attached.
For the canopy, use the longest piece of fabric (can be sewn from 2 parts). Its size will be equal to the distance from the bottom of the end of the bed to the crossbar on the ceiling, multiplied by 2.
The lower ends can be taped to the corners of the bed or left free.
Hoop canopy
An easy way to make a canopy is to use a hoop. You need to select the center of the fabric cut, secure it in a hoop that can be separated. Two pieces of fabric with a drawstring are strung on the outer circle.
A canopy can even be made using a hoop.
The upper edge of the material is turned up 15 cm and hemmed so that the “crown” remains protruding.
A crown is formed on the upper edge of the canopy.
The base can be decorated with ribbons, artificial flowers, and flounces made of the same material.
The base can be masked in any way.
Several strong ropes (thin ropes or twine braided in three) are tied to the free areas of the base; the ends are tied and suspended from a ceiling hook.
A piece of fabric is attached to a circle and the entire structure is suspended from the ceiling.
Canopy with birds
The canopy over the crib can be secured with 4 invisible thread hangers. In this case, the lightest fabric possible is chosen for the product.
Four mounts need to be hung from the ceiling. It can be placed directly above the corners of the crib or at a short distance from them (20-40 cm).
The main charm of such a canopy is that the attachment points will be decorated with small toys, which come with 2 rings: a thread is attached to one, and the canopy is attached to the other.
To make the birds, you will need to download or draw a pattern yourself. The toy will consist of parts:
- wing – 4 pcs., cardboard frame between parts;
- back – 2 pcs. (sewn at the top);
- belly – 1 pc.;
- beak – 2 pcs.
All details of the bird must be applied to the pattern.
You will also need 2 beads to make the eyes. The parts of the bird are sewn together. First of all, the wings; a cardboard base is inserted into them. When stitching the back, the wings and beak are inserted and secured into the seam. The belly part is not sewn on completely: you need to leave a slit to turn it inside out and stuff the toy.
You can use beads for the bird's eyes.
After the body is sewn, you need to turn the bird inside out, stuff it, and sew up the slit. Send one ring to the back, next to the wings, and place another under the beak.
A ring is sewn to the body of the bird.
A canopy is attached to the ring, which is located under the beak, and then the birds are suspended with invisible threads from the ceiling mount.
You can use ready-made toys of birds or other animals.
Mounting methods
All beds differ from each other in many ways. They are made from different materials and are characterized by certain sizes. There are single, double designs, and baby cradles. The type of canopy, as well as the method of its installation, depends on the type of specific model. Among the main methods are the following options:
- On a frame mounted on vertical support posts.
- On the ceiling cornice.
- On a round, square, rectangular frame suspended from the ceiling.
- On a semicircular wall frame.
- On horizontal rods.
Attaching a half-frame structure to a “crown” ceiling
The crown mount has a luxurious look. This variety is used mainly for decorative purposes, suitable for different styles, decorating the head of the bed with light fabrics. A canopy can be used even in a small room, since it takes up little space, does not visually reduce it, and can be attached temporarily.
Finished products can be easily found in specialized stores. When choosing a design, special attention should be paid to its strength and the included fasteners. If necessary, it is worth replacing the fasteners with more reliable ones, after which you can proceed with the installation, which consists of the following:
- Determine the height and location of the object.
- We make markings and find the center of the head of the bed.
- We attach the product, mark the points for fasteners.
- We drill holes on the ceiling using a hammer drill and insert dowels.
- We fix the canopy with self-tapping screws.
- We fasten the textile fabric using ribbons, ties, and hooks.
Mount with frame for baby cot
The product is equipped with a frame and fabric protection. The mobile design can be installed on either side of the bed. The choice of the appropriate option depends on the location of the bed relative to the wall. If you attach it to the headboard, the fabric will only cover half of the bed. The side connection to the vertical surface allows you to install the protection in the center and completely cover the baby’s crib. Assembling and installing the frame is very simple according to the instructions:
- We connect and twist all the parts;
- We install fasteners;
- Select the required height;
- We fix the frame to the bed crossbar using screws or self-tapping screws;
- We straighten the material, tuck it over the sides.
Design nuances for different types of furniture
Canopies are built over various pieces of furniture - single, single, double, bunk beds, sofa, house crib.
For a bunk bed
The canopy for a “two-story” structure, an attic, is usually attached to the sides of the upper tier. The drapery hides only the lower “floor”. Less common are canopies from the ceiling to the floor - then both the upper and lower bunks are covered with fabric.
Such canvases are distinguished by their tenderness, diffuse light well, but at the same time give a feeling of privacy.
For a double bed
For a double bed, a very voluminous canopy is made. Usually it is mounted on a frame that is integral with the bed. Options for a round or square ceiling cornice look good - the material seems to “flow” from the ceiling itself.
An elegant round bed with a transparent canopy looks especially gentle in the interior.
On a bed-house
A kind of “house” is obtained if you build a frame of the appropriate shape - when viewed from the end, it is pentagonal. Most often, the fabric is simply thrown over it or secured to the central crossbar. Less commonly, the upper part is sewn separately; four separate draperies are attached to its lower edge, tied with cords to the corner supports.
A canopy made of an airy veil will decorate the bedroom, but will not protect from sunlight.
The “tent” is different in that it is mounted on a round base located on top of the house. This is a solid frame, fixed to inclined posts leading to the corners of the bed, or the upper part is made suspended.
Above the sofa
The canopy, located above the sofa, is usually attached to the wall, along the long side of the folded structure. Ceiling options are used if the piece of furniture is folded forward. For modular sofas, which can be transformed in different ways, mobile mounts on folding ceiling hangers or narrow rails are suitable, where it is permissible not only to change the location of the canopy, but also the height relative to the floor level.
A well-chosen canopy decorates the bedroom and draws the eye to its central element.
Methods of attaching a canopy to various structures
There are several ways to attach a canopy to a frame or holder. The choice of option depends on the size and other design features. In any case, the fastenings should be simple and safe. The following methods are preferred:
- Ties. Ribbons are sewn into the upper part of the fabric, which are thrown over an oval or straight holder and tied;
- Loops. Small loops are sewn along the entire length of the canopy. A ring is inserted through them and the structure is fixed with screws to the side or head of the bed;
- Eyelets. The fastening type is suitable for large rectangular beds. Metal fasteners are placed on the axle along the entire perimeter of the frame;
- Hooks. A kind of cornice is attached to the ceiling. Hooks on wheels are installed in the rail and the fabric protection is hooked with them. You can even hang heavy canvases.
Places of purchase and cost of fastenings
Purchasing fasteners for a crib is not that difficult. All you have to do is go to a children's goods store. Online stores can also offer a large selection of holders. The average price ranges from 300-500 rubles. for a regular bracket. It depends on the material, country of manufacture, shape and size of the holder. Forged products for a wall or ceiling will cost at least 2,500 rubles. You can choose alternatives made of plastic.
Sources
- https://berkem.ru/drugoe/kak-krepit-baldaxin-na-detskuyu-krovatku/
- https://steshka.ru/derzhatel-dlya-baldaxina-na-detskuyu-krovatku
- https://komnatarebenka.ru/sovety/kak-ukrasit-komnatu/kak-odet-zakrepit-povesit-baldahin-na-detskuyu-krovatku-derzhatel-stenu-potolok-instruktsiya/
- https://bezkovrov.com/detskaja/vidy-derzhatelej.html
[collapse]
How to choose fabric for a canopy
The choice of material depends on the size and purpose of the protection. If it is necessary to protect the sleeper from drafts and the sun, choose long sheets of dense opaque material with fastening in the center of the bed. Different types of fabric create different visual effects and affect functionality; they have both positive and negative sides. Canopies for adults and children's beds are made from the following material:
- Cotton, linen. Natural fabrics do not transmit light, protect from drafts and dust;
- Chintz. Airy, light material creates comfort, protects from insects, and is well translucent;
- Organza. Transparent fabric looks beautiful and romantic, but is highly electrified and accumulates dust;
- Velvet. Dense, beautiful material protects from drafts and retains heat;
- Net. Used to create a cozy atmosphere. Such a canopy provides good air circulation, but allows the sun to pass through and does not protect from dust and wind.
Choosing a style
Why is it important to choose a canopy style? Don’t think that they are all the same and that they are all equally convenient to use. Not really. There are a lot of styles. It is clear that each has its pros and cons, but you need one that will be convenient for you. The most important thing is that the fabric does not constantly move under your hands. There should be nothing stopping you from putting your baby in the crib and then picking it up from there.
Also pay attention to the length of the free edge. It should reach the legs of the crib. This is necessary so that the product can perform its role well, that is, not allow midges and dust into the crib.
You can also match the color of the canopy to the design of your room. It's good if it matches other furniture. This way you will make the nursery very cozy.
If the child’s room is very sunny, then you can choose a canopy made of medium-strength fabric. It will protect the baby from scorching rays. In moderate lighting, it is better to use a product made of lightweight material.
Photo from the site: kakpravilno-sdelat.ru
How to sew a canopy yourself - options and cutting methods
A real original product can only be made with your own hands. Before choosing a pattern, you should decide on the mounting option for the structure and select the type of frame and fabric. You can work with simple rectangular patterns or complicate the task by sewing a canopy with beautiful rounded edges.
The size of the pattern will depend on the type of canopy itself. For standard products, patterns are used - 1.5 x 2.5 m. If it is necessary to make waves or folds, take fabric 2 x 3 m. Dimensions include seam allowances. For convenience, we make a pattern half the size of the finished product. There are two ways to cut the material:
- We attach the paper pattern to the fabric and trace it with chalk. We cut out the resulting silhouette along the line with scissors. This option is suitable for obedient straight materials (chintz, linen, velvet);
- We fix the diagram to the material with pins and remove the excess, cutting exactly along the contour of the paper. The method is used for cutting organza, chiffon, mesh.
If you plan to make a canopy with a “crown”, then you need to add 10 cm in the upper part of the pattern. First of all, all the edges of the material, the sides and the bottom are processed. Then they begin to sew on lace and ribbons, and assemble large parts.
What is a holder?
The baby canopy holder features an adjustable tripod and a closed or split loop at the end. The method of fastening the textile is determined by the configuration of the loop: if it is disconnected, then the woven fabric is simply strung, and if it remains solid, then the children's canopy is attached using ties or textile tape.
The tripod itself also consists of 2-3 parts that are inserted into each other. The position of the fabric canopy over the mattress depends on the height of the bracket.
Useful tips for choosing, assembling and installing a canopy
Proper installation of the canopy plays a huge role in its use. To avoid mistakes and simplify operation, when choosing a suitable design and installation option, you must take into account the recommendations of professionals:
- The fastening elements of the bracket on the wall must be at least 1 meter from the top bar of the headboard;
- Only reliable fastenings can be used;
- For a children's room it is better to choose a product of medium length. A canopy that is too long will get in the way underfoot, which will lead to contamination and deformation of the material;
- To more securely fix the structure to the ceiling or wall, dowels and screws must be used;
- The color of the canvas should be uniform and calm. Bright pictures will irritate and interfere with falling asleep;
- For ease of use, a special skewer is placed on the holder ring, which will allow you to correctly straighten the canopy without effort.
How to install the holder on the crib
You can purchase the holder ready-made. There is also the possibility of collecting it yourself. The product is made from a stick made of wood or plastic. The ring, in turn, is twisted from wire, the ends of which are subsequently bent at right angles and attached to the tripod using an elastic band. Fastening the finished structure to the crib is carried out using special clamps, which are not difficult to find in hardware stores.
The holder, which was purchased in a store, traditionally contains assembly instructions. However, even in the absence of any recommendations, strengthening the product will not cause difficulties. The general procedure traditionally looks like this:
- first, careful assembly of all frame elements is required, the tubes are inserted one into the other;
- Next, the structure is connected to a fixation element, which includes a screw and brackets; it is fixed in the side part;
- the height of the canopy is adjusted by raising or lowering a tubular metal frame;
- the screw is tightened tightly, a fabric canopy, actually the canopy itself, is put on the ring;
- the free ends of the ring must be mounted from above, directly into the base of the tubular type.