Residents of large cities do not have the opportunity to dig a cellar near their house and store supplies there for the winter. That is why people began to use alternative options, for example, the Cellar heating cabinet, which can be easily placed in a city apartment.
Such a heating cabinet is usually installed on a balcony or loggia. It is a small container in which the temperature is maintained within zero degrees. This is a convenient container for storing food throughout the fall-winter season.
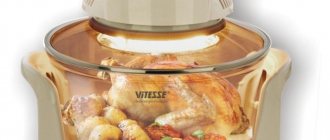
What is a household heating cabinet
The invention of a household thermal cabinet is a wall-mounted or floor-mounted thermal container for organizing the storage of agricultural products. This type of garden furniture was officially introduced into production and patented in 2001 by Nikolai Ivanovich Berezhny and Andrey Semenovich Novikov. The very idea of such an invention, thanks to which it would be possible to store various vegetables, fruits and preserves at home and without loss of food, appeared in 1998.
At that time, Russia was still going through quite difficult post-perestroika years. The population really needed such an additional closet in the form of a cellar, since people had to survive only thanks to agricultural products, and personal production. This was especially true in remote areas of the country. An additional convenience of this invention is that it saves space as much as possible, since its elongated hinged design involves unloading the floor.
Nowadays, the economic situation has stabilized somewhat, but with the growing interest in gardening, the heating cabinet has not lost its relevance and is an excellent solution for many owners of private farmland.
Easy to store, easy to install
This is a truly unique household appliance, especially for the Russian climate and climates close to it. Air constantly circulates inside the refrigerator cabinet. This prevents the formation of condensation drops. This means that turnips and squash will not rot. Another good thing about a thermal cabinet for a balcony cellar all year round is its cooling mode.
Power consumption – 220 W. It won't hurt the owners' wallets. Purchased from a reliable supplier, the mini-fridge:
- has all certification documents;
- complies with sanitary standards;
- meets fire standards.
For convenience, you can choose not a rigid device, but a flexible container. It will not take up much space when not in use. It is convenient to transport. To install this miracle technology, you don’t need to call a specialist. Those who have already bought a cellar have the most positive reviews, including about its installation.
How to choose a thermal cellar
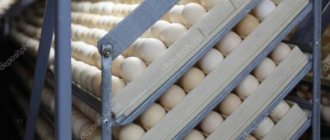
A hanging container (thermal cabinet, thermal cellar or thermal box, which is equipped with a thermostat), created by our compatriots, can be used in unheated rooms for the purpose of seasonal storage of vegetables and fruits. Suitable for storage:
- root vegetables,
- greenery,
- canned vegetables,
- pickled vegetables,
- individual large fruit vegetables, etc.
An electric heater is used to maintain the required temperature. It is located around the entire structure of the box. The body is equipped with thermal insulation, which provides a gap to provide oxygen inside the hanging container.
Balcony household heating cabinets can be completely different in appearance in terms of functionality, color and shape. Also, many modern manufacturers offer thermal containers with various technical characteristics. Based on them in your choice, you can choose such a hanging mini-cellar to your taste and color, according to the size of the room and, if necessary, in tone and shape to other items to maintain the harmony of the room.
To regulate and monitor the temperature inside this thermal container there is a special sensor with a thermostat. Balcony wall-mounted heating cabinets for saving agricultural products are mainly produced in Russia. Such ovens make it possible to maintain the required storage climate inside even at extremely low air temperatures.
Tara
- in piles or in bulk;
- in boxes;
- in bags;
- in grids;
- in containers.
In piles or in bulk
The most ancient method of storage. Its disadvantage is that one diseased tuber can destroy a significant part of the crop.
Bulk storage
Boxes
The drawers are very convenient for storage. It would be better if they were made of wood. Wood has the ability to absorb excess moisture and release it when the humidity drops. Coniferous wood also has disinfectant properties, which will help prevent the development of potato diseases.
Wooden boxes regulate humidity
Video instructions for building a potato storage box
https://youtube.com/watch?v=nIybv4zVMnw
It is possible to use plastic ones and plastic ones with holes for ventilation; they are more practical - easy to clean and store.
Well ventilated, easy to store
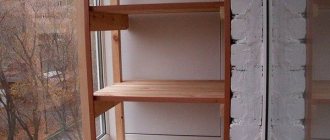
When storing in a city apartment, a box on the balcony is the best option. You only need to insulate it if the balcony is open. It’s easy to make a box with your own hands.
How to make a box for a balcony
You will need skilled hands, tools and materials:
- 5x5 block;
- plywood, thin boards, slats, fiberboard or other material;
- insulation - polystyrene foam or penoplex.
The timber frame is sheathed on both sides with plywood, slats, or other material. The result is a box with double walls. Insulation is placed between them. You need to cover the potatoes with insulation on top as well. It is more convenient to use penoplex for this; it is durable, absorbs moisture well and does not crumble. You can also use improvised materials - rags, unnecessary blankets, disused clothes. The main thing is that the crop is protected from the cold.
Insulated box for storing vegetables on the balcony
If necessary, such a box can be heated with an incandescent lamp or a hairdryer.
To heat with an incandescent lamp, a tin case is placed in the finished box into which the light bulb is inserted. The wires are routed out through holes drilled in the wall of the box.
By installing the heating, you can store the harvest in such a box on the balcony even in severe frosts
Using the same principle, you can make heating with a hairdryer. To do this, you will additionally need a hairdryer and plastic pipes with a diameter of 4-5 cm.
A hole is cut out in the wall of the box and a tube is inserted into it with small holes made in it to allow warm air to escape. A hair dryer is attached to the outer end of the tube. For the safety of the structure and to avoid overheating, an electrical contact relay is installed.
Heated by hairdryer
Bags
In the basement or pantry it is convenient to store the harvest in matting bags. They allow air to pass through well and absorb excess moisture. If a pocket of rot or disease occurs in one bag, it will not spread to the entire crop.
Matting is an environmentally friendly breathable material
An alternative option is polypropylene bags. They are durable, resistant to temperature changes, do not emit harmful substances, and breathe. Due to their low price and low weight, they are increasingly replacing traditional ones.
Grids
Actually, this is a type of bag, but unlike matting containers, the mesh does not absorb excess moisture.
Bags are increasingly being replaced by nets
Containers
This type of container is a large box and is suitable for storing a large harvest. To save space, they can be stored in several rows in height.
Suitable for storing large volumes
For storage on a cold balcony, a household thermal container can help you out. These bags with heating elements are available in different sizes and will help preserve the crop without loss.
This container will help preserve the harvest until spring.
A more substantial option, produced by industry, is the balcony cellar. It combines both heating and cooling functions. Therefore, it is useful at any time of the year.
Combines heating and cooling functions
The most famous models
There are many models and their modifications. We will touch on the most common ones.
Winter heating cabinet, model TBPZ-140 . It has dimensions of 60×50×80 cm. It has the following characteristics:
- saves food with outdoor temperatures ranging from -35 to +5 C.
- temperature control inside the wall-mounted oven ranges from 2 C to 10 C.
- It is used seasonally, during the frosty season, since it works exclusively for heating.
- winter heating cabinet models come in different capacities: 105, 145, 185, 245, 300 and 365 liters.
Year-round heating cabinet model TBPK-240 . This model is characterized by:
- adjustable temperature inside the cabinet, which can vary from 2C to 10,
- independence from the season, since it has a heating mode and a freezing mode (refrigerator);
- work at -30 C and up to +35 C;
- dimensions 1000×500×850 mm.
The capacity of year-round heating cabinets can be 145 - 185 -305 and 245 liters.
The year-round vertical heating cabinet from (Novosibirsk) has dimensions of 12085×50 cm. This heating cabinet is characterized by the following properties:
- internally galvanized steel body;
- equipped with a thermostat;
- internal climate stabilizer up to +2C at outside air temperatures ranging from -40 to +40 degrees;
- has modifications equipped with a partition and an additional cooling mode;
- The capacity is 145 and 365 liters.
Thermal cabinet with forced ventilation, dismountable, from (Moscow). Differs in the following features:
- dimensions 79×75×41 cm;
- due to forced ventilation, it ensures uniform distribution of temperature and air inside the heating cabinet;
- automation stabilizes temperature readings at +2 - +9 degrees at atmospheric temperatures down to -39 C.
Thermal cabinets from this manufacturer produce models with a movable removable partition. Thermal cabinets are designed for a volume of 147, 150, 174 liters.
Balcony wall vegetable cabinet model Cellar-200 from (Moscow). The model has features:
- forced airflow;
- dimensions 82.5x78x40 cm;
- automation stabilizes internal indicators at a temperature level of +2 to +9 (with atmospheric data -39C).
The “Cellar-200” model from the specified manufacturer has modifications with a movable removable partition, which can be used to divide the space of the heating cabinet into sections.
The price range of flat-bed heating cabinets directly depends on the seasonality of their use and dimensions. So, there are year-round and winter models. Accordingly, such household thermal cellars will differ in design features.
Making a thermobox with your own hands
When making a heating cabinet with your own hands, you need to take into account some points. You will need good tools and quality materials. What to prepare:
- box body. It can be made of plywood, boards or chipboard.
- insulation - this is represented by foil polyethylene foam or polystyrene foam, which are laid in several layers;
- additional insulation, which provides an air gap between the inner box and the insulation;
- drawer with ventilation holes for vegetables;
- insulated safety heater between the bottom of the case and the inner drawer.
This self-made cellar on the balcony is intended mainly for potatoes or other root vegetables. The best temperature for storing them is from +3 to +7 degrees, which is impossible to achieve on an unheated balcony in Russian winters without auxiliary heating of the storage. That is why a heater with moderate power is installed.
There is nothing complicated about installing such a cellar, and if you have the materials for its manufacture and tools at home, then it can be installed literally in one day. The technology is simple and easy to find on the Internet.
We do it ourselves
Many home craftsmen are interested in how to make a cellar on the balcony. Before starting work, the floor should be insulated. For this, foam sheets, polystyrene or mineral wool slabs are suitable. The top is covered with fiberboard, chipboard, thin board or plywood.
When the base of the balcony floor is prepared, the construction of the thermal container begins.
- sheet of chipboard or plywood;
- wooden slats and bars;
- insulation material;
- temperature regulating sensor;
- two 20 W lamps;
- cables;
- glue;
- tools - electric drill, hammer and nails.
- We build a box or box from boards or chipboard. We attach bars to the floor that will serve as the base. Vertical strut strips will be screwed to them, and rectangular frames will be installed.
- Using plywood and chipboard we make a box for the balcony (the distance between the double walls is about 10 cm). We put a heat insulator there.
- Inside the box we arrange shelves made of plywood and slats, and insulate the lid of the thermal container. The box needs holes for the wires.
- The plywood latch should move along the guides along the box lid. You need to make several holes in it (their diameter is 5 cm). The damper regulates the temperature by its movement.
- The heating function is performed by light bulbs. You can install a thermostat and thermometer inside the box to record the temperature. If electricity is needed, you need to connect the outlet to the balcony.
The thermal cellar is ready. The main disadvantage of such a homemade box is its susceptibility to moisture, and, as a result, the formation of mold and mildew. There is a risk of fire if the rules for installing heating elements are violated.
The result is a design that resembles a thermos - double walls with insulation between them. The lid of the box also needs to be made double and insulated with mineral wool, sawdust, thermal insulation made of foam plastic is suitable.
The thickness of the layer determines the reliability of protection of vegetables. This model without electricity for a balcony is suitable for regions with mild winters and well-insulated balconies.
If you don’t have enough time to make a balcony box yourself, you can buy a factory-made version.
There is a special prospect for ground floor apartments. Their residents don’t have to think about how to make a cellar on the balcony. They have a chance to build underground storage for canned food and vegetables. But the labor costs here are considerable.
- undergo approval and obtain an expert opinion that the construction of the cellar is safe for the building;
- cut a round or square hole in the balcony slab for the hatch, remove part of the concrete slab underneath, and remove a lot of soil;
- place a sand cushion under the screed, and then perform the screed itself;
- build side walls of brick, lay insulation, waterproofing material and install a ventilation pipe going outside;
- make the box itself, a staircase leading to the cellar and equip a hatch (sliding or folding), as well as lighting. Installing shelves is a matter of course.
The financial costs will also be significant, but a large family is interested in such a balcony subfloor, and the costs will pay off in a few years.
Assembling a vegetable thermal container
Having prepared all the necessary components, you can begin assembly. It is performed in several stages. The algorithm is like this:
- If the product is supposed to be “mobile”, then the frame of the box is assembled from bars. They can be attached to each other using metal corners.
- The bottom needs to be raised above the floor of the balcony, so two bars are attached to it, closer to the middle, which will not only provide an air cushion, but also impart rigidity to the structure.
- Insulation is being installed. It is cut to sizes that correspond to the perimeter of the planes between the beams. The insulation should be as thick as the size of the block. To ensure that there are no gaps for cold between the bars and the insulation, the resulting gaps are filled with polyurethane foam.
- Thin plywood is fixed at the bottom to cover the insulation.
- One of the pre-prepared heating devices is placed on top of it. Due to its small thickness and safety in operation, infrared film is optimal for the box.
- They also form a “warm pillow” with the help of light bulbs, but in this case the volume of the box is reduced, since an additional lattice bottom must be installed on top of them.
- After this, it would be good to line all internal planes with polyethylene foam, preferably foil-coated.
- If a light bulb is used for heating, the lattice bottom is not covered with polyethylene.
- The gap between the box frame and the lid, on the side where the hinges are supposed to be installed, should also be covered with elastic foil polyethylene foam. After installing the cover, the strip of insulation material is secured with staples to both the cover and the box.
Useful tips
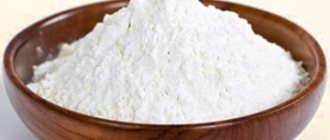
It is not always possible to preserve the harvest, even if the most optimal conditions are created for it. To prevent this from happening, you should follow the recommendations on how to store food:
- Place only dry, ripe specimens without the slightest sign of spoilage in trays or chests. Do not pre-wash.
- It is necessary to take into account the compatibility of cultures. They can negatively influence each other, causing rot. For example, it is not advisable to place potatoes next to cabbage, but beets and carrots are perfectly stored next to each other.
- Regularly sort through tubers and root vegetables, remove rotten and dried out specimens.
- It is better to separate early-ripening varieties from late-ripening ones. The first ones are generally very poorly stored.
Instagram superartmebli
Making such a box will not take much time. Its cost is also low
Preserving the harvest is not so difficult. There are many storage options. A home craftsman can easily implement his favorite solution. If you don’t want to make things yourself, you can use an old refrigerator, kitchen cabinet or a set of plastic containers as a cellar.
Reviews of the balcony cellar
We have such a thermal container, like a thermal bag. Flexible model of Cellar TGB-200. Capacity - 180 l. There is only one fan. I think this is bad, we need two. One cannot cope with such a volume. Or it should be more powerful. When you look into a thermal cellar, over time the smell of vegetables going out of order begins to emanate from there.
Victor
We're going out of town for a few months. In the fall, the population there sells high-quality products from their own production: potatoes, good carrots, zucchini, cabbage... But you can’t take away much, but you want to! We decided that we needed a box for vegetables on the balcony. Our neighbors advised us to buy a heating cabinet, which is what we did.
I really liked our cellar! Happy as a cat! Ours is seasonal. For the summer, it effortlessly folds into a bag-cover and waits in the wings. When packaged it does not take up much space. Stores vegetables a lot and for a long time. You can live with it just fine, it saves space in the kitchen. But in fairness, it should be noted that there is only one minus, and this is its cost. Sometimes they even ask for 33,000 rubles. This is sad, for that kind of money you can buy fresh vegetables for several winters in a row and every day.
Sofia
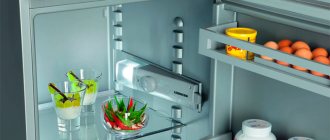
To store vegetables, my husband and I bought a thermal storage unit “Pogrebok-3”. In it, food does not freeze due to the fact that a certain temperature is constantly maintained. It turns out to be a kind of “reverse refrigerator” on the balcony.
They put it on the loggia, very conveniently, we had an outlet installed there a long time ago.
The cabinet measures 83×79×41 in total, which means it doesn’t take up much space. But the short cord turned out to be very short, so I had to tinker with extension. Up to 23 kg of vegetables can be placed inside the “cellar”. There is no partition, so you have to pick neighbors. We don't add onions. Overall, it’s a useful and necessary thing, we like it. There is electricity, but no more than any other household appliance. Olga
Special storage of vegetables
Most often they are installed on a balcony or loggia, since that is where the free space is usually located. The principle of operation is to have a thermostat that allows you to maintain the desired temperature during the cold season.
Such devices are called differently, the most common names being:
- Thermal cabinet;
- Thermal cellar;
- Thermal container.
Types of thermal containers
Depending on the design features, they can be divided into two types - rigid and flexible. The first ones are made of solid materials and take their place even in the summer, when they can stand without food. The flexible heating cabinet can be used only in winter, and then folded and put away so as not to take up space.
Thermal cabinets are divided into types according to several other criteria:
- Power dependencies: active, which require a connection to the network, and passive, which operate without consuming electricity;
- Material of manufacture: heating cabinets can be made of plastic, wood, fabric with non-wetting properties, padding polyester;
- Volume. Depending on the location where the oven will be installed, choose sizes from 95 to 100 liters.