Most owners tiling their bathrooms and kitchens with ceramic tiles. But over time, the coating loses its original appearance. The seams between the tiles darken, sometimes even becoming covered with mold and mildew.
You can cope with the problem using various methods that help whiten the grout between the tiles.
Why do the seams between tiles darken?
The elements that make up the tile joint are not as durable as the tile itself.
There are several reasons for darkening of joints:
- Not cleaning tiles regularly;
- Increased humidity in the room due to poor ventilation, so mold and mildew appear on the seams;
- The hood in the kitchen does not work or does not exist at all, combustion products and greasy drops remain between the tiles in the form of yellow spots;
- The tiles were laid with poor-quality grout;
- The seam processing technology is broken.
It is possible to restore tiled walls to their original appearance without major repairs, but first you need to find out the extent of the damage.
Prevention measures
You can keep tile joints clean for as long as possible, provided you follow some recommendations.
The basic rule is that fresh air should always circulate in the room. Frequent ventilation and the absence of condensation on the surface of the tile will prevent the appearance of mold and fungal infections on the seams between the tiles.
It is also necessary to remember that regular care of tiles and seams, timely removal of the smallest contaminants will help keep the surface clean for as long as possible.
Whitening is cheaper than replacement
If the tiles are in good condition and do not require replacement, then it will be enough to clean the joints. This work will require much less cost than a complete renovation.
You can get rid of mold, dark or yellow plaque at home, without the help of specialists.
There are few ways to return a bathroom or kitchen to its original appearance:
- Without removing the old grout, paint or whitewash the seams;
- The old material is removed and then a new composition is applied.
These updates can be done using both folk remedies and household chemicals. You can choose any one, as long as it is effective.
Causes of pollution
Of course, floor tiles get dirty most often and quickly for obvious reasons. But even the seemingly obvious reasons are worth understanding in order to prevent the loss of the presentable appearance of the seams in the future.
Common causes of grout contamination:
- ingress of dust and particles of finishing materials during repairs;
- poor rinsing of seams during cleaning - detergents or simply dirty water may remain;
- ingress of water, which creates an excellent environment for fungal growth;
- natural settling of dust in the toilet or grease in the kitchen;
- irregular cleaning of the premises.
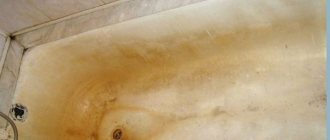
It is worth noting that grout can darken on its own, even if it is cleaned regularly. This happens from old age, for example, if the tiles have not been changed for more than 10 years. In this case, rather than cleaning, it is better to renew the grout.
Cleaning soda
In this way, the joints between tiles have long been renewed. A pack of baking soda and a used toothbrush will be enough.
Contaminated areas should be cleaned as follows:
- Moisten the areas around the tiles with water and sprinkle generously with soda;
- Wait 2 minutes and brush with a brush;
- Now you need to arm yourself with a bathroom brush, sprinkle soda on it, and go through all the joints to remove plaque.
After treatment, you need to rinse everything well with water, you can use a shower head.
If after cleaning black dots become noticeable, then they need to be treated with sodium bicarbonate. This disinfection will prevent the formation of fungus.
Vinegar and soda
For this procedure you will need the following tools: baking soda, nine percent vinegar, citric acid solution, brush, spray bottle and a clean soft cloth.
What to do:
- Mix 7 glasses of water, half a glass of soda, a third of tbsp. lemons, 50 ml vinegar;
- Pour the mixture into a spray bottle and thoroughly treat the entire surface of the tiles and seams;
- Leave the composition for 15 minutes so that the contaminated areas are well saturated;
- Rub the entire treated surface with a brush.
Then rinse everything with warm water and wipe dry with a cloth.
Applying new grout
You can leave the old grout color, but cleaning the grout will allow you not only to update the tile joints, but also to experiment, try to transform the boring design and use grout of a different color.
Jointing
When removing old grout, you need to carefully cut and clean the seams, wash them with soapy water, disinfect and dry.
The jointing is primed with a spray gun, the surface is wiped. After this, the tile grout is mixed and the joints are filled.
Important! To prevent the solution from starting to crack after drying, you should not make it too liquid.
For grouting, use a rubber spatula. It will allow you to fully fill the voids to the full depth and will not scratch the surface of the tile. Excess paste is immediately wiped off with a damp sponge.
Video of how to clean the jointing:
After all the tiles have been rubbed, the jointing is treated with a special protective water repellent, especially the seams between the tiles on the floor. This is necessary in order not to redo the work every six months. Impregnation will prevent cracks from appearing in the seams and delay the next scheduled repair.
Average score of ratings is more than 0
Share link
Comments There are no comments yet, but you could be the first...
Hydrogen peroxide for joints
This product cleans problem areas that have only recently appeared, but it will not remove stubborn stains. Peroxide perfectly disinfects the surface; there is no need to rinse it off with water. The working mixture is prepared simply: take 1 part hydrogen peroxide and 2 parts water. Then wipe all joints with the compound and leave until completely dry.
Cleaning the joint
Cleaning tile joints will be effective if the dirt is not deeply embedded in the grout. Renewing dirty seams is done using commercial detergents or using soda and peroxide. Here's a simple recipe for making grout cleaning solution:
- Pour 4 parts baking soda into a plastic bowl and dilute with 3 parts peroxide. For kitchen surfaces that are prone to grease stains, you can add dishwashing gel.
- Apply the resulting mixture to the yellowed areas, rub lightly and leave to soak for 2-3 hours. After this, thoroughly clean and scrub the seams with a brush, and rinse with water.
Use of household chemicals
There are many chemical products on sale to restore the whiteness of walls in the bathroom and kitchen.
The following mixtures are considered effective:
- Household cleaning chemicals such as Belizna or Domestos are quite helpful in cleaning tiles. The mixture is applied to the seams for 10 minutes, and then thoroughly washed off with water and wiped dry. These products will help deal with both dirt and mold. Any dishwashing composition may be suitable, but soap will not cope with problem areas.
- Uraltex-Bio Professional is produced specifically for whitening joints between tiles. This product should only be applied to the grout to avoid touching the tiles. After treatment, stains must be dried for two days.
- When fighting fungus, you can use car polish. It protects the surface well from mold formation.
What will be useful at work
You can tidy up the seams in different labor-intensive ways. The choice of the appropriate option for cleaning the seams between the tiles on the floor or walls depends on the degree of accumulated changes. The return of the tile to its original appearance occurs in the following ways:
- In a simple case, when the color has affected only the top layer of grout, cleaning with household chemicals (for example, bleach) helps.
- You can return the original color using dyeing; Paint or a special marker will do.
- Sometimes they prefer to prepare (grout and degrease) the seams and apply a fresh (second) layer of grout.
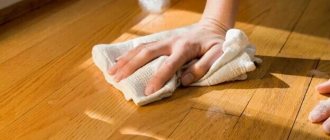
Timely maintenance preserves the structure of the grout Source cleanipedia.com
- If the material between the tiles begins to crumble, or mold has taken a fancy to it, radical measures are used: the grout is changed, not forgetting about the antiseptic treatment.
Depending on what you are going to do, you may need some of the items from the following list:
- A metal sponge and an old toothbrush (it’s better to take a hard one). Care is required when working with a metal sponge, as it leaves dark marks that are difficult to remove on the tiles.
- Small knife, seam scraper. If you have an angle grinder, a special cleaning disc is suitable for cleaning.
- Several rags (including floor cloths), a broom, clean water.
With any method, accuracy is important so as not to spoil the surface of the tile. Cleaning is carried out in two ways:
- Traditional methods. Home recipes are ineffective in advanced cases, but in others they successfully cope with the problem. The technique is suitable for those who like to mix ingredients and experiment with compositions.
Soda and vinegar will help cope with pollution Source pinimg.com
See also: Catalog of companies that specialize in finishing materials and related work
- Using a finished chemical product. Modern household chemicals are varied, economical in consumption, and inexpensive. There is a limitation in the choice - you should refuse powders with abrasives and any compositions with high concentration acid; they can dull the glaze and permanently damage the cladding.
When choosing ingredients for home recipes, you should also avoid acid. In addition, soap-based recipes should be used with caution: the soap solution remaining on the grout becomes a favorable environment for the development of certain microorganisms. For homemade mixtures you will almost certainly need the following components:
- Ammonia, hydrogen peroxide from a home medicine cabinet.
- Soda, salt, mustard powder.
- Vinegar, lemon juice.
- The result can be fixed with a solvent or bleach.
Before cleaning the seams between the tiles on the floor, it is a good idea to take out some of the furniture, perhaps remove shelves or cabinets, and protect the remaining items with film. The room must be ventilated, and you need protection for your hands and respiratory organs from chemicals (gloves, goggles, possibly a respirator).
To clean seams, at a minimum, wear gloves Source recordstar.com
Painting seams
There are times when it is impossible to remove stubborn dirt. Here you only have to paint over problem areas. Choose water-based paint for the job; it dries quickly and is not afraid of dampness.
In order for the paint to adhere thoroughly, it is necessary to prepare the surface:
- Completely remove dust from the joints;
- Wipe the paint application areas with a solvent;
- Apply primer along the seams.
When the primer is dry, you can paint the surface, removing excess paint from the tiles. The disadvantage of this method is that after six months you will have to repeat the whole process.
Preparation for procedures
Preparation for cleaning is a very important stage that cannot be skipped, since the result depends on it, among other things. The essence of preparation is to remove unnecessary items from the room and acquire the necessary tools.
- Remove all unnecessary items that may interfere with cleaning - for example, hooks, shelves, bottles of shampoo and other personal care products.
- Remove all textiles, as they can absorb unpleasant odors from cleaning products.
- Assess the need to remove the sink or toilet. Do this if necessary.
- Prepare gloves, safety glasses, a respirator and the grout cleaner itself.
- Wash the tiles themselves and the seams from greasy stains and clean easily removable dirt.
This small instruction will help you check whether everything is done correctly and whether you can begin cleaning activities.
Construction marker
A special marker can return the snow-white appearance to the composition. It consists of simple elements: a container for filling with paint and a rod for painting.
The coloring agent has many advantages:
- There is no smell;
- Non-toxic;
- Not afraid of moisture;
- Good protection against microbes.
Construction stores have markers of different colors in their assortment, so you can easily choose the right tone.
Removing the old layer
The most effective method is to completely remove the grout in order to apply a new coating. For work, purchase a tool capable of unstitching seams. But work must be carried out with care so as not to damage the tiles.
If the grout contains cement, an acid cleaner will be required. In a short period of time it will corrode the hard surface, which can be easily removed. Then you can apply a new layer.
To preserve the tiles and joints, you must carefully care for them. Clean with baking soda once a month, and wash the surface with ammonia or vinegar 2 times a week. Be sure to regularly ventilate the room. Such simple steps will help maintain the whiteness of the tiles and seams.
Preventive measures
Preventing the spread of mold in rooms with high humidity is easier than fighting this problem. The following measures help maintain cleanliness:
- Using sealant. After cleaning, the seams must be painted over with a compound that fills the pores of the grout. This prevents fungal spores from entering the cracks. Liquid waterproofing compound can be purchased at a plumbing or building materials store.
- Cleaning joints with soda. This product not only whitens the grout, but also suppresses the proliferation of pathogenic microorganisms. Cleaning with soda is done every 2 weeks.
- Airing the room. The joints between the tiles must not be constantly wet. It is necessary to take care of the ventilation of the room. It is recommended to keep the room door open. The tiles should be wiped with a dry towel.
- Timely removal of fungal stains. To eliminate dark spots on tiles and grout, use a pencil, which can be purchased at a household chemical store. This product contains bactericidal and antifungal additives.
The bathrooms are cleaned weekly. To eliminate fungal spores, the use of acetic acid or ammonia is sufficient.