In order for an LG washing machine to wash clothes efficiently and serve without breakdowns for a long time, you need to use it correctly.
It’s not difficult to understand the functionality, since the device interface is in Russian, and each model comes with a User’s Guide. By carefully studying it, you can find answers to most of your questions.
If some points are not completely clear, read the article. It will tell you in detail about how to use an LG washing machine: about starting the device for the first time, preparing for washing, caring for the main elements and more.
Turning on the LG washing machine for the first time
One of the most important moments is the first startup of the device . The correct operation of the LG washing machine in the future depends on how correctly the LG washing machine is turned on.
The development company recommends washing it on the maximum setting for the first time; there is no need to load laundry into the drum. This will allow you to wash all parts of the device from the inside of any remaining lubricant.
User manual:
install the device on a flat surface;- connect hoses to communications;
- connect the device to the network;
- pour the powder into the tray - you will need half the standard amount of detergent;
- set the “Cotton” program and the water temperature to 60 degrees;
- close the hatch door and start the wash;
- wait for the cycle to complete, open the machine, wipe the cuff.
Read more about the first launch of an LG washing machine in this article, and about connecting a household appliance to communications in this one.
How and why do you need to sort clothes before washing?
Why sort clothes before washing?
The first thing to do is find the label on the clothing. He will tell you how to wash this or that item. There is a reminder on the shirt on the inside left or near the collar. On the trousers - inside at the back. For example, some things shrink from hot water. Others can only be washed with bleach. This is what the label will tell you about.
Before you start using the washing machine, start the wash cycle and set aside items that say “hand wash” or “dry clean”. They cannot be washed in a machine.
Preparing for washing in an LG washing machine
Before you start washing, you need to complete several preparatory steps. They include:
- Sorting laundry . You need to separate it by fabric type and color. You should not load white and colored items at the same time, especially if you are washing at a high temperature.
- Loading the drum . Each model indicates the maximum weight of items that can be washed in one cycle. These values range from 4 to 17 kg. Be sure to take into account the permissible weight for each specific program.
- Checking pockets . They need to be turned inside out and any small debris shaken out. Coins, keys and other metal parts often cause damage to the device, which requires expensive repairs.
- Preparing things . If clothing has buttons or zippers, they must be fastened. The products are turned inside out.
What powders and other products should I use?
How can you wash things in a washing machine?
How clean yours will be depends not only on the washing machine, but also on the powders you use. Our recommendations:
- Choose powders that are machine washable and also look at the type of fabric (indicated on the packaging).
- Wash white items with bleach powder. This will help not only get rid of dirt, but also return things to their original white color.
- On the contrary, wash colored items without bleach so that they do not lose their brightness.
- Between dry and liquid products, choose liquid ones, because... they contain more active substances and are easily removed from things.
- If a stain remains after washing, try bleach (for whites) and stain remover (for colors).
- To keep things soft after using the washing machine, add not only the powder, but also the rinse aid.
Mode selection
The LG washing machine has several washing modes. All of them are precisely calibrated and designed for different types of fabric. List of programs and their execution time:
- "Cotton" . The mode is intended for the care of cotton and colored fabrics, lasts 1:43-2:02.
- "Cotton Eco" . Similar to the previous mode, but allows you to save energy. Duration from 1:57 to 2:17.
- "Everyday Wash" . This program is designed to care for moderately soiled items made from polyamide, acrylic and polyester. Its duration is 1:18-2:05.
"Mixed fabrics" . Suitable for any linen, except those made from delicate fabrics. Washing lasts 1:00-1:20.- "Baby's clothes" . The program is designed to care for children's things. Its duration is 2:27-2:37.
- "Taking care of your health" . Treatment involves a long rinse cycle, which allows you to completely wash away any remaining detergent. The cycle lasts 1:47-2:45.
- "Duvet blanked" . The mode is designed for caring for large items with down filling. Washing time 1:32-1:40.
- "Sportswear" . The program is used for washing items intended for sports activities. Cycle duration 0:46-0:54.
- "Delicate" . Gentle treatment of fabrics prone to damage. The washing time is 0:47-0:55.
- "Wool" . Suitable for caring for items made of wool, cashmere, knitwear. Duration 0:33-0:35.
- "Fast 30" and "Intense 60" . Programs are suitable for refreshing things and saving energy. They last 30 and 60 minutes respectively.
- "Rinse and spin" . Duration – 18 minutes.
- "Spin" . It lasts 13 minutes.
The manufacturer of LG washing machines does not use symbols to mark programs. All of them are signed verbally, next to the selector. If the device is equipped with a touch screen, the modes will also be displayed in words.
However, there are still a few icons on the panel. Their decoding:
- clock (dial) – delayed start;
- lock with a smile – protection from children;
- asterisk – drum cleaning;
- spiral - spin;
- basin with water - rinsing.
A detailed analysis of operating modes is in this article, about the washing time on different programs - in this one, about the drum cleaning mode, read here, on which program to wash a down jacket - here.
Preparing laundry
To ensure maximum washing efficiency, follow these rules:
- Sort laundry by color and fabric type.
- Check all pockets - often important things remain forgotten in them, which will be irrevocably damaged after washing. In addition, they can stain clothes and damage the washing machine (passport, coins, paper clips, etc.).
- To ensure that your laundry is washed and rinsed properly, do not pack the machine drum too tightly.
- It is not recommended to wash items one at a time or to place very large and very small items together.
- For delicate laundry, it is recommended to use special laundry bags.
- Wash items with small decorations with caution: you can not only damage the decoration, but also damage the machine. If some parts do not stick well to the clothes, they should be torn off or sewn on more firmly before washing.
- If there are an abundance of decorative elements on clothes, choose manual or delicate washing mode.
- If things only need to be slightly refreshed, use an economical or fast wash cycle (to reduce the consumption of water and household chemicals).
Starting the device
After the items are sorted and loaded into the drum, you need to close the hatch tightly until you hear a click . Then the detergent is poured into the tray, using the selector, select the desired program and start the wash. If the default settings require correction, this is done manually.
Temperature
You can set the temperature of the water in which things will be washed by pressing the button with the corresponding inscription.
In some programs, changing the temperature regime is impossible or has significant restrictions. For example, in the “Delicate” mode you can wash things only at 40 or 30 degrees.
The lower the temperature, the better. This allows you to reduce washing time, save utility resources and prevent scale from appearing on the heating element.
Spin
In LG washing machines, the spin can be turned off or set to the following values:
- 400 rpm;
- 600 rpm;
- 800 rpm;
- 1000 and 1200 rpm (not for all models).
The lower the speed, the better. When operating at high speeds, the belt and the laundry itself wear out faster.
Where should I put the detergent?
The detergent is poured into the tray, which is located at the top of the device. To pull it out, you need to place your fingers in a special recess and pull it towards you.
The powder receiver consists of several compartments:
- The compartment marked with the Roman numeral I is for the powder that will be used for the pre-wash.
- Compartment number II is also for bulk detergents, but they are consumed during the main wash stage.
- The third compartment, marked with an asterisk “*”, is intended for conditioner or rinse aid.
Read about where to add conditioner here, washing gel - here, where to add powder - here,
Caring for the machine
In order for equipment to serve for a long time and work properly, it needs care. There are a few simple rules to remember:
- There should be no foreign objects in the drum, so before washing, be sure to check the pockets and remove coins, buttons, etc. from them. Otherwise, foreign bodies may damage the washer.
- If you need to turn off the machine during washing, press the “Pause” button. Do not unplug the power cord from the outlet to avoid damaging the electronics.
- It is recommended to clean the drain filter at least once a month, where small debris accumulates.
- Once every few months, descale your washer using citric acid, soda ash or vinegar.
Now you know how to use the washing machine correctly. You no longer need to think about which washing program to choose for a particular fabric and what detergents to use. Feel free to start the machine.
What is smart diagnostics?
LG smart diagnostics or LG Smart Diagnosis is a technology that allows you to independently identify faults.
The smart program can detect up to 80 types of breakdowns . Notifications about problems are sent to your smartphone.
To perform diagnostics, you can install the application on your phone and use it to launch the program. The second option is to call the service center operator and follow his instructions. It will tell you which buttons to press on the panel to run the diagnostic.
Both of these methods allow you to quickly detect a malfunction. Read more here.
Sewing machine device
Main parts of the sewing machine: 1. Handle for selecting the type of stitch. Using this handle, you set the required type of stitch: straight, darning, zigzag or shifting the needle for sewing on a zipper, making a buttonhole, etc. 2. Buttonhole fine adjustment screw. Not every machine has such an adjustment. It is designed to equalize the frequency (density) of the zigzag stitch when making a loop. That is, in one of the directions the zigzag will be less frequent, so before making a loop, check it on a scrap of the same fabric. And if necessary, make adjustments. 3. Thread take-up lever. 4. Removable table with storage compartment for accessories. 5. Disc adjuster for upper thread tension.
6. Key for moving fabric in the opposite direction. 7. Device for cutting thread. A very convenient device, but it requires some getting used to. Usually they rarely use it, they simply forget about it when cutting the thread with scissors. 8. Presser foot adapter assembly. 9. Screw for securing the presser foot adapter. 10. Presser foot. 11. Needle plate. 12. Shuttle knot. 13. Bobbin case. 14. Combs (rail) of the fabric conveyor. 15. Sewing needle. 16. Needle clamp screw.
17. Shuttle cover. 18. Rod for installing the coil. 19. Bobbin winding device. 20. Flywheel. 21. Pedal connection socket. 22. Presser foot lever. 23. Power switch and backlight bulbs. 24. Built-in carrying handle. 25. Thread guide, thread tension regulator when winding on a bobbin.
How to set delayed start?
You can postpone the selected operation for a period from 3 to 19 hours. The machine will turn on at the time set by the user. To use the timer, proceed as follows:
- Connect the device to the network.
- Select the timer mode (the button with a dial designation).
- Set the required time. One press – delay for 3 hours, two presses – for 6 hours, etc.
- Start the timer by pressing the “Pause” button.
If the device is not equipped with a screen, then you need to find a button with a clock image. Further actions are no different.
How to choose the optimal mode
Today, almost all units use pre-wired program modes. However, in some cases the user is able to select the setting manually. There may be a different number of washing programs for different brands - from five to twenty items. The following programs can be used on the dashboard:
- “Cotton” exists in almost every washing machine. It is usually used for bed linen and cotton items (the process in this case can take two hours and maximum temperature). During spinning, high speeds are also used.
- For synthetic fabrics, there is a program of the same name, in which only the temperature used differs from the previous one.
- Hand wash and delicate wash are similar (for tulle, knitted clothes and similar materials), but the second program has a spin cycle.
- The express option is mainly intended for refreshing things. The machine heats the water to a minimum and washes in a short time. But the spin cycle is at maximum speed.
- If there is an “Intensive wash” icon, then it should be pressed when heavily soiled.
- Some manufacturers offer pre-washing, which is essentially soaking the laundry. It is used for very heavily soiled laundry - in this case, the items will be pre-conditioned inside the drum.
- Modern models offer an “Economic Wash” mode, which most often comes in addition to other programs. In this case, there is a minimal supply of water into the drum, which, moreover, does not heat up.
- And for wool and silk there are specially designed programs with low temperatures.
Each type of item has its own spin program. This mode will simultaneously protect your clothes and wash them. The most common algorithms in such devices are the following:
- The normal mode of the washing machine is automatic, which is used most often. Its advantage is the speed of execution for both rinsing and spinning. In different models, its action time is given differently - from 15 to 30 minutes. During this period, it will be possible to wash very dirty clothes made of thick material - this means bed linen, jeans, cotton, towels and even underwear and bras.
- Light spinning is expected when synthetic and knitted fabrics are loaded into the washing machine. Technically it will look like this: it will start out as a fast wash, but very soon it will turn into a slow wash. This is necessary to prevent lumps and pellets from forming.
- The delicate wash mode is suitable for delicate clothes - for example, lingerie, lace and even tights. The contents of the drum will be slowly washed out - this will protect your clothes from wear and tear. This mode usually eliminates spinning completely, or performs it at a speed no higher than 400 rpm.
- When you turn on a special mode in some models, after spinning you can carry out disinfection and steam treatment.
How to care for household appliances?
From time to time you need to run the drum cleaning function. Most models of LG washing machines independently remind the owner of the need to carry out the procedure.
To do this, just find 2 buttons marked “*” on the control panel, hold them down and hold them for several seconds. Then click the “Start” button. The drum will begin to clean itself. This program lasts 1.5 hours.
The maintenance procedure includes regular cleaning of the filter. It is hidden at the bottom of the device, on the front side. To get to it, you need to open a small hatch.
Under its cover there is an emergency water drain hose and the filter itself. It is unscrewed clockwise, dirt and adhering debris are removed from it, washed under running water and put back in place.
Read how to clean the filter here, and how to clean your washing machine here.
Cleaning the tray
To properly clean the tray, it is not enough to simply wipe it with a damp cloth. It should be removed and washed periodically. To pull it out of the nest, you need to pull the container towards you.
Holding it with your right hand, press the index arrow with your finger . It is located on the cover of the compartment intended for the air conditioner. This will make it easy to remove the cuvette.
After washing it needs to be put back in place. It is enough to get into the guides, after which the powder receptacle is pushed into the device. How to remove the powder tray, read this article.
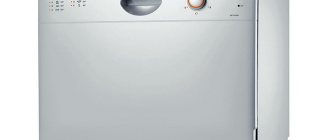
Brief information about Whirlpool devices
The main advantage is considered to be the fairly large functionality of the machine in comparison with the low pricing policy. A standard washing machine has about eighteen modes. It provides protection against child intervention, control of water and foam levels, and the possibility of self-diagnosis. Also, the advantage of devices of this brand is the economical consumption of electricity. Some models provide an express mode that allows you to wash clothes in fifteen minutes. Repeated rinsing, adjustable spin speed, and temperature control are also advantages of models from this brand. The downside is that it is noisy when wrung out. However, this problem can be solved with the help of special mats and proper installation of the machine on the floor surface. For long-term use, you must follow the instructions for using the Whirlpool washing machine.
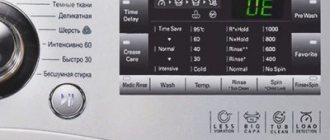
Errors
If a breakdown occurs, an error code will appear on the device screen. It indicates which part has failed. It needs to either be repaired or replaced.
The most common designations:
- OE – the drain system is faulty, it may be clogged;
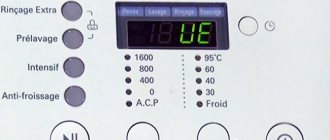
- UE – the load on the drum is unevenly distributed;
- DE – the hatch door is not closed;
- LE – engine blocking error;
- AE – automatic shutdown error;
- CE – excessive load on the engine;
- FE – there is too much water in the tank;
- IE – no water supply;
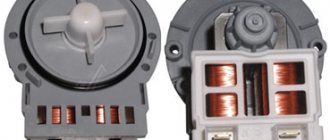
- PE – disturbances in the operation of the pressure switch;
- PF – failure in the control board;
- tE – problems in the heating circuit;
- SE – the shaft does not rotate;
- CL – panel lock is enabled;
- tCL – the drum cleaning process has started.
Read more about errors in LG washing machines here.
Full list of manufacturers:
- Aeg
- Ardo*
- Asko
- Beko
- Bosch
- Candy
- Daewoo
- Delfa
- Electrolux*
- Ergo
- Freggia
- Gorenje
- Hansa
- Hoover
- Hotpoint Ariston
- Ignis
- Indesit
- Kaiser
- Korting
- Midea
- Mirta
- Panasonic
- Samsung
- Saturn
- Siemens
- Smeg
- Tefal
- Vestel
- Whirlpool*
- Zanussi
- Atlant*
- error codes
- program tables
The instructions for the washing machine are available on the end pages with the models.
Helpful information
Tips that will be useful to all owners of LG washing machines:
When washing for the first time, it is recommended to stay close to the device or periodically check its operation. If problems are detected, it will be possible to react in time and take action.- When filling the machine, you need to make sure that the laundry is completely in the tank and is not pinched by the hatch door. Such an oversight can cause damage to the cuff during washing.
- Do not pour washing powder into the drum, this will lead to a deterioration in the quality of the wash.
This publication will tell you how to forcefully drain water from an LG washing machine.
What is the optimal washing temperature?
The right temperature for washing
Choosing the right temperature for washing depends on the fabric:
- Silk, wool and other delicate fabrics are washed at 30 degrees. Cold water takes better care of them and does not harm them.
- Bed linen and curtains can be washed at 30-40 degrees.
- Dirty children's clothes and towels can be placed at 40-60 degrees.
- They remove difficult stains and also disinfect linen and toys at a temperature of 95.
But before you choose the washing temperature manually, look at the label on the items; it has the optimal temperature at which the items will remain clean and not spoil.
Personalized settings
Temperature adjustment The washing temperature is adjusted using the TEMPERATURE regulator (see Program Table). The temperature value can be reduced down to washing in cold water ( ). The machine will not automatically allow you to select a temperature higher than the maximum value allowed for each program.
Additional functions Various washing functions of the machine allow you to achieve the desired cleanliness and whiteness of your laundry. The order of selecting functions: 1. press the button of the function you need; 2. When the corresponding indicator turns on, it means that the function is enabled. Note: If the indicator blinks rapidly, this function cannot be selected for the specified program.
Eco TimeBy selecting this option, mechanical movement, temperature and water are optimized for a reduced load on less dirty cottons and synthetics (see “Program Table”). In the "" mode, you can wash items in a shorter time, saving water and electricity. We recommend using a dose of liquid detergent corresponding to the load size.
! This function is not compatible with programs 1, 2, 7, 8, 9, 10, 11, 12, 13, .
Bleaching A bleaching cycle to remove the most stubborn stains. Pour bleach into optional insert 4 (see Bleaching). ! This function is not compatible with programs 1, 7, 8, 9, 10, 11, 12, 13, .
800-400 This button reduces the spin speed. ! This feature is not compatible with programs 8, .
Delay Timer Delays the start of a cycle by up to 12 hours. Press the button several times until the indicator corresponding to the desired delay value turns on. The fifth time you press the button, the function is disabled. NOTE: By pressing the START/PAUSE button, you can only change the delay value downward. ! This feature is compatible with any program.
Upper threading instructions
1. Raise the presser foot lever using the appropriate lever, and turn the handwheel toward you (counterclockwise) to raise the thread take-up lever to its highest position. 2. Pull up the spool pin and place the spool of thread on it. 3. Pass the thread through both thread guides: first through the rear and then through the front. 4. Pull the thread down and around the upper thread tension dial from right to left until the thread catches the limit spring. Hold the thread and pull it between the tension discs. 5. Guide the thread to the back of the thread take-up lever and then around it from right to left. Pass the thread through the slit, pulling it towards you until it hits the thread take-up eyelet. 6. Lower the thread down and pass it behind the thread guide. 7. Thread the thread into the eye of the needle from front to back and pull out about 5 cm of thread. Note: If the thread is not threaded correctly, it may break, skip stitches, or wrinkle the fabric.
If your sewing machine does not have instructions and you do not know how to use it, you can use this simplified and universal guide. These instructions are suitable for any economy-class sewing machine with an oscillating hook that performs a minimum set of operations.
Sewing machine accessories
1. Buttonhole foot. A special foot that is convenient for making buttonholes. The size of the loop depends on the size of the button inserted into it. In inexpensive models of sewing machines, buttonhole sewing is done in 4 steps. 2. Foot for sewing in a zipper. 3. Foot for sewing on buttons. 4. Set of needles. 5. Double needle. 6. Bobbins. 7. Darning plate. This plate replaces the lever lowering the toast. The plate is simply placed over the rack, hiding the teeth so that the fabric does not move forward when the machine is running. 8. Screwdriver 9. Additional spool pin. This rod is necessary when using a double needle; its purpose is to install a second spool of thread. The accessories listed above are stored in a specially designed case inside the extension table. These accessories are designed to make most sewing tasks easier.