The washing machine is used constantly in the family, especially if there is a small child. Its failure for a long time can create many problems, because hand washing takes a lot of time and effort. Therefore, it is better to spend time on maintenance and identifying breakdowns in the early stages, when repairs will cost less, and half of the problems can be fixed with your own hands. Potential problems are most often identified by ear. If the washing machine is knocking, then it is necessary to urgently interrupt the washing cycle and begin to identify the causes of the extraneous noise.
The main reasons why knocking occurs in a washing machine can be grouped as follows:
- Displacement of the counterweight (load stone).
- Failure of shock absorbers.
- The power filter is unscrewed.
- The balance is out of balance.
- Bearings are worn out.
- Foreign objects have gotten between the tank and the drum.
Now you need to analyze the causes of the malfunction for each item and the possibility of self-repair.
Counterweight (load stone) displacement
The washing machine tank is made of plastic, so under the influence of a drum loaded with laundry, it vibrates quite strongly. The counterweight itself is a cement or plastic block that is attached to the tank and stabilizes it. That is, it makes it less mobile under high dynamic loads on the drum. Displacement or destruction of the counterweight is one of the simplest, but far from harmless, breakdowns that need to be quickly corrected. This malfunction is diagnosed as follows: the drum begins to knock when spinning at maximum speed or with a large load, and the sound comes from the bottom.
Destruction of the counterweight
If the bolts holding the counterweight are loosened or completely unscrewed, the counterweight may become dislodged or the drum may have a lot of play. This problem can be fixed quite simply, you just need to tighten the bolt. And to prevent this from happening again, you can take the bolt a little longer and put a lock nut between it and the washer.
If the counterweight is destroyed, the situation is much more serious. Cement stone is practically irreparable. You need to go to a repair shop and just buy another one.
Bottom counterweight
You can get to the counterweight to secure it (adjust it) as follows:
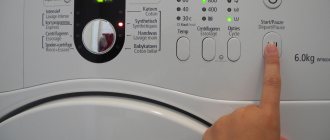
- The dispenser tray is fully extended. To do this, you need to press firmly on the central latch.
- Several screws will be visible in the opening that appears. Unscrew them and remove the control panel.
- On some models, you may need to additionally press out the plastic latches; we do this carefully using a flat-head screwdriver.
- At the upper end of the front panel you can see the heads of screws and bolts. Unscrew them and remove the front panel.
- That's it, we got access to the counterweight located at the bottom of the tank.
IMPORTANT! Before disconnecting the contacts on the dashboard, it is advisable to photograph them with a mobile phone, so that later you do not play the sapper of which wire to plug in where
Upper counterweight
Again, on some models the counterweight units may be located at the bottom, while on others they may be located at the top or rear. The exact position can be found according to the diagram in the data sheet, which is attached to each washing machine.
Failure of shock absorbers (dampers, springs)
A knocking sound in the washing machine may occur if, as a result of prolonged and intensive use, the springs have stretched or the shock absorbers have weakened. These elements are designed to dampen strong vibrations of the tank during spinning. Budget models of washing machines use only shock absorbers.
More modern and expensive models use a combination of dampers installed at the bottom of the tank and springs on which it is suspended from the top of the body.
As for springs, the situation here is very simple. Definitely replace, and no alternative options. It is better to buy dampers and shock absorbers and install new ones. However, if you want to work and don’t want to spend money, then you can try to repair it yourself. As a rule, breakdowns of these parts can be as follows:
- Wear gaskets: cut from rubber of appropriate thickness.
- Broken rod: solder (temporary measure, use the washing machine without spinning).
- Shock absorbers may additionally have a cracked return spring: replace with a new one
Important!
Deciding whether or not to fix these breakdowns should be based on their criticality. But, in my experience, it is better to install new parts. Moreover, even if one damper fails, a pair will have to be replaced. This will guarantee that further operation will be long-lasting and problem-free.
What exactly is in front of you, a damper or a shock absorber, is difficult to say without disassembling it. You need to focus on the presence of upper springs in the washing machine.
First you need to diagnose the damage to the shock absorbers. To do this, remove the top cover of the washing machine. On most front-loading models, it is removed in the same way. Two screws are unscrewed from the back of the case, and the cover itself is slightly pushed forward. Inside you need to identify the tank (plastic, white, round, large) and press it with a little force and release it sharply. If the tank takes its original position immediately without unnecessary movements, then the dampers and shock absorbers are in order. If oscillatory movements in different directions continued for some time, then it is necessary to begin repairs.
Sequence of actions for replacing dampers or shock absorbers:
- After diagnostics, the top cover of the washing machine has already been removed.
- We remove the front instrument panel (how to do this was in the previous section).
- We bend the sealing collar and the metal clamp that presses it. Carefully pry it up with a screwdriver and remove it.
- Unscrew the hatch lock bolts. The official name of UBL is a hatch blocking device. Disconnect the wires from it and pull it out.
- Find the screw heads of the front panel and unscrew them.
Removing the Damper
To quickly and easily remove a damper or shock absorber, perform the following steps:
- We put a nut on the plastic rod to fold the latches.
- On the other side, carefully pull with pliers.
- Simply unscrew the bolt at the bottom.
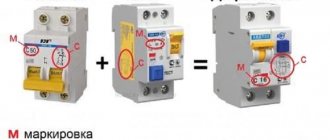
The surge protector is unscrewed
A fairly common cause of knocking noise in a washing machine is a loose power filter. This device is necessary so that the electrical impulses generated during the operation of the washing machine do not turn into parasitic interference from the household electrical network of the apartment. Simply put, so that the lights in the house do not blink due to the constant and frequent switching on and off of the electric motor and heating element of the washing machine.
Network filter
In fact, this defect is not considered a serious breakdown, since it does not lead to further damage to the mechanisms of the washing machine. Physical impact from vibrations and shocks on the wires and the surge protector housing can lead to breakdown. As a result, anyone who touches the washer may receive a noticeable shock.
To eliminate the defect, just screw the surge protector into place. For most models, it is located at the top of the case near the hole for the power cord. To access, you need to remove the top cover, as mentioned earlier.
The balance is out of balance
Both at the first start and as a result of long-term use, the balance of the washing machine may be disrupted. In this case, the washing machine knocks strongly from the contact of the body with the walls, the legs with the floor, or the vibration of the tub and drum inside. You can detect skew in any direction by simply shaking the device body. You can more accurately determine the need for rebalancing by using a water level. If, after checking, a skew is detected, then it is necessary to tighten the adjustable legs using an open-end wrench.
Anti-vibration stands
If the floor is too uneven or fragile (vibrates under dynamic loads), you can use special silicone supports. They will help raise the machine body above the floor level, provide a large area of contact with the base, and will additionally dampen minor vibrations.
Important!
In older models of washing machines, the phenomenon of imbalance occurs quite often. Usually if there is too much laundry or large items being loaded. To correct this situation, you need to stop the wash cycle and drain the water. To do this, unscrew the filter hole at the bottom of the washing machine. After this, the door will unlock, and it will be possible to remove some of the things or arrange them more evenly. With new models, such errors do not occur, since almost all of them have the “Imbalance Protection” function.
Normal or broken
It is quite easy to determine on your own that the knocking noise coming from the machine is an expression of a malfunction and not the norm. If the sound is inconsistent and uneven and exceeds the normal noise level of the machine, then this is not the norm. When the washing machine is working properly, the hum is quiet, uniform, without any extraneous knocks or other sounds.
Tank springs
Bearings are worn out
If after washing you get wet clothes, and the washing machine knocks during the spin cycle, both at high and medium speeds, then the reason is mainly the failure of the bearings. You can additionally verify this by opening the hatch and shaking the drum away from you. If there is significant play or a significant gap appears between the edge of the drum and the tank, then this is a guaranteed confirmation of bearing failure.
Correcting this defect is a rather labor-intensive procedure that requires a certain number of special tools:
- Set of flat and Phillips screwdrivers.
- Set of open-end wrenches.
- Adjustable wrench (preferred).
- Rubber or wooden hammer. You can replace it with a regular one, but you will have to hit it through thick rubber.
- Chisel or wrench.
- Lubricant, lithol recommended.
Disassembling the case is carried out as follows:
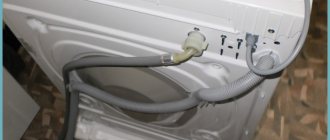
- The back panel is removed. To do this, you need to unscrew all the screws located around the perimeter. Some models require additional removal of the cover.
Remove the back panel
- All wires leading to the heating element and sensors are carefully disconnected from the tank. Naturally, they must be photographed first.
Disconnect all wires
- The belt leading from the electric motor to the drum drive - the flywheel is removed.
- The heating element is removed. To do this, you need to loosen the clamping nut and slightly push it inward, releasing the cuff. Then remove it by turning it at an angle.
- We fix the flywheel so that the flange does not rotate. It is better to do this not with a screwdriver, but with a wooden stick; there is less risk of piercing the drum.
- The fixing bolt is twisted. This requires significant effort. After which you can remove the flywheel.
Disconnect all wires
- Next, you need to unscrew the bolts that fasten the two parts of the tank and are located along its perimeter. This must be done to remove the drum without disassembling the entire washing machine. Thus, the first part of the tank with shock absorbers and an electric motor attached to it remains in place. The drum is removed and all further actions are carried out with it.
To remove the bearing, perform the following steps:
- The shaft is knocked out with a rubber or wooden hammer. You don't need to apply too much force to avoid deforming it.
- Once the drum is removed from the shaft, the oil seal and bearing will be visible in the hole.
Remove the oil seal and bearing
- The oil seal can be removed by simply poking it with a screwdriver. If this does not work, then use a chisel. Place the cutting edge between the tank and the seal and hit it lightly with a hammer several times. Once the seal is removed, the outer and inner bearings are removed.
- The groove must be thoroughly cleaned of accumulated dirt, limescale, etc. For this, both chemical detergents and sandpaper are used.
Replacing pre-purchased bearings is done in the reverse order. First, the inner ring is installed in the socket, then the bearings, then the oil seal, pre-lubricated with lithol.
Install bearings
Before installing the tank on the shaft, it must also be thoroughly cleaned and lubricated.
Prevention
In order for the machine to serve as long as possible, you should take small precautions:
- Items with small parts that can come off during washing are best washed in a special bag;
- Before placing things in the tank, you should check their pockets for debris, small items and other items that could damage the drum;
- do not exceed the load of the washing tank, observe the restrictions;
- add special substances that soften water - they will help preserve the heating element and remove scale;
- the machine must stand level and secure;
- It is advisable to ventilate the internal elements of the device, for which you need to open the hatch for loading laundry and the tray for detergents.
For more information about the causes and repair of a washing machine that is knocking, see below.
Foreign objects have gotten between the tank and the drum
It is possible that the drum in the washing machine suddenly starts knocking, but there seems to be no particular reason for this. In this case, you need to stop the wash cycle, drain the water using the function or through the filter hole and remove all items from the drum. Turn the drum several times by hand. If you hear a characteristic knocking sound, it means the cause is a foreign object. Based on practice, in the vast majority of cases this item is a wire from a women's bra.
Where might the item you are looking for be located? It is necessary to carefully check the areas behind the hatch cuff. The second place where small objects accumulate is the filter. In fact, this is what it is intended for. In particularly difficult cases, it will be necessary to remove the heating element.
Remove the heating element
It is located differently for different models. But in most cases, to access it you need to remove the front panel. We have already talked about how to do this earlier. Having gained access to the heating element, you need to disconnect the contacts and unscrew the central bolt. After this, the device can be removed.
It is necessary to disconnect the contacts and unscrew the central bolt
Diagnostics
To fix a problem, you must first identify it. Correct diagnosis is half of a successful repair. Before contacting a service center, some faults can be determined independently.
- If you hear a knocking sound when the drum rotates, it is most likely that change has fallen out of your pocket or the clothing has not been turned inside out so that the buttons and zippers are turned inward.
- If you hear a strong squeaking sound when the car picks up speed, it is likely that the bearing is worn out. To check this version, you need to open the hatch of the washing machine, press on the inner edges of the drum and scroll. Some skipping and cracking may be felt. It is likely that the bearing is faulty.
- Sometimes you can hear a knock on the case during operation. A possible cause is an imbalance in the rotation axis. To exclude or confirm this breakdown, you need to check the drum play: if it is too large, then this is the problem.
- If the machine begins to make a lot of noise and vibrate, then the counterweight mounts may have become loose.
- When you open the door, you can see that the tank is slightly tilted. When you press it, it hits the walls or other parts of the machine.
- If the washer made a very loud noise while draining the water and stopped working, then most likely the pump has broken down.
- To identify the incorrect installation of the machine, you just need to press one of its corners - it should not swing. You can also check it with a building level.
Summing up
Now you know why the washing machine knocks and how to fix the most common defects. Now it’s up to you to choose whether you can fix the defect yourself, but if you have doubts about what will happen, it’s better to contact a specialist. I would like to know your opinion whether the information presented in the article was useful or not. In addition, you may have encountered other causes of strange sounds in your washing machine. We will be grateful if you share your experience in detecting and eliminating other breakdowns.
Main reasons
A washing machine is a piece of equipment that is used almost every day. Even if you take care of the washing machine and treat it with care, over time the parts wear out and require replacement.
Location of transportation bolts.
Main causes of noise:
- The transport bolts have not been removed.
- The bearings have failed or fallen apart.
- The presence of a foreign object between the drum and the wall.
- The drum pulley is loose.
- The counterweight is poorly secured.
- The hatch needs replacing the seal.
- The machine is not installed correctly.
To repair the unit, you need to know the exact cause of the noise. To do this, you should listen to the nature of the extraneous sound, whether it increases during greater load. Repairing equipment at home is not always a justified idea.