Cleaning the crankcase ventilation is necessary for a car engine, because if it is not done on time, oil will leak when the engine starts. As you know, no vehicle can operate without this important fluid for the engine, which lubricates its parts, thereby allowing it to function without problems. Why is it necessary to clean the crankcase ventilation, and how to do it correctly so that the car starts working smoothly again?
Components of the ventilation system
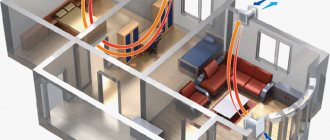
The crankcase ventilation configuration depends on the type of internal combustion engine installed on the vehicle. Despite this, the system includes the following elements:
- air pipe;
- a ventilation valve that performs the function of suctioning gases. The intensity of its functioning increases with increasing vacuum force inside the intake manifold;
- oil separator
Crankcase ventilation can be roughly divided into 2 large functional parts. These include:
- Small branch. Performs the function of selecting crankcase gases that accumulate under the valve cover.
- Big branch. Exhaust gases are removed from under the cover.
Both branches function harmoniously and are completely dependent on each other.
Ozone method
An excellent solution for ecology lovers. Ozone has very strong disinfectant properties and copes well with fungi and all microbes. What does the ozonation process look like? At the very beginning, you need to thoroughly vacuum the vehicle to get rid of any dirt.
The entire disinfection process occurs thanks to an ozone generator. Its use causes the oxygen molecule to split into two separate oxygen atoms. As a result of this reaction, O3 is formed, which then oxidizes any chemical composition. Ozone circulates, as a result of which all fungi and microbes die, and the unpleasant odor disappears. In the end, you just need to ventilate the Renault Logan 2.
Principle of operation
When a mixture of fuel and air is burned, a sharp and strong increase in its volume occurs.
This creates high pressure in the internal combustion chamber, which forces the piston to its bottom dead center. The movement of the piston drives the engine crankshaft. Some of the gases formed in this case, penetrating through the gap between the rings and the cylindrical mirror, enters the cavity under the crankcase cover. Here they mix with oil vapors, which leads to the formation of pressure.
The pressure has an aggressive effect on the crankshaft O-rings, as well as on the gasket located between the pan cover and the oil dipstick channel.
The expansion stroke is periodically repeated in each of the cylinders. This leads to the injection of a repeated portion of gases. If the crankcase ventilation is insufficient, exhaust gases accumulate and the crankshaft seals are gradually squeezed out.
If you do not clean the crankcase ventilation system, it is possible that gases will push out the oil dipstick and oil will leak out of the crankcase. In addition, the following elements accumulate in the crankcase:
- a small part of the fuel that did not have time to burn;
- small soot particles;
- moisture.
All elements are mixed with engine oil that has fallen into the pan. As a result, over time the oil oxidizes, clogging it and reducing its service life.
How to assemble an engine step by step
In order for the car to work properly, it is important to assemble the engine correctly. To do this, please read the assembly instructions:
To do this, please read the assembly instructions:
We replace all unsuitable seals and oil separator rings, and then coat them with oil. We attach the oil separator to the engine block, and then tighten it with bolts. The bottom bolt is tightened by hand, not with a screwdriver.
It is important to remember that the seals may come off during fastening. We put the hoses on the oil separator, not forgetting to secure them with new clamps. Then we lay them so that they are without kinks. We tighten the clamps on the fittings. Now you need to secure 5 bolts - if necessary, the gaskets on the manifold are replaced. We insert all the valves back, and then tighten them with bolts
Now you need to carefully slide the manifold onto the lower bolts and then tighten them. The next step is to assemble the fuel line. The probe tubes are installed in place and the bracket is screwed on. We connect the pipes, and then check all the fasteners. Then we connect the injectors and the XX system.
Now you can connect the battery and then check the operation of the motor.
If the car does not work, most likely there was an error in the assembly of the XX.
Thus, cleaning the crankcase ventilation system is a prerequisite for the normal and safe functioning of your “iron friend”.
The process of removing crankcase gases
The removal of exhaust crankcase gases has some differences between carburetor and injection type engines. Regardless of this, the entire procedure follows a standard scheme:
- Exhaust gases are sucked from the engine crankcase.
- In the oil separator, gases are purified from impurities of oil vapors and other combustion products.
- Purified gases move to the intake manifold through the air pipes.
- Crankcase gases mix with the fuel mixture and burn in the engine cylinders.
It is possible that a small amount of gas is getting into the oil pan. As a result, the process of selecting crankcase gases is disrupted.
Possible malfunctions, their diagnosis
Crankcase ventilation problems, as a rule, are not obvious, but until a complete blockage of some part of the exhaust gas exhaust air path occurs, such as a fitting, a rubber hose, part of the internal space of the oil separator or the valve mechanism itself.
Such a fatal malfunction will cause a frankly poorly running engine, or due to increased internal pressure it will simply squeeze out oil through the rubber gaskets of the oil pan and valve cover. In this case, simply washing the oil separator and valve will not solve the problem, as a complete cleaning of the crankcase ventilation system will be required.
However, before the crankcase ventilation elements are completely clogged, the following symptoms must begin to appear:
- gradual reduction in engine power;
- a slight increase in fuel consumption, especially in the urban cycle;
- failures in the accelerator pedal;
- the appearance of oil release on the gaskets and cuffs of the engine housing.
Possible system malfunctions
Unfortunately, in the first stages it is almost impossible to identify problems associated with clogging of the SWR.
They can only be identified after the system is almost completely clogged. This could cause the engine to malfunction or force oil out of the gaskets between the oil pan and the valve cover. In this case, thorough cleaning of the crankcase ventilation is necessary.
Even when using very high quality piston rings, it is impossible to ensure maximum sealing of the piston. This will invariably lead to gradual clogging of the crankcase space with combustion products of the fuel mixture, as well as its slight compression.
In order to ensure the normal functioning of the crankcase ventilation system, it is necessary to ensure an air supply to the crankcase space. Otherwise, a large vacuum will form in the crankcase.
This leads to loss of valve mobility and their jamming in a certain position. Crankcase gases include particles of soot and carbon deposits. If the engine is in poor condition, a large number of particles accumulate. They gradually accumulate not only on the valve itself, but also on the calibration holes and ventilation pipes.
In winter, when steam moves through the crankcase ventilation system, it can gradually accumulate in its narrow places, turning into ice. This process is known as freezing. If a large amount of ice accumulates, the dipstick may squeeze or force oil out from under the crankcase cover.
If the combustion products of the fuel mixture can accumulate over a long period, the freezing process develops very rapidly. To avoid the development of this problem, engine developers use heating systems in the ventilation system.
The operating instructions for the vehicle must indicate that it is necessary to periodically clean the crankcase gases, which should be carried out in parallel with changing the engine oil.
Cleaning steps
If the crankcase ventilation system is completely clogged, you will notice very unpleasant symptoms. These include:
- engine power decreases;
- an increase in fuel consumption, which is especially noticeable during urban travel;
- periodic loss of the accelerator pedal;
- Small drops of oil are noticeable on the gasket and cuffs of the engine crankcase.
You can remove blockages and clean the ventilation system using several methods.
For example, first of all, it is recommended to check the condition of all working elements of the oil separator and valve for the presence of various deposits of combustion products. Even if no accumulation is noticeable, it won’t hurt to do a little cleaning.
If after this the symptoms of clogging do not disappear, you will have to wash the damper rod
Experts point out that after washing, the damper must be thoroughly wiped dry. Under no circumstances should it be lubricated.
Cleaning the crankcase ventilation system is carried out in the following sequence:
- Remove the cylinder head cover.
- Remove all the screens located in the cylinder head cover.
- Wash all screens, oil separator housing and BC head cover. You can use kerosene for this. It is necessary to ensure that kerosene does not remain in the crankcase. If this cannot be avoided, you will have to completely change the crankcase oil.
- Install the grids by carefully turning them in the lid. On one side, the mesh should rest against the protrusion on the crankcase cover, and on the other, the hole on the oil separator body should be visible.
- Tighten the mounting bolts.
- Check the condition of the SVK cover gaskets. If wear or clogging is noticeable, the gaskets must be replaced.
- Install the cover on the cylinder head.
To do this job yourself, you need to have the right tools. These include:
- Core. With its help, channels are checked for the presence of deposits or blockages on their walls.
- A rod with a high degree of flexibility. Its use facilitates access to hard-to-reach areas of the system located horizontally.
- Brush machine. If this is not available, a hand brush can be used to remove deposits and blockages just as effectively.
- Channel punch. With its help, you can simplify the removal of blockages. To create punches, you can use brick or any construction waste.
If we talk about the frequency of cleaning the crankcase ventilation system, it depends on the engine system. The optimal cleaning period is once every 6-7 months. If the vehicle is used frequently, the period must be reduced to 4 - 5 months.
Fine fuel filters serve as a guide to the need for cleaning. As soon as dirt or deposits become noticeable on their walls, it’s time to start cleaning the HVAC.
Double-sided adhesive foam method
The easiest and cheapest way that even a beginner can do. It is enough to purchase a special antifungal spray, which is available at any automotive store and most supermarkets. Most often, a special device is attached to it, with the help of which the spray is introduced through the channels in the direction of the evaporator. Simply inject the product inside to destroy all bacteria and fungi.
Unfortunately, this method has its drawbacks. We are not 100% sure that the mold has died. We cannot see whether the tube being used reaches deep enough to clean the entire air conditioner. Dripping foam can also cause a short circuit.
Replacing KVKG
Replacing a valve is easy on almost any passenger car, but each SVKG engine model has its own design features. Let us consider, as an example, how the KVKG changes on the M54 B22 engine, the make of the car is a BMW fifth series in the back of an E39. The KVKG valve is located under the intake manifold at the front of the internal combustion engine, and to get to it you need to remove:
For convenience, you can remove the intake manifold itself, but then the work turns out to be quite labor-intensive, and you will also have to purchase manifold gaskets. After access to the valve is ensured, disconnect the hoses from the KVKG and dismantle the device itself. We are installing a new mechanism, putting all the parts in their places.