- November 16, 2018
- Needlework
- Natalia Khromenkova
Fabric pumpkins are a very beautiful handicraft accessory. The history of the creation of such vegetables is not known for certain. Pumpkin has always been held in high esteem by many peoples; traditionally, in mid-autumn, farmers put their agricultural achievements on display. This is how Pumpkin Day appeared; later this holiday was associated with All Saints' Day, which is celebrated on October 31. It is from this moment that the story of decorating the interior of your houses and plots with the help of these and other vegetables begins. Textile designs emerged as a special addition to the present during the festive period and have firmly established their place in the home decor rankings thanks to their bright colors and chic shapes.
How to sew a pumpkin with your own hands?
It is very simple to make such beauty from fabric; the work does not require special skills. Some handicraft masters can do without the sewing process altogether, which we will discuss below. If you need to make a small pumpkin-pincushion, then all you need is a suitable fabric, needle and matching thread. If the scale of the creation is larger, for example, a life-size pumpkin, then the fabric consumption will be greater, the twine will replace ordinary threads, and the sewing tactics will be completely different. Pumpkins made using the simplest techniques are in no way inferior in appearance to those sewn from six wedges. The main thing is the final decor and small details that give the mood to the overall picture.
The most realistic looking pumpkin is made from felt or plush fabric. To complete the image of the vegetable beauty, craftsmen use acrylic paints in brown and dark green tones at the base and near the stalk. You can’t immediately distinguish such a vegetable from the real thing. Mini pumpkins with minute embroidery and beaded decor are considered the pinnacle of handicraft craftsmanship.
Children's cartoon characters
Favorite children's cartoon characters are very simply made from pumpkin. Such crafts are suitable for young children for an autumn exhibition in kindergarten, since to make them you only need: a pumpkin as a base, colored cardboard, markers or gouache and sewing pins. It is advisable to choose spherical pumpkins of the same size.
Smeshariki are made very simply. Each character has its own coloring and body parts.
- The Krosh Hare is made like this: take a pumpkin, paint it blue with gouache, attach ears cut out of blue cardboard on top, and make the character’s arms and legs from cardboard. All parts are attached to the pumpkin using sewing pins with a plastic head. Krosh's face: eyes, nose, mouth are drawn with gouache, or these details can also be cut out of colored cardboard and attached with pins.
- The hedgehog is made from a pumpkin painted dark pink. The arms and legs are also cut out of dark pink cardboard. The “crown” of needles and the Hedgehog’s glasses are cut out of purple cardboard. All parts are attached to the pumpkin with sewing pins. The face can be painted with gouache.
In the same way, any character from your favorite cartoon: be it Krosh, Hedgehog, Losyash, Pin, Kar-Karych, Kopatych, Barash, Sovunya or Nyusha, can be made by children at home on their own. In the same way you can make angry birds - Angry Birds. And if you take a pear-shaped pumpkin, you will get an excellent minion.
Pumpkin is an excellent material for creativity. This queen of the fields can shine both on the table among other pleasant dishes and serve as a wonderful attribute for the embodiment of various children's plans and ideas. A child will never regret choosing a pumpkin for making his crafts, as this simple fruit will awaken his rich imagination.
Do you need a pattern?
Patterning a pumpkin is perhaps the simplest of all that is found in the art of needlework. The basis is an ordinary circle. It is quite enough to sew pumpkins like the ones in the picture above. More interesting options are mixing colors, patchwork, inside-out pumpkin and others. Those who are just starting their journey in the world of handmade crafts should start with the simplest idea. With experience will come inspiration, your own interpretations and a vision of artistic possibilities. A special highlight is the use of real stems in the manufacture of textile pumpkin crafts. However, they can be replaced with ordinary wooden sticks or twigs. The key to success, rather, is accuracy in work and the presence of beautiful fittings.
Why pumpkin?
A legitimate question is why exactly the pumpkin became the body of the lantern and why original pumpkin crafts are made from it with your own hands? The material is very convenient for crafts for several reasons:
- pumpkin is well preserved for a long time even without special treatment,
- pumpkin is a hard fruit that can easily be painted on,
- the fruit has a spherical shape, convenient for work and demonstration of skills,
Pumpkin can be stored for a long time
- bright color makes the product attractive,
- a variety of sizes from several centimeters to sizes of more than a meter allows the author to show his imagination,
- the fruit has a bright upper peel, which contrasts with the coating underneath, making the pattern bright and interesting.
A variety of sizes will allow you to realize any fantasy
The “inner world” of a textile pumpkin
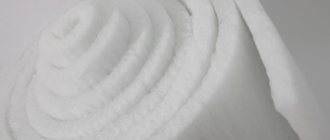
First, let's decide on the filler: padding polyester, holofiber, padding polyester, batting or simple shredded rags are perfect. The first three options are good because when stuffing them, “cellulite” does not form; the product has a neat appearance, without folds or wrinkling. If you are planning to make a life-size pumpkin, to save quality filler, you can use a frame made of newspapers and tape, plastic or something similar. The filler is placed on top of the frame in several layers, and the textile pumpkin acquires a stable shape and is practically not deformed.
If the vegetable queen will decorate the territory of a private house, plot, or recreation area, then you can use sawdust and wood shavings as a filler.
To make the vegetable beauty not only beautiful, but also aromatic, you can add cinnamon, ground coffee or vanilla to the filling (preferably in the center). Or you can take a pinch of salt, sprinkle with your favorite aromatic oil and put it deep into the pumpkin.
Decorative pumpkins: for those who don't like to carve
To decorate your home for Halloween, you don't have to go through the hassle of cutting out and removing the pulp. You can leave the fruit whole. At the same time, it will be stored much longer.
Multi-colored pumpkins
This collection contains several options. Firstly, you can simply paint the vegetables as you wish (for example, with acrylic paints). You can also glue rhinestones or use markers.
Decorate with a garland
If you have some glue and a solid piece of garland with balls, you can glue it to the pumpkin. To do this, coat the vegetable with glue and attach the garland to it in layers.
Confetti
Grab some confetti or create your own using a hole punch and colorful paper. Coat the pumpkin with glue and sprinkle with the resulting circles. You can add an additional layer of glue on top to prevent the confetti from flying around.
Pumpkin unicorns
Of all the ideas presented, this is the most interesting and unusual (especially if you are creating a surprise for a girl). For it you will need a pumpkin, foamiran for the ears, acrylic paints (you can take a balloon), polymer clay, glue and wooden skewers.
Start by painting the pumpkin and cutting off the stem. After this, glue the ears pre-made from foamiran. Twist the horn and stick a skewer into it, bake the structure (if the clay is baked). After that, stick the structure into the “forehead” of the unicorn. Make a mane from several sausages of polymer clay and also attach it to the creature's head. Color the face.
What to sew from?
Textile pumpkins can be sewn from almost all types of material.
The most suitable are soft fabrics that are prone to deformation: cotton textiles, plush, soft felt, fleece, knitwear. You can sculpt a miracle vegetable from jeans, leather or old sweaters.
It is not at all necessary to choose a color scheme of orange shades. Prints with polka dots, flowers, stripes and checks are suitable. An excellent option would be to use burlap; it is combined with wooden decorative elements and rough fittings.
Pumpkins with letters - stylish decoration for home and garden
In addition to drawings and patterns, you can put letters, words and entire sentences on the pumpkin. Paint, markers, felt-tip pens - use anything that leaves bright marks and feel free to experiment with the placement of signs. First, the pumpkin should be painted in a single color. If you are not sure that you will get an even lettering, use the decoupage technique: simply cut out the letters you like from a glossy magazine and glue them to the surface of the pumpkin with latex glue, which does not leave a yellowish tint.
halloween.tammam.co
Draw a letter on each pumpkin and make up some good word from them: “Thank you”, “Happiness”, “Holiday”. Or you can use the vegetable as a board for wishes or a “book” of reviews. Let each of your guests leave some kind of inscription on the fruit. You will get an original memorable pumpkin!
sheartalentwithcolor.com
thecozyoldfarmhouse.blogspot.com
Option one: let's start with the basics
So, let's decide on the size of the pumpkin. To get a vegetable slightly smaller than the palm of your hand, you need to use a circle template no smaller than 20 centimeters in diameter.
Along the entire edge of the circle, retreating about 0.5 cm, we lay a line with a seam “over the edge” or an overlock stitch. We tighten the workpiece along the entire diameter and fill it quite tightly with padding polyester. We tighten the ball completely, fixing it with several stitches in the center of the hole. You should get a spherical vegetable with a small hole where the tail will later be.
Next, we take threads to match, or you can, on the contrary, use completely different ones, contrasting in color, and pierce the ball right through, bringing the needle out in the center, on the reverse side of the place for the stem. Mentally divide the circle into 6–8 sectors: stitch each of them, tightly pulling the thread and returning to the center of the circle after each “clamp.”
After all six parts have been stitched, firmly secure the thread inside the vegetable. All that remains is to attach the stalk using a glue gun and add a few decorative elements - leaves, straw threads, ribbon bows or something else.
Holiday Pumpkin Crafts
On Halloween
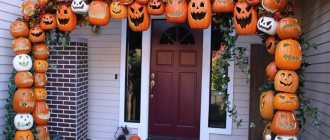
The pumpkin head or lantern for Halloween in America is the main symbol of the holiday. On the night from October 31 to November 1, the entire country transforms into a dark world, with glowing pumpkin heads and lanterns appearing everywhere. Gradually, in Russia, this holiday is gaining momentum and many are making pumpkin lanterns at home, since it is the pumpkin that has the appropriate spherical shape and bright color, which create a festive mood.
- To make such a lantern, you need to select a bright orange pumpkin, spherical in shape, the dimensions of which should be at least 25 cm, this diameter is enough to make an original lamp in the shape of a pumpkin head.
- Next, you need to thoroughly rinse the pumpkin without damaging the integrity of its surface and dry it.
- Next, cut off the top of the fruit with a sharp knife. If you plan to make a lantern with a lid, you need to choose a pumpkin with a tail, so it will be more convenient to open it.
- The next step is to remove all the pulp of the fruit with a spoon; this must be done as carefully as possible so as not to damage the pumpkin skin. The thickness of the peel should remain within 1.5 cm. You can also rub the inner surface of the pumpkin with sandpaper or a brush, this will completely remove the pulp.
- In order for the pumpkin to stand unchanged for a long time, its inner surface must be lubricated with a disinfectant, such as alcohol, or you can also use diluted bleach.
- Then you need to leave the pumpkin in the air to dry. To do this, you need to place the fruit on a towel, and inside it - absorbent napkins. As the napkins become wet, they will need to be replaced with new ones. This drying method will allow the pumpkin not to change its size and volume during drying.
- It is best to cut designs on the skin of a pumpkin with a sharp knife. You need to use homemade stencils: if it’s a pumpkin head, cut out ominous eyes, nose and mouth on the pumpkin, if it’s a simple lantern, cut out any shapes that come to mind. Also, there is no need to cut through small parts - this is inconvenient; large designs on the lantern look more impressive. All cuts must be treated with any vegetable oil, so the lantern will be stored longer.
- If the lantern is illuminated with a candle, then one top cut will be enough: the candle will be placed on top. If there will be some kind of lantern shining, then it will be necessary to make the lower part of the pumpkin: the pumpkin will cover the lantern standing on the table.
for the new year
A snowman always evokes associations with winter and the New Year in people, so this craft will never go unnoticed by both children and adults.
- Making a pumpkin snowman is easy. You will need 2 pumpkins of different sizes, which are painted white with gouache. There is also an interesting way of painting using a mixture of PVA glue and shaving cream in equal proportions, you get paint that imitates snow.
- The lower pumpkin should be larger - this will be the body of the snowman, to which a smaller pumpkin - the head - is attached using two knitting needles, pointed on both sides. Two knitting needles are stuck into the lower pumpkin, and the upper pumpkin is strung on top.
- The legs and arms of a snowman can be made from potatoes painted white, which are attached with toothpicks.
- The face can be drawn with gouache: eyes, mouth. The snowman's nose is traditionally made from a carrot and attached to the head with toothpicks.
- A scarf made of thick fabric is tied around the snowman's neck, and a homemade bucket made of colored cardboard is placed on his head.
Option two - complicated
A textile pumpkin sewn using this pattern will be more flattened, closer in appearance to a real vegetable.
The work progress is as follows:
- We fold the round blanks with their right sides inward and stitch them with an indentation of 0.5 cm along the edge.
- In one of the circles we make a small cut in the center and turn it right side out.
- We stuff the ball very tightly with padding polyester or other filler.
- We sew the middle in the same way as in the previous case. You can make not six sectors, but more. It is desirable that they be symmetrical and the same size.
Halloween and Jack: a little history
It’s impossible to start making Halloween lantern crafts without getting a little acquainted with the legend itself. According to the Irish or English version, there lived a completely illegal citizen Jack, who was famous only for unrighteous deeds. Without money to pay for the drink, he sells his soul to dark forces, which he was also able to deceive.
In exchange, he receives a promise that he will not go to hell. But since heaven is also closed to him, to this day Jack walks the world restless. The dark forces took pity on the unfortunate man and, so that he would not get lost, they threw a couple of smoldering coals after him. In order for the fire to burn for a long time, Jack made a lantern out of a pumpkin, which is now repeated in various versions on Halloween.
The Legend of Jack-O-Lantern
Therefore, the pumpkin is painted with frightening grimaces, has a frightening appearance, and serves as a stand for a candle.
Textile beauty: we sew from 6 sectors
To sew a textile pumpkin in this case, we will need to cut out six identical parts.
We sew the parts together, retreating from the edge about 0.5 cm. We assemble the workpiece into one whole, connecting the last and first parts. Turn it right side out, fill it tightly with padding polyester, and sew the middle of the vegetable with a hidden seam. You can sew a needle and thread through the product, tightening it to give it a flattened shape. We attach a “pumpkin tail”, small leaves and other accessories as desired.
Kawaii felt pumpkin for Halloween
And here is a guest post from Nastya. Anastasia is a very creative and versatile person - a needlewoman, layout designer, and caring mother. And she brings a piece of herself to every direction, creating something new and magnificent. What wonderful toys she makes from wool and felt! How he optimizes websites (and at the same time creates designs)! I’m generally silent about the role of a young mother and the combination of all this.
So, I give the floor to Anastasia herself, who will tell us how to make a Halloween pumpkin with your own hands from felt - a wonderful cute souvenir for family and friends on the Night of Floating Apples ^^ After all, who said that a pumpkin must be hard?
Hello, dear readers of the blog nyaskory.ru. My name is Anastasia Kalashnikova, and I present to you today this small master class. Halloween is very soon, so I suggest sewing its symbol from felt - a cute pumpkin. The toy consists of simple parts, so it is perfect for creativity with children.
You will need:
- Orange, white and black felt;
- Orange and white floss;
- Needle;
- Scissors;
- A little padding polyester;
- Black beads for eyes;
- Ribbon or magnet optional
You can download the pattern HERE, this is what it looks like:
Pumpkinmania
The production of various textile pumpkins for interior decoration, decoration and all kinds of props has become so popular that it is no longer associated with the Halloween holiday. Fairytale houses, bags, kitchen accessories, and pumpkin-style pincushions are common inhabitants of stores and websites that sell handmade products. Textile pumpkins of all possible sizes, colors and shapes are so popular that every housewife considers it a matter of honor to have such beauty at home. A home decoration made with your own hands in the form of a delicious, bright pumpkin will delight the hostess and surprise the guests.
Pumpkins with designs and patterns for home decoration
It doesn't matter whether you can draw or not. Be sure to try decorating your pumpkin with a design or an intricate pattern. Not at all confident in your abilities? Then use a stencil or simply glue a beautiful picture onto the pumpkin. Even your child will enjoy drawing on a pumpkin.
saigonmias.com
halloween-wizard.com
homesecurity.press
Paint can also be applied in non-standard ways: with dots (using the dot painting technique) or streaks. Look how unusual it will turn out in the end! Just remember to dry the product thoroughly and protect it from moisture in the future.
miltonpd.com
homesecurity.press
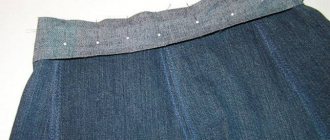
Regular push pins are a great material for decorating pumpkins! Draw the desired design on the peel with a simple pencil, and then stick it along the contour of the button. Make sure they fit snugly and don't wobble. Exclusive interior decoration is ready!
homesecurity.press
theinteriordirectory.wordpress.com
You can also cut out patterns on a pumpkin with a sharp knife. This will require some skill. So try making the pattern on a small pumpkin first. If the attempt fails, no problem! Decorate the fruit with twigs, as shown in the photo below, and make it one of the elements of the composition.