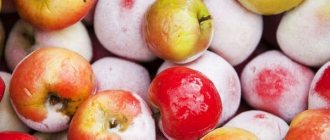
Do you like dried fruits? They are tastier than candy, and also very healthy. Now I will tell you how to dry apples in the oven on a baking sheet. This is easy to do even at home if you know some secrets.
Dried apples are used to make compotes, jelly and pies fillings, and added to muesli or granola.
Dried fruits are stored for a long time, retaining all the vitamins and microelements that are lacking in winter. They also take up little space and do not spoil for a long time (if stored correctly). This year I prepared apples for the first time. I hasten to share my impressions.
Methods for drying apples
My grandmother scattered the pieces onto oilcloth and placed them on the roof of the barn, under the sun's rays. The apples were dried in 3-4 days. This is the easiest way, but it takes a long time. It is available to residents of the private sector, as it requires a lot of free space. And the weather is not always favorable.
In a city apartment it is easier to thread dry. Apple slices are strung on it using a gypsy needle, and then hung in a well-ventilated place.
To protect against flies, cover with a piece of gauze. The advantage of this method: the pieces are open on all sides if they are not placed too tightly. This cuts the process time in half. In bright sun the garland will dry in 4-5 days.
Here are other options:
- in an electric dryer,
- on a gas stove,
- in an electric oven,
- on the balcony under the fan.
Some people try to dry apples in the microwave, but I am not a fan of this method. You won't prepare much. And prolonged exposure to microwaves creates a risk of nutrient breakdown.
Step-by-step instruction
How to dry apples in an electric oven? We have already discussed the key principles of preparing apples before drying, and we will not focus much attention on this process. After the chopped apple slices or rings are ready, they need to be placed on a wire rack lined with baking paper ( parchment paper ).
Baking trays are not suitable for this purpose - the dried fruits will be unevenly dried, and drying will take much longer than planned.
to leave the apple skin before drying is a matter of personal preference and the purpose for which you are drying the fruit.
fully peeled are most suitable so that the skin does not scratch and spoil the taste.
Which varieties are suitable for oven drying?
The easiest way to dry apples is late and mid-late varieties, sweet and sour or sour. They turn out aromatic, retain their shape well and do not crumble when cut. If you decide to use carrion or sweet varieties, you will end up with a second-class product.
Here's a list of my favorites:
- Red Delicious,
- Kuban crimson,
- Starkrimson,
- Granny Smith
- Gala,
- Golden Delicious,
- Jonathan,
- Simirenko.
Antonovka is good, but it doesn’t grow here. Do not even try to dry white filling or Melba. They are too loose and tender - they will fall apart.
It is better to dry apples freshly picked from the branches. If they fall, recycle them first. Unnoticeable defects will turn into significant damage in 1-2 days.
Wormy fruits are a separate matter. If you have reaped a large harvest, you don’t have to waste time on trifles. Otherwise, they can be dried if all damage is carefully cut out (that’s what I did).
We prepare raw materials correctly
Proper preparation of apples for drying is half the success. Preparatory activities are carried out in several stages:
- First, you should thoroughly rinse all the fruits under running water.
- The fruit should then be inspected. If there are bruises or other defects, you should carefully cut them out with a knife.
- Next, the fruits are cut into thin slices.
Not all apple varieties perform equally well when dried, so try to choose your fruit wisely.
Choosing the perfect fruits
Winter varieties of apples are the most aromatic and tasty. Their dense structure, which gives them the ability to survive in low temperatures, is excellent for slicing and drying. They do not crumble and are not watery, so it is better to opt for them.
The best varieties for harvesting are Antonovka, Titovka, Anis, Slavyanka, Borovik and Aport.
If you do not have the opportunity to choose a winter apple variety for harvesting, then you can try to dry summer varieties of fruit. However, do not forget that such apples should be dried with the skin, while this is, in principle, not required for winter apples.
Apples for drying must be selected according to the following criteria:
- Fruits of the 1st category . These are the fruits that were collected directly from the branches. There are no damages or defects on them, so they are ideal for preparing smooth and beautiful dried fruits.
- Fruits of the 2nd category . These apples can be collected from branches or from the ground. They have minor damage, such as marks from shoots, dents from the impact of a fall. In principle, such raw materials are also suitable for preparing dried fruits for the winter.
- Fruits of the 3rd category . This is an apple carrion. It may have small indentations left by worms and other defects. It is better, of course, to refuse to use such raw materials when drying, but you can dry them if you have no other choice. But before drying, you need to carefully remove all damage, leaving only the healthy part of the fruit.
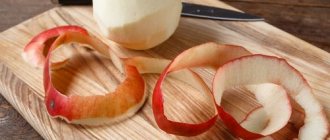
How to cut apples for drying
It would seem that what could be difficult about slicing apples for drying? But this procedure also has its own nuances, which will determine the appearance, taste and shelf life of the finished product.
Rules for cutting apples:
- Many people advise removing apple peels before drying (especially winter varieties of apples), but this is not at all necessary. It is the skin that contains the most vitamins and beneficial microelements for the body. If you plan to prepare dried fruits as a base for compote, you can leave not only the skin, but even the core. However, when drying fruit for charlotte, jelly or jam, the skin should be removed; it will spoil the taste of the finished dish due to its hardness.
- cut the fruit into circles, the thickness of each of which should be approximately 5 mm, or into slices of 7 mm. Slices that are too thick will dry unevenly (or not at all), but slices that are too thin will become “rubbery”, so you won’t be able to chew them later.
- When slicing, try to make the slices as uniform as possible so that the process of drying them occurs simultaneously and in the future you do not have to dry them separately from all other fruits.
- To prevent the slices from darkening from contact with air, they must first be soaked in a solution of citric acid (2 g per liter of water) or lemon juice.
Drying apples takes on average 5–10 hours. Drying time directly depends on the type of fruit (hard and sour apples take longer to dry), as well as the thickness of the individual slices, so try not to make the slices too thin or thick.
Optimal cooking temperature
Before putting apples in the oven for drying, consider several important nuances, namely the temperature:
- First you should set the temperature to 50–60 °C.
- Next, the temperature is gradually increased to approximately 80–95 °C.
- You should only put fruit in the oven when it is already hot enough.
- Open the oven door slightly as soon as the temperature reaches 80°C. This will make it possible to get rid of excess moisture inside the cabinet.
- Remember to constantly turn the apple slices so that they dry evenly and at the same time (and do not dry out on the parchment sheet).
How to prepare apples for drying?
To ensure that the result does not disappoint, select whole fruits that are not damaged by pests. Discard overripe and spoiled ones. Sort by size.
Dry the apples in batches. Collected from trees of different varieties - separately from each other.
Then do this:
- Wash them thoroughly under the tap.
- Inspect. Trim defects if necessary.
- Remove the core with a special round knife. Don’t peel off the skin – that’s where the health benefits lie!
- Cut the apples into slices 5-8 mm thick. Try to stick to one size.
- To prevent the pulp from darkening, immerse it in an acidic solution for 10 minutes. To prepare, use diluted lemon juice (50 ml per liter).
- After this, place them on a clean napkin to dry slightly.
Before drying, prepared apples can be powdered with cinnamon or a mixture of ground spices. Allspice, cardamom, star anise and cloves are suitable. Among the herbs, rosemary, thyme, and basil make a good company. Herbs add flavor and variety. A pinch of ground ginger won't hurt. But don't overdo it!
My neighbor in the country likes to dry it with the seeds. She cuts the fruit into slices and places them on a baking sheet. It looks funny, but it’s not very convenient to eat – the hard core gets in the way.
Ring drying option
As mentioned above, apples can be cut into slices of any shape, but always of medium thickness. Fruit rings look the most beautiful of all, which are perfect as a preparation for both aromatic compote and a delicious pie. Cutting them is more difficult than ordinary slices, but only a tiny bit.
This is done in the following way:
- Select healthy and beautiful medium-sized fruits without damage.
- Take a sharp knife and cut the apple into slices.
- Using the tip of a knife, cut out the core.
You can dry apple rings using any of the methods described above.
How to dry apples in a gas oven
I used to think that it was enough to put a baking sheet in the oven, heat it to 60-70 degrees, and wait for them to cook. It turned out that everything is not so simple...
This requires constant air movement and removal of water vapor. A convection oven meets the conditions. If it is not there, you will have to keep the door ajar and from time to time “ruffle” the slices with your hands.
For stoves with gas, convection is not provided, so the algorithm is as follows:
- Set the heating temperature to 50-55 degrees.
- Line a baking tray with baking paper.
- Place the prepared slices in one layer.
- Place them in the oven.
- Leave the door slightly open so that the moisture evaporates faster.
- After 1.5-2 hours, carefully turn over.
- When the slices are dry, reduce the heat to 45-50 oC.
- Leave until completely dry (3-4 hours).
A metal baking sheet prevents warm air from reaching the bottom of the pieces. You won't be able to use a standard grid for this. The apples greatly decrease in volume and fall down through the bars. Therefore, it is recommended to turn them over.
To get crispy apple chips, start drying at 70 oC and end at 50 oC. If you want the pulp to be easy to chew, do the opposite: start with forty or fifty, and then turn up the heat to 60 degrees.
A kilogram of fresh apples yields 150-200 grams of dried ones. The duration depends on the set temperature, the characteristics of the stove and the type of fruit. I noticed that pears take longer, but apples dry out faster. If you raise the temperature, the cooking time will be reduced.
How to reduce time?
Despite the fact that cooking dried fruits from apples in the oven, at first glance, may seem like a very simple procedure, this method has several serious disadvantages .
These include:
- The need for careful monitoring of the condition of the fruit throughout the entire drying period.
- The duration of this process.
For this reason, many housewives are thinking about how to reduce the time it takes to dry apples in the oven. How to dry apples at home in the oven quickly ? There is such a way. To do this, peeled and cut apples into slices are boiled in boiling water for 5-7 minutes, after which they are cooled under running cold water. After this, you can dry them in the oven.
The second option: keep the prepared apples in a sieve or colander over steam for 10 minutes and then cool them in cold water.
How to dry apples in the oven of an electric stove?
Almost the same as in the gas one, but with some amendments. The electric oven has several heating elements, so the apples dry more evenly. Many devices are equipped with a built-in fan, which speeds up and facilitates the process. The baking sheet is blown from all sides with hot air. In addition, convection allows you to more accurately control the temperature.
The procedure is as follows:
- Warm up to 55-60 degrees.
- Place the prepared apples on a baking sheet lined with parchment.
- Place in the oven.
- After 2 hours, the heating is increased to 75-80 oC.
- To prevent the apples from burning, after 60 minutes. the mode is reduced to a minimum (40oC) and kept until completely dry.
Turn the pieces over periodically to prevent them from sticking to the paper. If the oven is an electric oven with convection, you do not need to open the door. If not, then open it slightly, as when drying in a gas oven.
Another recipe
It is very simple to turn drying apples into an exciting activity, using the proposed recipe as a basis. Sweet dried fruits will perfectly complement jelly, fruit salad or compote.
Ingredients:
- Fruits – 1 kg
- Sugar – 0.2 kg
- Water – 1 l
The algorithm for preparing dried apple fruits is as follows:
- Remove the core and stem from the prepared fruits, cutting them in half. For beautiful dried circles, you can remove the seed pods.
- Cut the apples into thin slices of equal thickness.
Apple compote
Attention! If the drying is subsequently used for preparing jelly or compotes, then the fruits can be crushed immediately with seeds and peel.
- At this time, cook the sugar syrup, adjusting the amount of sugar to taste. Cool the syrup to room temperature.
- Place fruit preparations in a saucepan. Pour syrup over the fruits so that the liquid completely covers the apples. Leave the pan with apples in a cool place for 24 hours.
- After 24 hours, remove the apple slices from the pan and place on a baking sheet lined with parchment paper.
- Heat the oven to 60 degrees.
- Place a baking sheet with slices in a hot oven.
- After 2-3 hours, change the drying temperature, increasing to 100 degrees. The total cooking time for drying will be 6-8 hours depending on the thickness of the apple slices.
Attention! Be sure to turn the pieces over during drying.
- After the time has passed, cool the product and place it in bags, glass jars or fabric bags.
You can serve the preparation as a complete treat, sprinkled with cinnamon or powdered sugar.
How to dry apples in the microwave?
This is what I don’t recommend! Heating food takes 30-40 seconds. But prolonged exposure to an electromagnetic field deprives the product of most of its flavonoids, vitamins and other biologically active substances. If this does not stop you, or you need a small portion, then here is the procedure:
- Place the prepared apples on a porcelain or glass plate.
- Set the timer for 3 minutes.
- Turn on the microwave oven at medium power.
- After the bell rings, turn over and repeat the cycle.
If the skin is wrinkled and the flesh does not stick to your hands, it’s ready! A properly dried slice is slightly soft and creamy or light brown in color.
Exposure temperature
At what temperature do we dry? The most profitable solution is considered to be a gradual increase in temperature followed by a decrease closer to readiness. First, preheat the oven to 45-50 °C . At this stage of drying, the fruit wilts slightly. Then you can increase the heat to 70-95 ° C and leave for several hours until most of the moisture has evaporated from all the fruit.
At the final stage of drying, the temperature should be lowered again to protect the product from burning .
The apples will reach the desired state and undergo sterilization, which will be evident by a yellowish or brownish tint.
How to dry apples in an electric dryer?
It took me 8-10 hours. If I added pears (it turns out they had to be dried separately), the time increased. Sometimes I had to continue the next day. But I managed it in a week and saved the harvest!
My dryer has 4 trays. I laid out the prepared apples on them and set the temperature to 55 degrees, as indicated in the instructions. After 3-4 hours, reduced to 45 -50. If you were greedy and packed too much, the apples took longer to dry.
Every hour I changed the pallets: I moved the top one to the bottom, and the rest were raised by 1 tier. I noticed that apples dry faster on the lower rack.
Preparing the apples
I dry the fruit directly with the peel. I choose dense, mealy varieties - the less juice in the apple, the less fuss. And the smell, don’t forget the smell! The more aromatic the fruit, the better the preparation will be.
Antonovka is very good for drying; if you see it on sale, be sure to buy it.
- Wash the fruits and leave to dry. If you don't want to wait, just wipe dry, but that's extra work - and who likes that?
- Cut the apples in half and remove the core.
- Cut the fruits into slices 3-4 mm thick. If you have a slicer, don't hesitate to use it. It will save a lot of time.
- Sprinkle the slices with lemon juice or water with diluted citric acid. Now the apples will not darken from the air.
There is a second cutting option - “decorative”.
- Cut the core out of a whole fruit using a special thing - it looks like a metal tube with a sharpened end. After such a device, beautiful, even holes remain in the center of the apple.
- Cut off the top and bottom of the fruit. The trimmings can be used for compote.
- Use a slicer to cut the apples into neat circles.
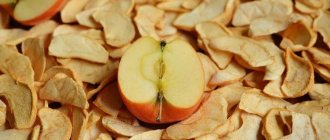
If you dry this beauty, you will get real apple chips - the ones that are sold in bags and cost 500 rubles. for 400 gr.
We recommend: How to create a marble effect on Easter eggs
You can dry it!
How to check the readiness of dried apples?
Carefully remove the thickest slice from the oven. Cool it and cut it in half with a sharp knife. The cut should be dry, not sticky. No traces of moisture or juice.
Another way: cool the dried apples. It will take 30-40 minutes. During this time, residual moisture will evaporate from them. They will become harder and denser. Use your hand to scoop up a full handful. Make a fist. If the pieces don't stick together, they're ready. If they stick to each other, continue drying.
The skin of properly dried apples is dark. The color of the pulp depends on the variety and processing. I did not put it in an acidic solution, so some of the sections darkened slightly. But I even like it. So delicious