Installation nuances:
To properly attach rivets to clothing, you need to know the principles of the procedure in different cases. You can install the accessories:
- For the finished product;
- On the part when sewing;
- On jeans.
Below are several technologies for working in different cases.
Ready product
A button is a round metal or plastic object used to fasten clothing. There are several types of devices: copper, aluminum, steel, iron. Depending on the type of material, additional tools are used.
For self-installation, use an installation kit for installing buttons on clothing. It consists of 11 items, each of which is designed to work with different types of fittings of different diameters. The set will help you attach the device to clothes, shoes, bags, wallets, and other handmade items.
The procedure for installing rivets for a finished sample of clothing will be as follows:
- Product preparation;
- Use of special tools;
- Functionality check.
First you need to prepare the product: carefully smooth it with an iron, and also mark the places where the buttons will be located. After this, it is recommended to use a special tool for installing fittings and a hammer. It is better to take a small hammer for convenience. The tool is installed on both sides where the clothes will be fastened, after which it is struck several times with a hammer. Then the buttons are carefully separated from the device. The product already has 2 fastened button parts. The last step is to check the operation of the buttons: you need to fasten and unfasten the fittings several times to check the functionality and correct installation.
Part when sewn
Manufacturers often install accessories directly during sewing on parts, for example, when making pockets on denim. In this case, the block can be installed by sewing or riveting using special pliers
Before purchasing a sewing button, you should pay attention to its design - it does not have a release mechanism, but is equipped with holes for a needle and thread
It is not recommended to make a hole for the block with your own hands. The most common mistake is using scissors. Then the hole turns out to be uneven and will become wider over time, which is why the button can easily fly out of the seat. Many people are interested in the question of how to strengthen the hole for the button: for this you can use special glue - you need to walk the substance along the edges of the hole and leave it to dry for a while.
Choosing buttons of the sewn type Do not use scissors
Sew on the product
Strengthen the button with glue
Jeans
The most common problem when wearing jeans is that they come unbuttoned. This means that the button is not securely installed. A short instruction will help you correctly solve the problem of how to rivet fittings on clothes.
| Stage | Description |
| Preparation | For beginners, it will be easiest to purchase buttons consisting of 4 parts. You will also need an awl, a splitting punch, which will help the button open. |
| Creating a hole | Using an awl, you need to make a hole in the jeans. |
| Installation | Next, you need to insert the button leg into the hole. |
| Fixation | After this, you need to place the button on the product on the anvil and hit it with a hammer. |
Next, you need to remove the anvil and check the functionality of the button by opening and closing it several times.
Choosing buttons for jeans
Preparing the awl Making a hole with an awl
We attach the button leg into the hole and fix it with a hammer
Varieties
Clothes buttons differ in the material they are made of:
- metal;
- plastic.
According to the method of fastening they can be:
- installation - secured using special tools;
- sewn - to attach them you need a thread and a needle.
Depending on their form, purpose and application, they are divided into:
- simple;
- s-shaped;
- shirts;
- magnetic;
- clasp;
- holsters;
- straps;
- tablet
O-shaped
The most common type of buttons is o-shaped. They are called simple, ring or flight, because the fastener first appeared on jackets and overalls of pilots. The design is not complicated and consists of two metal parts that fit tightly into one another. The upper component has a spring fastening.
Simple buttons are used both on different types of everyday clothing and on specialized textiles.
S-shaped
This type is of the spring type. One of the parts resembles the letter “S”, which is why they are called s-shaped. Depending on the size they are divided into several types:
- uniform - the size of the top ranges from 27 to 40 mm;
- article - half the size of the uniform;
- anorak - compact size;
- mini anorak - the upper part is less than 8 mm.
The shape of the top is varied - from flat and round to diamond-shaped, square, drop-shaped. They are fixed by sewing or fastening. The large spring allows it to withstand heavy loads.
Shirt
Shirt-type buttons differ from regular ones in the way they are fastened - not with a single pin, but thanks to 6-8 spikes. The design allows fastening fasteners on fabrics of light density. They are suitable for children's clothes, knitwear and knitted clothes, light summer jackets.
The devices are convenient to use, but quite expensive to manufacture. During installation, the material is pierced with spikes located on the ring. Their diameter varies from 9.5 mm to 40 mm. The largest ones are used on jackets.
Magnetic
Self-fastening magnetic fasteners are most often used in household products - bags, outerwear, wallets. They are convenient to use, but they are expensive to produce. The connection strength thanks to the magnet is high, and it is very easy to unfasten even with one hand. The magnetic button device includes four parts - two bases and the same number of mounting flanges. The magnet allows you to automatically select the position and close. The larger the fastener size, the greater the connection force.
Koburnaya
This type has another name - tablet. They have been produced since the times of the USSR, when they were necessary for fastening military haberdashery. The lower part of the structure is very similar to the part of the s-shaped device. The top of the lock is hollow inside, petal-shaped. Its size is 12 mm. When the button is fastened, it expands and contracts. Most often, the fasteners are nickel-plated, but they can have two more color variations - black and brown.
How to replace correctly
The procedure for replacing the matrix depends on the specific TV model. Differences in the procedure for disassembling and installing a new element are associated with the unequal design of the devices. Screws or latches are used as fastening elements. The TV is disassembled from the front or back.
When accessing from the front, release the latches holding the facing of the television panel. After disconnecting the latches, access to the matrix, screwed to the body with screws, opens. To dismantle, remove the fasteners on the rear wall, then install a new component and reassemble in the reverse order.
Since the case uses screws of different lengths, it is worth remembering their positions. Having disassembled the case, all that remains is to remove the matrices and install a new screen.
The matrix installation procedure itself is not particularly difficult, but it is important to follow the sequence of actions. In particular, you need to perform the following steps:
- After disassembling the case, a matrix is visible on which electronic boards and cables are fixed. The components are disconnected after first photographing their location.
- Disconnect the cables along the perimeter of the TV. In some types of devices, the cables are hidden under the frame.
- Having removed the matrix, it is placed next to the working one and the modules and electronic boards are transferred one by one. Immediately after transferring the board, the corresponding cable is connected to it.
- When a set of modules is connected, the case is assembled and the functionality of the display is checked.
In order for the device to function correctly, it may be necessary to match the new matrix to the modules. To do this, you need to turn on the TV, go to settings and launch the corresponding function. The detailed process is described in the instructions supplied with the equipment and may vary slightly.
What glue is suitable for repairing truck awnings?
The awning is a canvas made of synthetics, banner fabric, tarpaulin, PVC. For the repair of these materials, only certain compositions are suitable, ensuring reliable connection of several spare parts with each other.
Special glue for PVC “Winstik”
Winstik adhesive solution for PVC allows you to create a strong and transparent seam that is resistant to the influence of liquids, while maintaining its elasticity. The composition dries within a couple of days at room temperature.
"Desmokol"
Polyurethane adhesive "Desmokol" is intended for repairing PVC fabrics. The solution is transparent, so it does not leave marks or streaks after drying. Due to its easy flammability, contact of the substance with heating appliances or open fire should be avoided during operation. After application, the solution provides a strong connection of the surfaces, without the risk of displacement and tearing of the patch from the awning structure.
"Cosmofen"
The Cosmofen mixture has universal characteristics, which allows it to be used with any materials. Quick-setting cyanoacrylate adhesive is easy to apply and requires tight compression of the treated area with a press for a strong connection. The solution endures ambient temperatures of up to +80 degrees, so the seam should not be exposed to more heat to prevent the glue from melting. Due to the release of toxic components when using Cosmofen, it is necessary to repair the car awning in a constantly ventilated area.
Rapid
The thermoplastic composition of the Rapid brand reliably eliminates defects on the awning, maintaining the tightness of the canvas in the damaged area. The adhesive must be used in combination with a hardener and heated before application. The solution is suitable for repairing fabric awnings.
Instructions for replacing the button
To install a new fastener, you need to perform several steps:
- Dismantle the old one if it is out of order.
- Use an old hole or make a new one.
- Insert a button into the hole.
- Put on the fixation ring.
- Use a flat surface to install the fastener.
- Divide it into four parts with a punch.
- Roll the petals with a hammer.
It is worth having several spare buttons so that you have something to replace damaged ones, since the pin petals often break.
Removing the old button
The process of removing an old, failed push-button fastener is simple, but it is important not to damage the fabric. You should prepare a pair of pliers and a knife whose blade does not bend
You should prepare a pair of pliers and a knife whose blade does not bend.
Procedure:
- At the bottom of the fastener, carefully place the blade of a knife between the button and the material from the underside of the product and bend the metal edge.
- Do the same on the front of the garment, symmetrically to the back.
- The edge should be bent so that you can grab it with pliers.
- On both sides of the fabric, grab the folded edges with pliers and, using a little force, separate the two parts.
- To remove the upper part, use pliers to grab its front and back parts and, twisting, separate it.
Gluing the front part
To attach the front part, perform a series of sequential actions:
- Prepare a wooden plank.
- Make a hole for the fastener using a thick awl or punch.
- Insert the button cylinder into the prepared hole.
- Place the spring part on top.
- Roll the edge using a tapered awl.
To avoid rapid fraying of the edges on synthetic fabric or the formation of torn edges, the awl is heated over a fire before piercing the fabric.
Assembly of the reverse part
To assemble the lower part, you need to prepare a small device. It is a board with a hole slightly larger in size than the part. The tool used is a hammer with a flat striking surface.
The order of the operation is as follows:
- Make a hole using an awl or punch.
- Insert the button into the notch.
- Pass the fabric into the second part of the reverse part.
- Combine both parts.
- Connect the parts with a gentle blow of a hammer.
Is a punch necessary?
Replacing or putting a button on something without a punch is extremely difficult. If you make a hole with scissors, it will spread and the button will quickly fall out. In specialized stores you can buy a manual punch, which also allows you to make beautiful holes for buttons. It looks like a metal cylinder and is often equipped with nozzles of different diameters.
If you don’t have professional tools, you can use a Phillips screwdriver or an awl, but using them to make a perfectly straight hole is extremely difficult. A hand punch is a useful household item that allows you to quickly and efficiently put a button on a trigger or other clothing, so you shouldn’t save money on buying one. The procedure is carried out step by step, with mandatory preparation of the product and marking of the fabric.
For those who are going to start sewing or constantly repair clothes, it is better to acquire professional tools - a press or tongs. These are tools that make it easier to fix buttons because they do almost all the work. There is no point in saving on such devices - cheap models often have handles that break, causing them to become unusable.
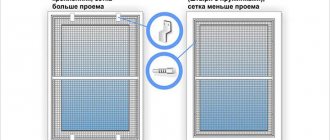
What do the numbers mean?
The numerical designations refer to the size of the teeth: they show the width in millimeters when the zipper is closed. Markings are applied to the slider from the inside. The shape of the upper part of the tongue depends on the type of links.
Metal teeth come in 3, 5, 8, 10 millimeters, the top of the slider has a triangular shape. Molded plastic teeth (tractor) - 3, 5.7, 8, 10 millimeters, oval or trefoil-shaped runner. Twisted plastic links (spiral) - 2, 3, 4, 5, 6, 7, 9, 10 millimeters, the slider resembles an oval. The longer the teeth, the stronger the connection against tearing and stretching.
Metal fasteners
The teeth of a metal zipper are made of flat brass or nickel wire. The shape of the links is asymmetrical: on one side there is a protrusion, on the other there is a recess. The connection with the braid is two-way. The quality of the clutch is high, but due to the misalignment of the teeth, the slider may “stick.”
Tractor zippers
The fastener consists of wide plastic teeth attached to a thick band on one side. The shape of the links resembles a caterpillar track. The advantage of such a zipper is the wear resistance of the links. But in terms of the fastening method, it is inferior in strength to metal and twisted fasteners.
Twisted clasps
A zipper is made from a fishing line rolled into a spiral. The fiber is wound or sewn onto the braid. The adhesion is formed by the fiber protrusions on both sides.
How to strengthen the button on a jacket so that it does not unfasten?
How to strengthen the button on a jacket so that it does not unfasten? The button on the jacket keeps coming undone, is there anything I can do?
toshiba
Achievement received 05/17/2019
The clothes button consists of two halves, one of which contains a protrusion in the form of a sphere, followed by a narrowing. Externally, this protrusion is very similar to the top of a chess pawn. The second half has a cavity in the form of a blind hole, inside of which there are two pieces of steel spring wire. During the fastening process, the spherical protrusion pushes the spring wires apart. This continues until the expanded antennae reach the point of narrowing. In a narrow place, the wires come closer together, which ensures a reliable connection of both elements of the fastener. During unfastening, the process is repeated in the same order.
There are only three reasons for button “incontinence” and all of them can be easily eliminated. The first reason is that on the half of the button where the spherical protrusion is present, there is too little difference between the widest part of the sphere and the narrowed part. The closed wire whiskers, with the slightest pull, immediately disengage, barely moving apart. The defect is eliminated either by sawing out a deeper groove at the point where the protrusion narrows (if the thickness of the metal allows), or by forming a more prominent recess by compressing the protrusion of the button using ordinary metal cutters. The main thing is not to overdo it and not to bite off the protruding element completely. Therefore, the operation should be performed without unnecessary effort, without trying to perform it in one step. It is better to make several light compressions, distributing them evenly over the entire diameter.
The second reason lies in the response part of the button with spring wires. They may initially be spread too widely. You can bring them closer and reduce the distance between them using round pliers with narrow jaws, tweezers or tweezers from a ladies' cosmetic bag. If the button uses low-quality wire that does not restore its shape well, then the procedure will have to be repeated regularly as the fastener loosens. The risk of breaking the wire tendrils is low, since the wire only breaks at sharp bends.
Reason number three is disguised as an extraneous inclusion, again in the response part of the button. An extraneous inclusion may be debris that has accidentally accumulated in a blind hole, for example in the form of fabric fibers from clothing. This debris significantly reduces the tenacity of the fastener. Firstly, it prevents the wire springs from fully closing. Secondly, the speck prevents the protrusion of the button from completely penetrating deep into the hole in the mating part. Even if the springs are of high quality, they simply do not reach the place where they are supposed to connect and arrive in a half-open state. In this case, the problem can be resolved by simply cleaning the counter part of the button and removing the blockage using a thick sewing needle.
I first encountered the problem of weak buttons in the early nineties, when shuttle merchants imported leather jackets from Turkey in huge quantities. The buttons haven't gotten any better since then. I managed to restore the functionality of several dozen buttons with my own hands. Everything works fine.
How to install a button on clothes at home?
Of course, if you have the opportunity, then entrust the installation of accessories to a master who has a special press, various devices, a set of tools, and most importantly, experience, thanks to which such work will not take him much time. If you don’t have this option, or you want to find out for yourself how to install a button on clothes, then prepare the following tools:
- Awl.
- Hammer.
- Forceps.
- Punch. You will have to purchase this tool. It is necessary to ensure that the hole is smooth and the edges of the fabric do not fray.
Adviсe:
- Do not cut a hole for the block with scissors, as over time the button or block will definitely “fall out” of it. The hole for the button should be minimal, it is advisable to even slightly stretch the fabric over the leg, since the tighter the fabric is pressed against the part, the more securely it will be fixed.
- Punch a hole in leather or fabric using a wooden anvil (not metal) to avoid damaging the tip of the punch. The wood should be very dense (not loose). An area with a knot will do. You can use other dense materials as an anvil that will not damage the punch.
- Areas on knitted and bulk materials where holes will be punched can be glued with adhesive fabric so that the edges of the hole do not fray. You can also treat the edges of the hole with silicone glue.
Rivet installation process
It is necessary to work with tools carefully, slowly and without making sudden movements. Otherwise, the fabric, accessories or tools may be damaged.
The most common type of installation of accessories is the installation of a block on clothing. In workshops and ateliers, forceps are used for this procedure. However, such a tool must be purchased of good quality so that the handles do not bend and the “cheeks” do not move.
Don’t despair if you don’t have special forceps at hand; you can do without them at home. Use the following step-by-step instructions:
- Use a punch to make a hole of the required diameter in textile material or leather.
- Thread the block leg and put a ring on it.
- Place the piece of clothing with the block on the anvil.
- Use a punch to split the stem of the block into petals. If all the steps are done correctly, the petals should bend on their own on the block ring.
- Lightly go over the block with a hammer to finally secure it to the fabric.
When working, place the ring with the convex side away from you so that it repeats the convex shape of the edge of the block.
How to attach buttons to clothes?
The most difficult process is installing rivets on the rough fabric that outerwear is often made from. Difficulties also accompany installing rivets on jeans. But if you use a good tool and follow all the technological steps, you will probably be able to attach the button to your clothes.
You will need the same tool as when installing the block. Sometimes, special punches are included for this type of button, but using them is ineffective. It is much more convenient to use a punch that splits the stem into petals.
To make a rivet on a jacket or other outerwear, proceed as follows:
- Unbend the leg of the four-part button at the top and bottom.
- Carry out the standard riveting process (described above).
Tools
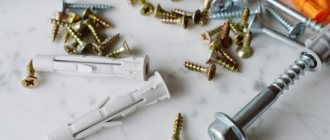
Using rivets on clothes, you can significantly transform the appearance of the product. Most often, metal fittings are used on jeans, leather jackets and other items made of thick fabric. To install the blocks, you will need the following tools:
- Press for punching holes. A special device made of steel allows you to instantly punch a hole. Before making a hole, the master marks it. Then he brings the textile to a special area under the tool and presses the press. Under the weight of the press, a hole is formed - it is always smooth and small. Workshops often use a large number of attachments for different button diameters;
- Manual punch. This tool looks like an oblong cylinder of small diameter; it is also equipped with attachments. The punch helps to obtain smooth and beautiful holes;
- Hammer. Without a hammer, the punch will not work. When installing buttons on clothes, the master fixes the punch at the site where the future hole will form and hits it with a hammer several times;
- Chalk or soap. These tools are necessary for marking future holes. Usually soap and chalk are used, since the blocks are placed on jeans. If the fabric is painted in a light color, use a fabric marker.
In addition to the listed devices, you need a mini anvil where the punch will work, an awl for making holes and scissors.
Soap or chalk
Press Manual Punch
Hammer
Self-installation of buttons on clothes
Of course, only a master with special equipment, a professional set of tools, a number of devices and extensive experience will give a guaranteed result. But it happens that there is no time or money for a atelier, so you have to install the button on the clothes yourself at home. This is not so difficult to do if you prepare the following tools:
- Forceps.
- Hammer.
- Awl.
- Punch - creates even holes, you need to buy it.
Important! You usually buy one punch, but with the right approach it is better to purchase a set with interchangeable tips. Anvil (you can use a second hammer as it)
Anvil (you can use a second hammer as it).
Recommendations
- Do not cut holes using scissors. The hole for the button should be small so that the button foot fits tightly and securely in it.
- When piercing leather or fabric, it is better to use a wooden anvil made of dense wood rather than a metal one (ideal if this is an area with a knot).
- Areas on knitted and loose materials must be glued with adhesive fabric, otherwise the edges of the hole will crumble. As an alternative, you can use silicone glue.
Important! To gain experience, it’s better to start with inexpensive clothes, because if the result is negative, you won’t be as sorry for them as branded items
Installation of rivets
When working with tools, you need to act carefully, slowly, without any sudden movements and with extreme caution. If you rush, the fabric or accessories can be damaged
The most popular type of installation is installing a block on clothing. Craftsmen use tongs, which must be purchased at the studio. A high-quality tool should have rigid handles.
If you don’t have special forceps at hand, this is not a problem if you follow these instructions:
- Use a punch to make the desired hole in the clothing.
- Thread the block leg and put a ring on it.
- Transfer the clothes to the anvil.
- Use a punch to split the stem into petals.
- Tap the block with a hammer to firmly secure it to the clothing.
Important! Place the ring with the convex side facing away from you. When working with a hammer, do not apply excessive force, otherwise the block will break or the fabric of clothing will tear.
Attaching buttons to clothing
The most difficult and responsible process is installing rivets on outerwear. Installing rivets on jeans is no less difficult, but using a set of tools and carefully following the technological steps described in the article, you can make this task simple and feasible.
Important! The easiest way to install buttons on outerwear are those that are assembled from four parts connected by a ring. Having prepared a set of tools, you can proceed to installing buttons on outerwear, this should be done like this:
Having prepared a set of tools, you can proceed to installing buttons on outerwear, this should be done like this:
- Unbend the leg of the button from the bottom and top.
- We carry out the riveting process.
Types of accessories
Accessories for clothing are:
- Hooks.
- Buttons.
- Blocks.
- Lightning.
- Loops.
- Buckles.
- Rivets – utilitarian and decorative.
- Eyelets – plastic or metal.
- Holniten - metal rivets on denim clothing.
- Textile Velcro fasteners.
Important! The service life of the fittings and its quality are determined by the material from which it is made. The main purpose of the accessories is decorative, because thanks to them the clothes should be more elegant and elegant.
At the moment, most fasteners and fasteners are made from the following materials:
- Plastic.
- Metal.
- Ceramics.
- A combination of several materials - in this way you can combine beautiful appearance and practicality.
Important! If the fittings are not chosen correctly, for example, the type of fabric was not taken into account, then it will not cope with its functional task, will quickly fail and will need to be replaced.
How to put on a denim button?
To install the simplest button on jeans, proceed as follows:
- Poke a hole in the waistband of your trousers with an awl.
- Insert the button shank into the hole.
- Place the button on an anvil (on a metal surface) and hammer in the shank. It is the leg, not the button, otherwise you will damage the decorative element.
Important! To install a button of a more complex design, the leg of which will move freely, you will need a dowel cut down on sandpaper, since the leg of such a button will need to be flared on the button itself. Step-by-step instructions on how to install buttons on clothes at home:
Step-by-step instructions on how to install buttons on clothes at home:
- Thread the stem of the button into the waistband.
- Place the button on the shaft.
- Assess how far the stem extends from the button. If necessary, “bite off” the edge of the part with pliers. Otherwise, the leg will bend and it will be impossible to flare it.
- Place the button on the anvil.
- Place the dowel on the center of the button shank and, by lightly tapping with a hammer, flare the shank until it fits snugly with the cap body.
How to remove a broken button
It happens that during wearing, the installed product breaks along with the clothes: how to remove the button in this case is discussed below:
- First you need to prepare the tools: you will need a straight screwdriver, pliers, an awl, a file and a chisel;
- Before removing the fittings, it is necessary to grind off the head of the rivet with a file;
- Care must be taken during the procedure to prevent damage to fingers and clothing;
- Having dealt with the head, you need to bend the metal teeth and pull out the rod.
Now, knowing all the nuances of installing accessories on clothes - how to install a rivet and how to remove it - you can safely go shopping for a variety of buttons, blocks and eyelets to add beautiful decorative elements to your wardrobe.
Cutting the button using scissors
Rules for removing a button