Basic rules for cleaning and caring for polished furniture
In order not to have to learn the rules for cleaning polished furniture, you need to properly care for it. Firstly, it needs to be cleaned of dust every day with a dry cloth. Do not install furniture in a sunny room or in a room with high humidity.
No matter how carefully you care for such furniture, over time, scratches and even cracks will still appear on it.
The point is the possible deformation of the product. Secondly, you cannot place cold or hot products on the surface of the furniture. Do not use cold water or boiling water when cleaning. This may cause the finish to crack and cause white spots.
Old furniture that was made to last is subject to restoration.
Thirdly, due to fear of heat and cold, polished furniture should not be placed next to the stove and windows.
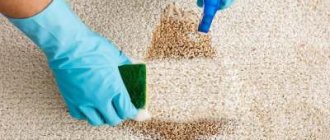
Note! To remove fingerprints from its surface, it is better to use a dry cloth. To remove greasy stains, you will need a soap solution, soda and adsorbents with a soft cloth. For more difficult stains, you can use a washing gum and ammonia mixed with water.
Use the advice of professionals to polish your furniture.
How to restore polish at home
If polished furniture has received scratches, you can restore them yourself using three simple methods:
- Rubbing the damaged area with walnuts, thoroughly polishing the texture with a cloth;
- Using shoe polish (choosing a suitable color, carefully applying the composition to the surface and carefully polishing the texture using flannel cloth);
- The use of special production products for polishing, surface repair or a marker with a suitable color.
When chipped, it is necessary to determine the composition of the polish. This can be a traditional varnish with shellac, polyurethane or polish. The composition is selected through independent visual selection.
You can simply refresh the faded polish on furniture using mixtures you prepare yourself.
Before applying the solution, be sure to thoroughly sand the surface.
Assessment of the degree of coating wear
After looking at countless photos before and after restoration, almost all people are inspired. After this, they try to work on improving their furniture.
I can say that it is no more difficult than restoring a mirror. And it’s no easier compared to repairing wooden chairs. We have already talked about these procedures, and therefore I suggest you follow the links and read our materials, leave reviews and share your personal experience.
The first step of restoration requires a visual assessment of the current condition of the surfaces. The first sign is specifically visual aging. Darkening often occurs near threaded connections, the varnish cracks, and a huge number of chips can also occur. The aging of the varnish and the end of its current cycle are indicated by small nets on the surface. Yes, it’s not always small flaws that significantly affect the overall picture.
But there are also cases when the usual removal of the old layer and application of a new coating cannot be done.
Think about whether there is any point in restoration. If yes, then get to work.
Rules for painting polished furniture
Before you paint an object and start thinking about how to restore the polish on furniture, you need to choose a composition. To do this, drop alcohol onto the surface. Polyurethane will not affect the alcohol, shellac will absorb it, and the varnish will begin to swell.
There are special products for polishing furniture.
Before completing the painting work, it is necessary to go through the stage of preparation, priming and painting itself.
Preparatory stage
Before restoring lacquered furniture, it is necessary to carry out preparatory work. The first step is to remove the old polish.
Furniture must be cleaned before polishing.
To do this you need to use:
- special composition for removing polish;
- steel wool, sandpaper;
- paper napkin, spatula;
- wide brush.
Quite often you have to remove the polishing: it is not the most fashionable finish.
In this case, the composition for removing polish can be thick or liquid. Conditions of use: the thick composition is ideal for vertical surfaces. Liquid will be useful in hard-to-reach places.
Use professional polishing products.
The step-by-step instructions for the preparatory stage are as follows:
- first you need to pour the composition into any container, take a brush or an old toothbrush;
- Next, you should remove the old polish in the direction of the wood grain;
- then repeat the procedure for removing the old composition;
- then remove polishing residues using steel wool;
- Apply a thin layer of the product to the cleaned surface, remove it with paper and smooth out any irregularities with sandpaper.
Advice. When removing the old layer, you must use eye and hand protection. Carry out work in a ventilated place.
Apply polishing using special gloves.
Primer
After removing the polishing, be sure to remove cracks and chips with fine-grained wood putty.
Choose a quality primer.
Sand the dried mixture with sandpaper. For high-quality restoration of furniture, it is necessary to apply a primer to the surface.
The surface must be coated with a primer in one layer.
It will provide protection against paint peeling.
The painting process itself
Varnishing should be done carefully, without rushing.
After priming, the table is sanded again.
In this case, you should ensure that there are no smudges with spaces. Use several layers of paint, but if the surface is heavily damaged, apply a third final coat. Apply each layer as the previous one dries.
Varnish the surface of the furniture with high quality.
Note! The better the varnishing is done, the better the result will be. The most important thing is to choose the right paint. You can use stain, varnish, alkyd paint or acrylic paint. In order to restore some of the former shine to the surface, it is recommended to apply a couple of layers of varnish. This is a difficult process that can take a couple of days.
How long does it take for restoration?
You can repair and restore furniture at home as much as necessary - small items can be dealt with in one day, larger projects can take months to restore. The service life also depends on the materials used - each varnish, primer, putty or paint has a certain drying period, which must be waited. If you do not allow the layers to dry, the final result will be unpredictable.
Important point! Read the instructions carefully before using any product and follow them. Before applying the next layer, the previous one must dry for as long as the manufacturer recommends.
To prevent paint coatings from deteriorating, tightly close the containers with them during breaks between work.
To speed up the restoration process, purchase in advance compounds that dry quickly. Thus, there are many coatings on the market that do not require long drying. Before purchasing, it would be useful to read reviews about a particular product.
Preliminary planning, by the way, is necessary for all stages of work and acquisitions. In order not to go to the hardware store several times, even at the initial stage you need to carefully think about what tools, devices and materials you will need - you need to buy them at once and keep them on hand. Then the process of restoration work will not drag on for long.
It’s better to go to the store with an approved list of necessary purchases
How to remove dirt from polished furniture
To wash dirt from home furniture, you can use a special chemical solution from the manufacturer or improvised materials. You can even wash the surface with tooth powder dissolved in ammonia.
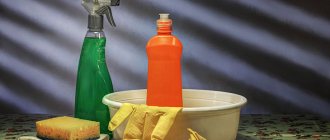
It is also necessary to prepare means for treating the surface of the product.
Preparation of a special solution
To remove dirt from polished furniture, you can use a special solution and antistatic agent for clothing, hair shampoo and several glasses of water at room temperature.
Folk remedies are suitable for preventive cleaning.
The resulting mixture will get rid of stubborn stains, grease and dust.
Use of beer
Beer is an excellent way to remove ink stains, stubborn dirt, grease and paint marks. A dark, intoxicating drink can remove ink, and a light drink with added sugar can remove fat and the rest.
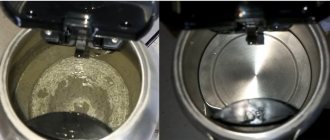
Photo: example of a polished table before and after.
When using beer as a cleaning agent, remember that furniture polishing does not tolerate icy liquids.
Olive oil or wine vinegar
If small scratches appear on the surface, it is recommended to use a mixture of olive oil and wine vinegar (or maybe some red wine).
The oil can be used on almost any surface, except those that are highly absorbent.
After mixing the solution, apply the mixture to the surface and rub it with an old toothbrush. After a few minutes, you need to wipe the cabinet or table with a flannel napkin.
Oil protects wood from moisture.
Burr oil
You can quickly remove dirt, greasy stains or white marks from varnished furniture with burdock and linseed oil. A mixture of pure gasoline, denatured alcohol and the indicated oils will be useful. It will help remove grease, stubborn dirt, scratches, paint marks, pen marks and a number of other troubles.
Polishing furniture improves its appearance and improves many functional characteristics.
In this case, the smell of the infusion will help remove denatured alcohol and a cloth napkin.
Tea brewing
Tea leaves will also be useful in removing dirt and cleaning polished furniture. To use it, you need to wrap the used tea mixture in a paper towel.
Tea leaves will help improve the appearance of furniture.
Use the resulting bundle to wipe the stained area and, as the stains are removed, wipe the table, cabinet and other object with a dry rag.
Remaking an old wall: changing the design
That’s not what’s trending today. But plain or patterned ones are what can turn an old wall into new furniture. The steps are simple, but the work requires care. But the result is excellent. See two photos. The first one shows an old Soviet chipboard wall before renovation, the second one shows it after.
Updating an old furniture wall - before and after
Now about how it was updated. Compacted furniture self-adhesive film was used, cream color, matte surface. The open part of the old wall was closed with glass doors; a translucent matte film was used for the glass. The edging is furniture layout (also self-adhesive) chrome color. The order of work is as follows:
- Everything that can be removed, you remove and disassemble. Remove old fittings.
- Surfaces must be clean and free of grease. This is easier to achieve with a soft cloth soaked in dishwashing detergent. Then everything is washed off with warm water and a small amount of vinegar. Wipe with a dry cloth.
- Cut out the details. It is better to cut the film 8-10 mm larger. The remains are then cut off with a paper knife.
- Spray the part to be glued with water from a spray bottle. On a wet surface, the film can be moved if something goes wrong. You can even peel it off without damaging it.
- After removing the protective layer from the film, carefully lay it out. Having leveled it, begin to smooth it with a soft cloth from the middle to the edges. Try not to have any bubbles. To do this, you need to move gradually, without jumping from place to place.
- If there is still a bubble, you can pierce it with a thin needle approximately in the middle. Then expel air from the edges of the bubble to the hole and rub the puncture site.
- Having glued the film, take a clean thin cotton cloth, spread it on top and iron it with a warm iron (medium heat).
- We glue the trim and install new handles.
This is the sequence of work with every detail. It’s the same with glass, you just need to glue it to the inner surface. After assembly you have a renewed wall. This technique can be used for any item: chest of drawers, bedside tables, wardrobe, kitchen set, etc.
With lighting, the updated wall looks magical
For example, after a successful experiment with a wall, we remodeled an old cabinet in the same way and added it to the right. Now the entire wall is occupied. You can update your kitchen set in the same way: apply self-adhesive film and replace the handles.
A simple renovation of an old Soviet-era wall: paste suitable non-woven wallpaper on the doors
What's good about this method: it's easy to change the decor. Tired of the old appearance, they tore off the wallpaper and put on new ones. Despite the fact that the method seems frivolous, the appearance is maintained for several years. Its author even tried it on a kitchen set.
Sometimes wallpaper is varnished. But before you do this, try it on a scrap piece: see how they react to it.
You might be interested in reading how to make a bar counter in the kitchen yourself (several options)
Using the same technology, a banal coffee table can be turned into a modern piece of furniture. In this case, it was covered with wrapping paper. It is dense, adheres well and does not become limp when applying varnish.
Before starting work on decorating the tabletop, the legs of the old table and the edges of the tabletop were painted in a light color: this way it fits better with the new design style. Then the process of its transformation began.
When pasting, the panel is cut out significantly larger than the dimensions of the tabletop. It's necessary. The paper is glued to PVA and rolled with a roller so that there are no lumps or blisters. The surface must be absolutely smooth.
The paper is glued gradually, roll it with a roller so that there are no bubbles
How to make a beautiful edge
Even cutting with a guillotine will not give you a fairly even edge. And with this method, it turns out professionally designed. There is no smell of amateur activity.
This is what the edge looks like when all the excess has been removed
After the glue has dried, the surface is coated twice with a thin layer of varnish. It should be applied with a soft brush in a small amount. Layers are applied in different directions: first along the long side, then across.
What kind of shelves there are and drawings for making them yourself can be found in this article.
Remaking furniture with your own hands is a creative endeavor. Even from a boring shelf you can make a great thing. And it is not at all necessary to repeat exactly what you saw. Many useful ideas come during the implementation of a “project”.
It’s just a pity that some of what was planned turns out to be not as attractive as it seemed. Try it, experiment. Fortunately, modern technologies allow this to be done at minimal cost.
How to restore lacquered furniture
If you intend to restore small areas of lacquered furniture, you will need regular shoe polish. A universal colorless composition is suitable. You can also use wax if the polished item has dulled over the years and lost its appearance.
Of course, to start polishing and varnishing furniture, as well as restoring it, you will need patience and studying the life hacks presented above. But if you use the methods correctly, the result will be visible immediately.
Caring for matte furniture without polishing is much easier.