How to reduce humidity in the basement and cellar
So, now let’s figure out how to use simple means to reduce humidity and keep the walls dry.
- First of all, check whether all windows and doors through which moisture can enter the cellar are tightly closed. Replace door and window seals. Inspect the walls and floor for cracks and crevices and repair them if necessary.
- Move all basement shelves, cabinets, furniture and other items a few inches away from the walls. This will allow air to circulate better and moisture to dry faster.
- To quickly dry a room, use fans and heat guns or electric heaters. For a more detailed guide, see our article “How to Dry a Cellar.”
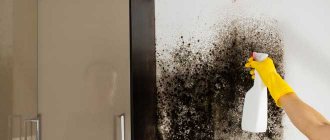
- If mold appears, you can remove it yourself, provided that it is only a small area. To do this, you will need 70 percent alcohol, protective equipment (mask, goggles, gloves) and a rag. Since there may be mold spores in the air, windows should be opened. A rag is soaked in alcohol and the affected areas are wiped with it. This treatment may need to be repeated several times.
- Then clean the basement with a vacuum cleaner and mop.
- Only after the basement has completely dried, no longer damp, apply at least 3 mm of sealing solution to the walls with a brush. Additionally, glue insulation boards onto the sealing solution.
- Finally, all that remains is to plaster the insulating panels with restoration plaster.
- Basements in older buildings are often lined with brick, and moisture can penetrate the bricks over time. In these cases, you can modify the masonry to prevent moisture penetration.
- It is also recommended to upgrade or completely replace the drainage system and waterproofing of the wall. However, it will be better if this work is performed by a specialist. Non-professionals will not be able to fully assess the extent of structural damage, and incorrect actions will only worsen the problem.
Installation of waterproofing for a garage
In many cases, dampness in the garage occurs when there is no concrete floor. If you are building a garage yourself, do not be lazy to fill the floor; damp soil will have a bad effect on the room, and in the end all the work will be done down the drain. After all, the garage will not justify itself, but will bring even more problems.
Therefore, it is necessary to fill the screed with reinforcement. But don’t forget, all this should be done on a bed of gravel and sand.
It must be remembered that the screed does not prevent the appearance of dampness in all cases. Groundwater, which may be close to the base of your garage, interacts well with concrete, and it, in turn, releases the resulting moisture into the room.
Important! Before starting work, find out the groundwater level in the area of your garage. If water is close, be sure to install waterproofing
It happens that a concrete screed is installed simply without waterproofing. There is a solution to this problem: insulate the surface with a self-leveling floor. A thin layer will be enough to prevent moisture from entering the garage.
In concrete garages that are not insulated, moisture can enter through the walls, namely through their base. In this case, you will need a special grease for walls; it is applied to the inside of the wall. Thanks to it, the wall will not become damp. But, do not apply the mixture very close to the floor, the distance from the base of the wall should be 30–40 centimeters, and you need to isolate the joints that are located between the inner wall and the floor.
Ways to combat pathogenic microorganisms
Excess moisture that is not dried in the cellar in time leads to the massive development of harmful microorganisms. All kinds of mold and fungi multiply rapidly and cause harm both to all wooden structures and to products stored openly. Spores of harmful microflora have a very detrimental effect on a person in an infected basement. The following agents are available to combat pathogenic microorganisms:
- Quicklime (install a barrel of lime in a ratio of 3 kilograms of dry lime per 1 cubic meter of volume, fill with water, leave the room, seal the basement, ventilate after two days).
- Sulfur checker (you must first remove metal objects from the cellar or cover them with a layer of lubricant. Place the checker on a fireproof stand, light the wick, trying not to inhale the smoke, quickly leave the room being processed, tightly close the hatch and ventilation, ventilate for 24 hours every other day).
Rising damp
The reason is water that has soaked the floor and walls; dampness then typically covers a surface up to one meter wide above ground level. This is a constant problem, even in dry weather.
The main areas that need to be monitored for increased dampness are the damp proofing around the walls and the damp proof film on the ground floor. Older properties, often built without either, can contribute to widespread damp.
If the materials from which such a house is built deteriorate or are damaged as a result of the displacement of its structural elements, then they can be insulated, but this cannot be done with damp spots that occur in places where water penetrates.
A layer of waterproofing that is less than 150mm thick allows water to pass over its surface, seep through the walls and ultimately cause damp patches at baseboard level. If the waterproofing comes into contact with a layer of exterior or interior plaster, the dampness will rise above the baseboard. Spaces filled with rubble, soil or plants pressed against the wall can also allow damp to penetrate.
The gaps between the masonry of the opening and the perimeter of the wooden window frame no doubt allow rainwater to pass through, which in turn leads to damp patches.
Injecting a silicone layer onto the inner surface of the wall; to do this, you will need the help of specialists.
Water vapor from household work can cause condensation.
Condensation is a common feature of our modern, draft-proof homes, but to maintain your home and your family's health, it is important to control condensation.
External drainage
An effective measure against dampness in the cellar can be to drain groundwater outside the garage or into the sewer system. But external drainage can only be installed for a detached garage. This method is not applicable in cooperative garages. It is advisable to provide for external drainage at the initial stage of construction, but if this point is missed, the method described below can also drain water from the constructed premises.
Stages of external drainage construction.
Basement drainage diagram.
- A trench 40-50 cm wide and the same depth is marked and dug along the perimeter of the cellar floor.
- Wells are drilled to the first layer of sand every 2 m. Plastic tubes are inserted into the wells and covered with a metal grid with a fine mesh to protect against crumbling soil.
- A geotextile fabric is laid on the bottom and walls of the trench with an overlap at its edges. The trench is filled with crushed stone or gravel to a level just above the base of the cellar wall, and the backfill is carefully compacted.
- The edges of the canvas are carefully wrapped around the filled gravel, forming a kind of drainage pipe that prevents the accumulation of drainage water.
- The structure is filled with the remaining soil and compacted.
When constructing wells, drainage pipes should not be buried too deep, as wastewater may enter the aquifer.
Preventing dampness
As usual, this “disease” is easier (and cheaper) to prevent than to treat. Still being decided at the design stage:
- If groundwater is close or its level rises significantly in spring/autumn, external waterproofing is necessary. Liquid compounds are applied to the outside walls (better) or rolled ones are fused (cheaper, but less effective).
- If the cellar is being built on a slope, a drainage pipe must be laid in the ground above it, which will drain the precipitation flowing down the slope.
- A blind area is made around the cellar (or the building under which it is located), which removes precipitation flowing from the roof.
- Inside the cellar, in opposite corners, there must be two ventilation pipes with a diameter of at least 125 mm. One of them ends at floor level - 10 cm higher. Air from the street or room enters through it (supply pipe). The second ends almost at the ceiling - 10 cm below its level. This is a hood. Ventilation pipes on the street should be covered with umbrellas to prevent leaves and precipitation from getting into them. The exhaust pipe (the one that ends near the ceiling) should be higher and it is better to install a deflector on it to activate the draft. It can be painted black: due to heating from the sun, the draft should be better. Another subtlety: for good traction, ventilation ducts with natural air movement must be straight. If it is necessary to make a bend to the side, its angle of inclination must be at least 60° relative to the horizon, and the length of the inclined section should not exceed 100 cm.
- Between the room located above and the basement there should be a vapor barrier that prevents moisture from penetrating both from the basement and into the basement.
Inspecting the floor
Very often the floor in the cellar is made of earth. This is often the source of excess moisture. Through it, the moisture contained in the soil gets inside. To reduce humidity in the cellar, you need to level the earthen floor, compact it and cover it with thick plastic film. You can use roofing felt, but it breaks more often. Although it seems more durable, it breaks due to less elasticity.
There is no need to pour sand or soil on top of the film. Sometimes there is a large amount of water in the basement (accidental flooding). Then you simply remove the film, the water goes partly into the ground, partly evaporates through the ventilation. After the dampness has gone, you can re-cover the floor. If there is earth or sand on top, you will need to poke around in this slurry, extracting the film.
If the floor in the cellar is earthen, most of the moisture enters through it
If after laying the film the humidity level in the cellar has decreased, then you have found the reason. You can leave everything as is, just change the “flooring” periodically, or you can make a concrete floor with full waterproofing. The choice is yours. To prevent the film from tearing when people walk on it, knock down the wooden panels and throw them on the floor.
Improving waterproofing
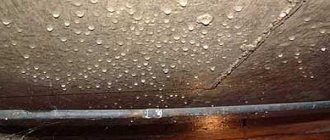
The second reason why humidity increases in the basement is an insufficient degree of vapor barrier or waterproofing of the walls. This usually occurs if the cellar is lined with brick, especially silicate brick. The material is very hygroscopic and allows water vapor to pass through well. They settle in drops on the ceiling and all objects.
The problem can be solved if you make good external waterproofing: dig out the walls and apply bitumen mastic in two layers. Previously, they were coated with resin, but mastic is more effective and easier to handle.
Brick walls require additional waterproofing
But excavation work is not always a joy, and it’s not always possible to dig out the walls. In this case, you can make internal waterproofing of the cellar walls. For this purpose, there are cement-based impregnations: “Pnetron”, “Kalmatron”, “Hydrotex”, etc. They penetrate to a depth of up to half a meter into the thickness of the material (concrete, brick, etc.) and block the capillaries through which water seeps. Water permeability decreases significantly. Their only drawback is the price. But they are really effective.
All these measures will prevent the appearance of high humidity in the basement. But what to do if there is already moisture, how to dry the cellar? Next, we’ll look at ways to reduce humidity.
Optimal temperature and humidity conditions
To store vegetables, the temperature should be 2-4 degrees with humidity up to 93%
To make the cellar dry in the garage, you should understand the parameters of the final result that meets the standards for maintaining basements in garage blocks.
As a rule, a vegetable cellar is built under the building, where vegetables, fruits and twists are stored. If there is excess humidity, the fruits become damp and disappear, and if the air is too dry, they dry out. Therefore, it is necessary to dry the subfloor taking into account these features.
The optimal indicators are:
- relative humidity - 85-93%,
- temperature - +2-4ºС.
Where does dampness come from?
This problem most often occurs in basements. There can be many reasons for the appearance of condensation:
- Problems with the ventilation system. As a rule, this common mistake is made at the stage of designing houses. If the floor slabs were poorly laid, and the ventilation ducts were blocked by construction debris (or they were not designed correctly at all), then it is not surprising that moisture appears.
- The groundwater level is too high. This is almost a standard situation for most regions. In spring and autumn, heavy rains begin, which leads to flooding of basements and cellars. If the drainage system is poor, the humidity rises rapidly.
- Capillary penetration of moisture. During the construction of the concrete foundation, mistakes could have been made, due to which moisture from the soil began to penetrate through microcracks in the foundation.
If the problem is not solved, mold will begin to form. This means that the cellar under the house can “infect” the entire structure. Mold and mildew are known to be hazardous to health. In addition, increased moisture will lead to the fact that food will begin to deteriorate, and the walls of the cellar itself will collapse faster.
Therefore, it is worth periodically inspecting the underground storage facility for damage to the walls. Even the strongest concrete can crack if the installation process is not carried out correctly.
Folk remedies
Condensation in the garage and basement can be removed using home remedies. They are inexpensive and effective.
Humidity and condensation in the cellar - how to get rid of it:
Dry sawdust will not completely dry out the basement, but will significantly reduce the humidity. They are poured onto the floor, shelves and in drawers. When the sawdust gets wet, add new ones. Before using hydrochloric acid, food and preserves are removed from the cellar. A liter of product is diluted with 10 liters of water. Wearing gloves and a mask, treat all surfaces
It is important to ensure that the hydrochloric acid solution does not get on things or your naked body. It may cause chemical burns. Slaked lime
After restoring the ventilation ducts or creating them, place a container with this substance in the corner of the room. Lime absorbs water. The humidity in the garage and basement will quickly disappear and condensation will disappear. Slaked lime also kills fungi in pairs. During the procedure, it is not advisable to go into the room or wear a mask. Lime vapors are not safe for human health. One kilogram of calcium chloride can absorb 1.5 water. It is laid out around the room and collected after 1 day (gloves and a mask are used). Then the calcium chloride is heated and can be reused. This product is also toxic, be careful with it. Cardboard boxes absorb water well. They are just like sawdust, laid out on the floor, and a day later they are collected and laid out with new ones. The method is cheap and effective, but it will not dry out the cellar completely. This method is only good for eliminating condensation. White moss powder is a great way to remove moisture. How to eliminate dampness: jars of white moss powder are placed in the corners of the cellar. This method is effective at a low percentage of humidity.
You can also make a room dry using hot clay bricks, an electric fireplace, sulfuric acid and diesel fuel.
Smoke bomb
Sulfur bombs are bought at hardware stores or wherever they sell seeds. This is an excellent remedy against parasites and fungus in the cellar.
A smoke bomb is a time-tested method of removing mold.
Advantages:
- cellar disinfection;
- disinfestation;
- extermination of rodents and moles.
The sulfur bomb warms the air in the room and saturates it with toxic smoke. During the treatment of the basement, you must leave the house or garage. There is a possibility that smoke will penetrate through the cracks into the living space, and a person may be poisoned by it if they inhale sulfuric anhydride.
Use of a smoke bomb:
- Preparation: remove metal objects, food, and canned goods from the premises. If it is impossible to remove metal structures, they are treated with grease or other viscous lubricant to avoid corrosion.
- Counting the number of sulfur bombs: 1 piece per 5–10 cubic meters of area.
- Protection: you need to wear rubber gloves, safety glasses, a respirator and tuck your hair under a hat.
- Application: place a sulfur bomb on a fireproof stand (brick, stone or foam block), light the wick and make sure that it begins to smolder. Then immediately leave the premises.
After leaving the cellar, you need to change clothes, wash your face, hands and hair. After 5 hours, the smoke bomb is removed and the room is ventilated.
Dehumidifying air using improvised methods
If the air in the garage is damp, and purchasing a dehumidifier is not yet possible, then the following methods can be used as a temporary solution:
- silica gel balls poured into containers and placed in different places in the garage. Some craftsmen pour them into a bottle, and to make the air circulate better, attach a small fan. Silica gel can be dried and reused;
- white moss in powder form, placed in containers around the room, work in the same way as silica gel. It actively absorbs moisture;
- Calcium hydroxide has good absorbing properties;
- Another option is clay brick. It is heated well in the oven and placed in the garage. As the brick cools, it absorbs moisture. For high-quality drainage, you will need several of these bricks, and you must work carefully so as not to get burned;
- some advise using hydrochloric and sulfuric acids, but the possible risk of burns and poisoning is higher than the likely benefits of the methods, so they should not even be considered.
You can check the effectiveness of such improvised dehumidifiers using a hygrometer. The simplest devices cost a penny, but they measure the humidity level quite accurately.
When using these homemade dehumidifiers, remember that a device specifically designed for dehumidification will always work much more efficiently, especially if it is chosen correctly.
Tags:Garage
Drying a ventilated basement
Before draining your basement, you should do some preparation. To do this you will need lime and copper sulfate. After removing all the shelves and drawers, you need to check for the presence of mold deposits. If they are available, then wooden surfaces are treated with copper sulfate dissolved in water. The concentration of the solution is 5-10%.
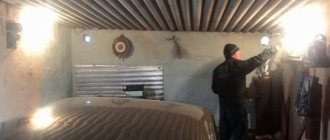
The area inside the cellar is whitewashed with lime. Take a thick mixture of limestone with an admixture of copper sulfate (5-10%). The corners should be coated well. Spray the surfaces in the room with a brush with a thick solution of whitewash. After the lime has dried, reapply another layer. When the walls are dry, you can dry them.
How to dry a cellar in a garage if at first there was no condensation, but then it appeared. The cause may be clogged air ducts. When cleaning pipes, moisture disappears. But it happens that moisture remains. Then, it is necessary to carry out the process of activating the movement of air masses in the following ways:
- Install a high power fan on the draft pipe. Open existing hatches and windows. The drying period lasts 3-10 days.
- Apply heat using a candle. To do this, the air duct for the outflow in the cellar is extended and a burning candle is placed under it. It is possible to use dry alcohol. Under the influence of heat, the pipes dry out and good traction appears.
- Heating the room using a “brazier”. It can be a bucket with holes or another metal container. Smoldering coals, coke, and coal are placed in the container. Then the bucket is placed in the cellar, the door and windows are closed. Sometimes the doors should be opened slightly to allow fresh air to enter. After the coals go out, you need to re-ignite them. After all the coals have burned out, the bucket is removed. The usual one of these buckets is enough to dry the cellar.
In hot weather, there are situations where increased air movement leads to increased condensation. This is due to the temperature difference between inside and outside the room. In this case, ventilation is not carried out. On the contrary, you need to close all the hatches and windows. After the air temperature drops to +10°, carry out ventilation actions using one of the methods.
You can dry the cellar in winter by using other heaters:
- Heat gun 3-5 kW;
- Kirogas;
- Potbelly stoves;
- Propane burners.
When using such methods, you need another person for backup.
Sources of excess moisture inside the home
If, after conducting an experiment with glass, you are convinced that the reason for the appearance of dampness lies inside the apartment, you need to make a thorough inspection of it and analyze your own habits and actions.
- Those who do not have balconies, or those who simply do not have enough space, often have to dry their laundry by hanging it throughout the apartment. If this is done on an ongoing basis, you need to reconsider your habits;
- The presence of aquariums in an apartment can cause increased humidity, especially if they are not equipped with special covers;
- Excessive number of indoor flowers;
- The reason may be irregular ventilation or its complete absence;
- Clogged ventilation ducts;
- Blocking of ventilation due to improper installation of household appliances or its blocking with finishing materials;
- Violation of the integrity of water pipes, which leads to regular leakage of water. If the pipes are hidden in plasterboard boxes, it will be impossible to notice the leak. Go to your downstairs neighbors and inspect their ceiling to rule out this cause;
- Carefully inspect the ceiling in your apartment, especially in the bathroom. Perhaps it is not you who have a leak, but the neighbors above you;
- Incorrect installation of plumbing elements;
- Leaks in plastic window structures;
- Cold slopes.
Dehumidification of a ventilated basement
In a basement of any type, a whole series of work will have to be carried out, but first it is necessary to remove from the cellar the supplies stored there, dismantled structures (shelves, racks, flooring), storage containers (boxes, crates, barrels). All wood structures must be dried in the sun and treated with a 5-10% solution of copper sulfate, regardless of whether they have been damaged by pathogenic microflora. The second step is to whitewash the walls with a double layer of lime.
- The lime is diluted so that the solution does not drain from the paint brush (you can add a 5-8% solution of copper sulfate).
- Divide the lime powder into two equal parts.
- The first part, using a paint brush, is to create gaps in the corners of the cellar and throw them with force onto the walls (you can also onto the ceiling), without trying to get a flat surface, but not forgetting about safety precautions.
- A day later, the second part of the solution is also smeared on the walls.
The end result is that on the third day, the internal surfaces of the cellar become porous and lumpy. Moisture in the form of condensation is not retained on them, since the lime takes water inside itself. As soon as the top layer of lime has dried, you should start drying the basement.
Scheme for drying a cellar with ventilation
1. Check whether the ventilation is properly arranged (if the shortcomings are not corrected, the cellar will have to be dried again, almost a couple of days after the drying procedure).
2. Check the cleanliness of ventilation ducts or pipes (remove all dirt, mold or moss growths).
3. Strengthen the air ventilation process:
- Installing a fan on the exhaust pipe. With the doors and hatches open, the cellar will dry out (depending on the amount of accumulated moisture and weather conditions) within 3 to 10 days.
- Organization of increased ventilation using a small heating device (candle, dry alcohol tablet, alcohol burner). To do this, extend the ventilation pipe above the ceiling so that a heating element on a non-flammable stand can be placed under it. Warm air will increase circulation and speed up drying of the basement.
4. Warm up the cellar if forced ventilation is unable to dry out the basement. The drying process using heating is carried out in stages:
- Take a metal bucket (preferably not new).
- We make many holes in it, both in the walls and at the bottom.
- Fill the charcoal almost to the top edge of the container.
- We light the contents of the bucket and wait for steady combustion.
- We lower a bucket of coal on a leash inside the cellar (the bucket should hang in close proximity to the bottom of the storage and a fire-resistant substrate must be placed under it).
- Close the cellar lid tightly (as tightly as possible so that the smoke escapes into the ventilation).
- We periodically open the hatch cover to allow oxygen to enter the room being dried or increase ventilation using a vacuum cleaner through the supply pipe.
- Remove the bucket of burnt coals.
- Seal the lid tightly for three to four days.
- We ventilate the dried and disinfected cellar.
With this method of draining the basement, the bucket can be replaced with other heating devices
A small stove is quite suitable - a potbelly stove, a heat gun with good power (more than 3 kW), working kerosene gas, a gas burner (be careful - open fire)
Overview of drying methods
The air in the cellar can be periodically dried with a heater.
Before drying the basement in the garage, it is necessary to eliminate the source of moisture in it. This is done after diagnostics have been carried out and the exact causes of the problem have been established. Depending on their nature, additional thermal and waterproofing is done, penetrating solutions are used to seal cracks, and blind areas and ventilation are repaired.
After the repair is completed, mold and mildew should be removed, and irreparably damaged wood products should be removed and disposed of. Everything that has survived must be dried and treated with lime solution.
After this, you can use one of the following methods for drying the subfloor:
- Normal ventilation. This approach is only effective in warm, windy weather. You need to open the gate or hatch and hold it there until the dew drops.
- Install a powerful heater. This will increase your electricity bill, but the desired effect will be achieved quickly, cleanly and practically safely. The best option would be a heat gun, which you can rent for several days.
- Bringing large quantities of sorbents into the room. This could be coal, lime, sawdust, and even rock salt that is not needed on the farm. The method is not the fastest, but it does not require significant effort. The main thing is not to forget to change the sorbents.
- Potbelly stove or homemade roasting pan. The furnace creates intense heat, as a result of which the structures heat up and the absorbed water evaporates from them. You don't have to worry about fire, but you need to be extra careful with carbon monoxide.
- Paraffin candle or dry alcohol tablets. The candle is placed under the exhaust pipe and lit. Due to the temperature difference, a strong draft arises, carrying fumes and odors outside.
After drying the damp surfaces, it is advisable to treat the subfloor with a sulfur bomb. This will help destroy pathogens and completely eliminate unpleasant odors.
Possible solutions to the problem
To remove dampness from your basement, you can either waterproof the inside every week or waterproof the outside every 3-5 months. The procedure for draining the basement from the inside:
- First, dry the room. This can be done with a heat gun, hair dryer or any other drying device (watch the video to do it right).
- Remove coatings that are peeling.
- Use a brush to clean out all the cracks. Prepare cement mortar and pour it into the cracks.
- Buy an antifungal drug at a hardware store and treat the walls.
- After this, coat the walls with a waterproofing solution.
- Places where cracks often form are best treated with plaster or alabaster.
- Additionally, you can either make new walls from moisture-resistant material or plaster the old ones.
This is a relatively inexpensive option for removing dampness. We also suggest you learn how to clean heating radiators yourself - there are a lot of similar methods - inexpensive, simple, using ingenuity and improvised means.
Pipe for drainage water
The optimal solution for draining drainage water from the basement is a low-resistance HDPE pipe. Such a tube can be laid without connections. The diameter corresponds to the pump discharge pipe. It is advisable to first lay the pipe vertically to a level equal to the discharge mark. The passage in the basement wall must be made through a casing, carefully sealing the passage with cement mortar and applying a layer of penetrating waterproofing. Outside the building, the pipe is laid in a trench. The laying depth can be higher than the freezing depth of the soil if its slope towards the discharge is greater than 0.005. Open pipe installation is not recommended.
Some recommendations for eliminating moisture in cellars
The most powerful draft in the cellar ventilation system is formed at low temperatures. The lower it is, the stronger the thrust. With the dampers open, the basement quickly cools down.
Therefore, the air flow must be regulated. Close the exhaust damper more tightly than the supply damper. In severe frost, it is recommended to close both dampers, and sometimes turn on heating devices in the basement to reduce the level of air humidity.
In summer, the air temperature in the cellar is lower than outside. Air will not naturally flow through the supply pipe into the basement. Forced ventilation required. It can be done in several ways.
- Install a fan on the hood. It will blow air out. A relative vacuum will be created in the room, and air will flow inside through the supply pipe. But the fan consumes electricity, which is not cheap.
- Wind energy can be used. You install the deflector on top of the exhaust air duct; the device, under the influence of the wind, creates a vacuum in the pipe, and air circulation begins. You can replace the deflector with simple turbines; they, like a weather vane, catch air, then transmit the force along a flexible shaft to a fan installed in the exhaust air duct. He pumps air out of the basement.
If, after installing ventilation, condensation continues to form on the ceiling and walls of the cellar, the air becomes humid, and mold appears, this means that the ventilation system is not working correctly. Re-adjust the dampers, increase the exhaust air duct from the outside, and the draft will increase. Using these simple methods you can get rid of humidity and dampness in cellars and basements.
Main factors causing condensation
Installation of a hatch handle in the basement
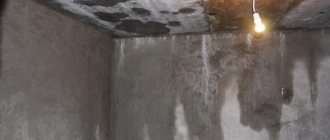
There may be several reasons for the appearance of condensation in the garage. Moreover, this problem can arise in buildings made of any building material, built at different times of the year and using different technologies. Condensation appears at sub-zero temperatures due to cooling of the outer surface of the building. The inside of the garage remains heated, so drops of moisture appear at the dividing joint. This dividing line is usually the ceiling and walls, so it is on such surfaces that condensation appears.
Why does the humidity level increase in the garage?
- Insufficient ventilation of the room. A well-thought-out air exhaust system from the garage is necessary during the construction stage. Improving or making it later is also not so difficult. Many car owners close the air vents to ensure sufficient heating inside the room, but this should not be done under any circumstances. Insufficient air circulation can even lead to poisoning by harmful substances.
- The insulation of the internal surfaces of the room has not been completed. This is a necessary measure to reduce the difference between the temperature inside and outside. Moreover, we are not talking about cold bridges, but about another concept - dew point.
- Finishing work was carried out incorrectly. The joints between materials must be sealed. If this is not done, you can expect that it is in these places that there will be maximum accumulation of moisture.
A small amount of moisture on the ceiling and walls can be ignored, since such phenomena cannot be completely eliminated. An alarming signal can be stagnant air in the room, as well as damage to metal products inside the room.
Well-organized ventilation is also a safety requirement, because in the garage there are compounds harmful to humans that can lead to poisoning or even suffocation.
How to dry a cellar
For drying, choose a dry sunny day. First of all, we remove all the products and boxes remaining there from the room; we also need to remove the shelves, disassemble the racks and pallets. Next, you need to sweep out all the debris and sand. If there is water, it needs to be pumped out.
All existing structures are cleaned with hot water with the addition of soap and baking soda. Next, all parts are treated with a solution of lime and copper sulfate. This will help get rid of fungus, mold and harmful bacteria. After this, all the parts are left to dry in the sun for several days.
After this, we open the doors, all ventilation pipes and hatches to dry the room.
Factors of penetrating dampness
Damp in the ceiling of the upper floor of a home can be caused by broken or loose roof tiles or damaged upper course of masonry walls. Dampness on the ceiling, coming in streaks from the wall above the fireplace (from the protruding part of the fireplace), usually occurs due to a violation of the waterproofing at the junction of the brickwork elements or the appearance of cracks in it at the seams. When damp patches are on the walls below the ceiling of the upper floor, look for dirt clogged or broken gutters or pipes, and also look for a layer of fallen leaves on the roof. When the dampness has spread throughout the entire wall, check whether the bricks in the masonry are cracked or whether their surface is too porous. Individual spots of dampness on the wall arise due to damage to the jointing, as well as the formation of cracks in the plaster (large spots of dampness) or due to damage to the cement screed covering the anchor ties in the hollow wall (small spots). Rotting woodwork and damp spots around window and door blocks are the result of gaps forming between the brickwork of the openings and the trim bars and the absence of drain slats on the windows and doors. Perhaps a teardrop (a groove or protrusion on the lower surface of window sills, window frames, etc.)
to drain water) is clogged with old paint or overgrown with moss.
| Spalling of the mortar and damage to drains (roofing elements) can cause dampness to penetrate. | Gutters that are clogged with dirt or broken allow water to seep through the masonry. | The flow of water through cracks and holes in a damaged roof and saturation of load-bearing wooden structures with moisture is fraught with dampness and rotting of the wood. |
How to dry a garage cellar yourself
In particularly rainy and damp weather, many garage owners may encounter certain inconveniences associated with flooding of the garage cellar. This is possible if some mistakes are made that could have been made during construction, since it is quite difficult to foresee and prevent all possibilities of moisture entering the basement. A certain surprise may be groundwater or the presence of water runoff from neighboring garages directed towards construction. If flooding does occur, the cellar must be dried. This can be done in several ways. It is also better to take care of waterproofing the garage cellar in advance (see Waterproofing the basement in the garage: we approach the issue comprehensively). Let's consider the basic methods of preventing moisture from entering a room, as well as its subsequent drying.
You can take care of waterproofing in advance
To do this, even before starting construction of the basement and the garage itself, it is necessary to provide for all the nuances of its design, as well as choose the right materials for construction. After all, the price of the issue is quite high and therefore everything must be done efficiently. You can do all the work yourself and save money. So:
- The basement is best made of concrete. This can be poured concrete or concrete slabs. This material is perfect for both floors and walls. It is better to refrain from using porous materials in the construction of such premises, such as expanded clay, brick, foam block, etc. Such materials have fairly high absorbent properties, which can subsequently cause dampness in the room.
- You also need to decide in advance on the type of structure. The choice can be made between monolithic and prefabricated and primarily depends on the capabilities of the owner of the building. Thus, a monolithic cellar requires a lot of labor, but will also last much longer. Prefabricated concrete block construction is also an excellent option and is much faster to construct.
It is best to build in the summer. This will help prevent the occurrence of groundwater at the site where the pit is formed.
How to dry out a basement
Unfortunately, it is not always possible to provide for absolutely everything during the construction of a basement. And despite the right location and good waterproofing, the basement still becomes damp and humid. In this case, it must be dried. There are several ways to do this. Let's take a closer look at how to get rid of water in your garage basement. Before drying directly, the room must be prepared. To do this, you need to remove all objects from it, including shelves, boxes, racks, cans, etc. You also need to sweep out the trash. After this, the room is usually left for several days to dry with air under natural conditions. This means that the best time for such work is the hot and dry summer period. Let's see how to dry out your garage basement using simple and affordable methods. The instructions to follow are quite simple and will not require any costs. Ways to dry a garage basement:
| Using a brazier | Drying using a kind of fryer. This is most likely the easiest method for getting rid of dampness in the basement. |
- To do this, you will need a metal bucket, which is installed in the center of the room.
- A fire is built in it, which must be maintained long enough for the basement to dry out.
- In addition, the smoke generated during combustion allows you to destroy fungus and mold on indoor surfaces, as well as rid it of rodents and harmful insects.
We use a candle Drying with a candle is also a fairly simple and effective method of getting rid of excess moisture in a room.
- In this case, a ventilation pipe is constructed that extends all the way to the floor.
- A metal container is located and secured under it.
- For the initial draft, a certain amount of paper must be burned in the pipe itself. This craving can be maintained with a candle burning under the ventilation.
- This process must be carried out for at least three days, during which it is necessary to ensure that the candle does not go out, and also to change the cinders to new candles in a timely manner.
- Dry fuel can be used instead of candles.
Insulation
A relatively inexpensive, but quite effective way to avoid problems with condensation in a garage building is to insulate it. But before starting insulation work, you should remember that when carrying out the work, the type of garage building must be taken into account, which can be carried out in the form of:
- separate capital structure;
- premises built into a residential building;
- in the form of an extension.
In addition to the above options, it can also be a temporary structure, which is a prefabricated structure made from standard sheet metal blanks or a so-called shell garage. When insulating your building, the material used in its construction (metal sheets, brick or concrete blocks) must also be taken into account.
Depending on the above characteristics of the garage structure, a variety of types of insulation can be used to insulate its walls and ceiling, including the following names:
- mineral wool in mats;
- foam blanks or penoplex;
- polyurethane foam or polystyrene foam boards;
- regular backfill made of expanded clay.
Mineral wool
This is how metal garages are insulated with polyurethane foam:
How to dry a cellar without ventilation
If ventilation was not installed during construction, it is advisable to install it now. At least some: it will be easier to get rid of dampness. It is better, of course, to have two pipes - one for inflow, the other for outflow - as described at the beginning of the article. If the cellar is made separately on the street, it is easier to organize: they broke through the ground and roof of the cellar, inserted pipes, and filled everything with concrete mortar.
It’s more difficult with a garage, but it’s solvable that no one cares about aesthetics here. But if there is a basement without ventilation under the house, everything is more difficult to do: it is better not to break the foundation, and you cannot stretch many pipes through the floor into the room. But even in this case, make at least one pipe. Even if it’s through the lid, into the wall or ceiling, or installing a supply and exhaust fan. It can be turned on either for supply or exhaust and in this way somehow dry the cellar.
Having at least such ventilation, you can use any of the methods described above. You can also try to collect more moisture. To do this, hygroscopic materials are laid out inside:
Pour in dry sawdust; when it gets wet, throw it away and add new sawdust. Drying this will not dry out the basement, but it will lower the humidity. There will definitely not be any drops of condensation on the ceiling. Slaked lime. Folds out around the perimeter, along the walls and on shelves. It not only collects moisture, but also kills fungi in pairs. Slaked lime can be used to reduce humidity in the cellar
Calcium chloride. 1 kg of dry matter absorbs 1.5 liters of water. You buy several tens of kg, lay them out, collect them a day later, warm them up (calcinate them) and can be used again
You just need to work carefully: chlorine and calcium vapors are also toxic. Dry cardboard boxes. Funny as it may seem, they also absorb moisture well
You put in a few dry ones, after 12-20 hours they are so wet that they almost fall apart in your hands. Throw it away, throw in new ones. Cheap and cheerful. Drying the cellar will not dry it out at all, but it will collect condensation from the ceiling and walls.
If all these dances with tambourines don’t inspire confidence in you (although they work), you can dry out the cellar using modern technology. There are such household appliances - household dehumidifiers. They are often installed in swimming pools to get rid of dampness in the room. You will need a medium power model. They cost about 20-30 thousand rubles, operate from a 220 V household network. In the process, they collect moisture from the air into a special container. You will need to drain the water periodically.
One way to dry out a damp basement is to install a household dehumidifier.
Use of additional waterproofing of floors and walls
If the reason for the appearance of dampness lies in the proximity of groundwater, then in addition to drying, additional waterproofing is necessary.
Here they use a “clay castle”:
The floor in the premises is covered with a layer of clay and compacted:
- Pour a layer of sand.
- Concrete screed is poured.
How to prevent water from entering through cracks in the floor?
Serious waterproofing of the floor can also be done in this way:
- a layer of crushed stone is poured onto the floor,
- filled with bitumen
- lay a material with waterproofing properties,
- poured with concrete (sometimes expanded clay is mixed into it).
You can carry out additional waterproofing of the walls. To do this, the walls on the inside of the room are covered with insulating material or covered with bitumen.
The dangers of increased humidity in the garage
High humidity in the garage negatively affects the condition of the body. High air humidity and condensation accumulation lead to the most unpleasant consequences:
- Dampness poses the greatest danger to transport. The car body is protected by special paint, but if chips and cracks appear on it, and this is inevitable, water penetrates under the paint layer and the metal rusts.
- Dampness is a good environment for the growth of mold and fungi. Mold affects any materials: wood, concrete, plastic, fabric. Often its victims are food supplies stored in the garage. To some extent, the fungus is dangerous for humans.
- All metal parts of the building itself are subject to corrosion. If there is excessive humidity, no primer or paint will save the metal and doors, beams, and racks will begin to rust. This is especially dangerous for metal boxes.
- The rotating and locking mechanisms of gates are the earliest victims of corrosion. The doors are difficult to open and the automation jams.
Harm from mold to humans and buildings
If the owners see mold in the basement of a wooden house, how to get rid of it must be decided immediately, before the problem goes far. After all, fungus can negatively affect the health of all family members, the condition of the basement itself and the house. Mold causes the following damage:
- reduces the service life of finishing and building materials, shelves and racks made of wood;
- affects concrete floors, which begin to crumble and lose strength;
- harmful fungal waste products enter the house or garage if the cellar is located underneath them;
- vegetables and fruits are also affected by mold, the products acquire an unpleasant “aroma” and spoil;
- Mold in the basement also negatively affects human health - its toxins cause headaches, nausea and vomiting, lung diseases, coughs and runny noses, and allergies.
Traditional methods of dealing with dampness
You can normalize the humidity level in the cellar using folk remedies:
- dry the cellar walls using clay bricks. Place 2-3 bricks heated over a fire in different corners of the basement. As they cool, they will begin to absorb moisture. To achieve maximum effect, heating the bricks can be done repeatedly;
- to get rid of mold, treat the walls of the cellar with acetic or boric acid (dilute 20 ml of acid in 1 liter of water), you can use citric acid (dissolve 100 g of powder in 1 liter of water);
- remove all food stored there from the basement or cellar and treat the damp walls with diesel fuel, and then whitewash them.
Removing dampness and mold is a rather labor-intensive process. Therefore, you need to take care of organizing drainage and waterproofing in advance, then you won’t have to deal with high humidity. What methods of dealing with dampness do you know?
Storage floor design
The main reason for waterlogging of the cellar is closely located groundwater. Initial proper floor installation will prevent the problem of excessive moisture in the basement. There are several ways to install a waterproofing floor.
Most often the floor remains earthen. Water from the lower layers penetrates through capillaries to the floor surface. To prevent the need to dry out the cellar from dampness, the earthen floor is leveled, compacted and covered with a thick film or roofing felt.
To protect the coating from tears or breakage, wooden boards are used (possible reasons for damage to the coating: foot pressure, installation of boxes with sharp corners, careless displacement of heavy objects). An earthen floor can be reinforced by packing clay, that is, covering the entire floor with a compacted mixture of clay and sand. This operation, which allows you to dry the basement by creating a natural barrier for moisture to escape, is carried out in four steps:
- One layer of crushed stone or broken brick is poured onto the previously leveled earthen floor of the cellar, and the space between the stones is filled with a thick mixture of clay with the addition of sand (clay is taken with a good percentage of fat content, and the floor level should rise by 15 cm after pouring).
- The clay is compacted very tightly.
- Sprinkle sand onto the compacted floor and rub it in. Remove excess with a broom and dustpan.
- The created clay floor must be thoroughly dried for two to four weeks.
The most profitable way to improve the waterproofing of the floor and avoid regularly drying out the cellar is to make it concrete and with a good drainage system. True, this is the most expensive method, requiring special knowledge and skills.
If after all the manipulations with the floor the level of humidity in the basement or garage decreases significantly, then you will no longer need to worry every year about how to dry the cellar from moisture (especially during the spring rise of groundwater).