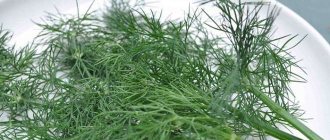
You can dry dill for the winter in a variety of ways. For example, in natural conditions on the street. It works well in electric dryers. Sometimes the oven comes to the rescue. But there is not always time to wait. We have found the fastest, most convenient way to prepare using a microwave. She's a microwave.
We will be happy to tell you how to dry dill in the microwave with minimal loss of properties. The plant will retain its taste, aroma and even green color. Bonus - what else can be dried in the microwave?
Collection and preparation
- Select the herbs you want to dry. To preserve the color and texture of the plant, a specific drying method must be selected for each species. Herbs with dense leaves (bay leaves, rosemary, thyme and sage) can be simply spread out or hung in a dark, dry place. Broad-leaved tender varieties are more sensitive to moisture (basil, parsley, mint, tarragon, mint) and require a faster drying process.
- Collection of herbs. Most herbs are recommended to be collected before flowering. However, it all depends on the condition that will allow the plants to retain their shape and aroma. If your goal is to get flowers, then it makes sense to wait until the buds open. As for the time of day, it is better to cut the herbs after the dew has evaporated, but before all the volatile essential oils have evaporated from them under the influence of the sun.
- Preparing for drying. Herbs will be preserved better if you begin to prepare them for the drying process immediately after harvesting.
- Wash the herbs if necessary. Some herbs must first be washed under running cold water, then any remaining debris, insects, or leaves with stains or defects must be removed.
Note: Harvesting greens for the winter
Method 1: Drying your herb quickly and easily
This method allows you to obtain fresh and pure herbs for cooking.
- Place a clean kitchen towel on a suitable surface, such as a kitchen chair or windowsill.
- Wash the herbs thoroughly. Use as little water as possible to avoid damaging the leaves. Then shake them gently over the sink to remove excess moisture.
- Place the plants on the prepared cloth so that they do not overlap each other.
- Let them dry in a heated kitchen. Once the herbs are dry enough, use them for their intended purpose.
Method 2: Drying the herb in the sun or outdoors
This method is not the best, because when exposed to direct sunlight, the plants will quickly wilt and lose their taste. This method is suitable when you need to obtain seeds or for compiling a herbarium.
- Tie the herbs together with ribbon or string.
- Hang them down with flowers in a sunny spot. Leave it for a few days, checking from time to time.
- You can also wrap the plants in a paper bag, which will protect them from sunlight and also prevent the seeds from falling.
- When the stems and leaves are brittle and brittle, they can be stored.
Method 3: Drying your herb indoors
Indoor drying is preferred over outdoor drying to preserve the aroma, color and quality of the herbs. This method is recommended for herbs with soft leaves.
- Tie the herbs together to make a small bouquet.
- Drying times may vary if you are binding different types of herbs, so consider the drying times specific to each variety. It is also better if the bouquets are the same size, this will make them easier to store and use.
- A paper bag will help speed up the drying process and prevent debris and seeds from falling out. On the other hand, by letting them dry without the bag, you can get beautiful bouquets that will serve as decor in your home.
- Find a suitable drying area. It should be dry and well ventilated. Ladders, beams, hangers, nails, etc. can be used for this purpose.
- It will take approximately 5 days to several weeks depending on the type of herb you are drying.
Method 4. Drying in the oven
- Set the oven to the lowest temperature. Leave the door open.
- Place a sheet of parchment paper on a wired baking sheet and add herbs.
- During the process, they must be turned over to dry evenly.
Method 5: Microwave drying
If you need dry herbs quickly, this method is perfect! Be prepared that drying times can vary greatly depending on the type of herb you want to dry.
- Place the plants in an even layer on a plate.
- Set the timer to 2 minutes or to the defrost function. Then let stand for 10 minutes. If the plants are not dry, then turn on the microwave for another minute and so on until the desired result is achieved.
- Herbs that tend to air dry well (such as thyme) need less time in the microwave than herbs that dry less well (such as basil).
Method 6. Drying using desiccant
Herbs dried in this way can be used to create decorative crafts. You should not use this method if you intend to use the herbs as food or medicine.
- Choose a desiccant. Desiccant is a substance that causes plants to dry out. Cornmeal, sand, borax, silica gel or even cat litter are suitable desiccant agents for herbs.
- Pour 2.5 cm of the selected substance into a glass or plastic container. Glass or plastic will not absorb moisture.
- Arrange the herbs. Make sure the flowers are not touching each other. Leaves and petals that are close together should be separated to allow the desiccant to dry out all parts of the plant. Carefully fill the plants, making sure that the substance gets into all the recesses of the flower.
- Once the plants are tough and dry to the touch, remove them and brush off any remaining desiccant with a brush.
- Avoid over-drying the plants, as they may crumble.
Method 7. Drying in a vase
Some herbs, such as fennel, rosemary, and immortelle, dry out easily even in a bouquet.
- Place the plants in a vase or other container without water.
- Let them dry, making sure to check them from time to time to prevent mold or rot.
Method 8: Pressure Drying
Press-dried herbs can be used to decorate albums, frames, bookmarks, collages and cards.
- Select the flowers or leaves you want to dry.
- Carefully fold the book between the sheets; you can put some weight on top.
- After 30 days, check the plants; during this period they become flat and dry.
Adviсe
- All dried herbs should be stored in airtight containers away from direct sunlight. For culinary purposes, use herbs within 6 months after drying, after which they begin to lose aroma and taste.
- You can also freeze herbs. This method is recommended when the aroma of the plant is more important than its appearance.
- Many plants lose color and shape when they wither. Drying herbs is more of an art that you learn through experimentation and making mistakes.
- Use elastic ribbons to tie bouquets so that when they dry, the stems will not fall out of the bouquet.
- Silica gel is poison. Keep it out of the reach of children and animals, wear a mask when working, and do not eat the herb that has been dried with silica gel.
- Poorly dried grass rots and becomes moldy; if this happens, throw it away.
- Avoid drying herbs in high humidity areas such as the bathroom or kitchen.
- Avoid too much heat when drying to prevent the herbs from breaking down.
Basic Rules
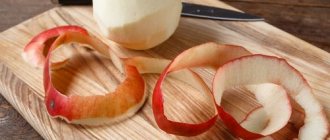
How to dry apples in the microwave correctly? To prepare apples, it is better to use winter varieties - sweet and sour or sour. These varieties include:
Summer varieties or carrion are also used for preparing dried fruits . But the final product will be of low quality. Summer varieties are dried with the skin.
For this you will need:
Before drying apples in the microwave, you need to process them, not all at once, but in portions . If all the apples are processed at once, they will oxidize and darken.
How are apples prepared? Wash and wipe the apples. Excess moisture will increase the drying process.
Remove the core. This is done using a special device. It looks like a tube with sharp edges.
You can also remove the core with a knife by cutting the apples into quarters. But if dried fruits are prepared exclusively for compote, then the core can be left .
Recommendation. If you are going to dry apples from your garden, then you do not need to peel the skins, as they contain many useful microelements . Apples purchased at the supermarket must be peeled.
Slice the apples after processing with a knife or household slicer. The thickness of the pieces should not exceed 5 mm. Place on a cotton cloth, place on a plate and place in the oven.
be kept in saline solution for 4 minutes . It is a natural clarifier that will allow apples to become lighter after drying. The solution will also protect dried fruits from insects and increase their shelf life. To prepare the solution, add 100 g of salt to a bucket of water.
Before cooking, apples can be soaked in sulfuric acid for 3 minutes. This solution will repel pests and preserve the color of apples. The solution is prepared from 1 liter of water and 1 g of acid.
How to collect medicinal and spicy plants?
At the market or in the pharmacy you can find a lot of mixtures of dry medicinal and spicy mixtures. They are used in folk medicine, home cosmetics and cooking. Their quality is sometimes highly questionable. Another thing is mixtures collected with your own hands in an environmentally friendly place. But in order for them to be truly useful, they need to be collected correctly.
Collection rules:
- All herbs, medicinal and spicy, should be collected before flowering, when they have just gained color. Plants that have already bloomed have a weaker aroma and lower essential oil content;
- The grass is plucked in the morning, when the dew has already dried. This is done in dry, clear weather;
- Plants should only be collected in an environmentally friendly place. This could be your garden or vegetable garden, if you live far from roads and factories, a meadow or forest, next to which there are no highways or polluting industries.
How to dry raw materials correctly?
Even the best plant materials can be ruined by improper drying.
Plants need to be dried following a certain sequence of actions:
- Be sure to wash herbs grown and collected on your own plot: parsley, dill, basil, mint and others. Shake off the water and dry, spreading on towels;
- plants collected from a meadow or forest do not need to be washed. Wash them only if they are covered with dust. But it’s better not to collect such things at all;
- disassemble the collected raw materials into small bundles and tie them with thread. These bouquets must be hung with the flowers facing down. The best place for natural drying of plants is a well-ventilated and dark room. This could be a shed or storage room. Plants should not be dried in direct sunlight, otherwise they will lose their beneficial properties and aroma. They don't like humidity either. Stems and leaves may rot in wet conditions;
- drying naturally takes from several days to 2-3 weeks. But if you need to dry the herb quickly, you can do it in the microwave at home. To do this, place a small amount of herbs between two paper napkins and microwave them. How long should you microwave herbs? Drying time is 2 minutes. Then the raw materials are removed and left for some time on napkins to completely evaporate the moisture. However, this drying method is less good than the natural one. With it, the beneficial properties of herbs may be lost;
- Properly dried plants do not change their color and aroma. The smell of herbs can become even stronger and richer. The finished raw material is dry to the touch, crumbles and breaks easily in your hands.
How to properly store dried herbs?
Completely dried plant materials can be stored in several ways.
- In tightly closed glass jars and containers. To do this, the dried herb is crushed to a size convenient for use and poured into washed, dry containers;
- In thick paper bags. This way you can store the herbs whole, not crushed. With this method, they retain their beneficial qualities longer.
- In dense fabric bags. Plants can be stored either whole or chopped. The main thing is to keep them away from odorous substances so that they do not lose their aroma.
How long do dried herbs last?
Properly dried plants can be stored for up to two years. In this case, it is necessary to observe the storage conditions and avoid getting moisture into the dishes or bag with the mixtures.
Check your supplies periodically for mold or harmful bugs. If spoilage is detected, the dried plants must be thrown away and cannot be used.
For herbal teas, medicinal and cosmetic products, it is better to use plants from the first year of storage. Those that last longer are also suitable for baths or compresses. For culinary needs, plants are harvested for a year. And next season they use fresh ones and dry new ones.
Drying herbs is a very useful and exciting activity. Knowing how to quickly dry herbs at home, try doing it yourself, drying plants for your table or for medicinal purposes. You will provide your family with aromatic and healthy teas, delicious dishes, and healing baths. Be healthy!
DIY herb dryer
Making a dryer with your own hands is not a difficult task. They make a simple structure consisting of a base and mesh shelves attached to it. Herbs are placed on these shelves. This saves space indoors or under a canopy and ensures good ventilation for drying.
Or you can make a dryer with heating and forced ventilation. They make a body - something like a large box. Mesh shelves are fixed inside. A fan and heating element are installed at the bottom. The heating element operates either constantly or is regulated by a timer or temperature sensor, which turns the heating off and on. A necessary condition is that the upper part of the structure is mesh so that the forced air leaves the dryer. The lower part should also allow air flow to flow freely.
Brewing tea
A drink made from dried mint is characterized by quick preparation and a number of useful qualities. Tea is recommended for consumption in the presence of a number of diseases:
- diabetes;
- gastritis;
- hypertension;
- cold;
- pancreatitis;
- malfunction of internal organs caused by poisoning;
- varicose veins
Brewed mint is also useful for eliminating hangovers and insomnia. There are two options for preparing tea:
- based on mint alone;
- with the addition of other beneficial herbs.
In this article you will find many interesting mint tea recipes.
Dried tarragon (tarragon) - prepared at home
How to grow watermelon at home in the garden
It is harvested in summer and autumn. Important! Tarragon contains very volatile essential oils, so it is very demanding in terms of preparation and storage. Otherwise, with the wrong approach, it loses its taste and aroma.
Tarragon
It is dried as follows.
The branches are washed and then laid out on a clean, dry surface in the shade. The degree of drying is determined by the fragility of the branches. If they break when bent, then dry enough. Then the leaves are torn off the branches and immediately poured into jars. Otherwise, in an open space, the herbal aroma will quickly disappear.
You can also dry it in a dryer, but the temperature should not exceed 35˚C. But the first method is more preferable.
Room with heating boiler for drying cannabis
This option is suitable for owners of private houses. A warm room with a heating boiler can be a great place to dry your cannabis. Thanks to the high temperature, the humidity will also be kept at a suitable level.
The most productive way is to hang the sprigs on a stretched clothesline or, again, wrap the cannabis in paper bags. You will be able to try small inflorescences in 3-4 days if the temperature does not drop. The voluminous and dense buds will dry in about a week.
The main disadvantage of the method is the need to keep the boiler on around the clock, which will result in utility bills being noticeably higher than usual. This method is especially unprofitable in the summer, when no one turns on the heating.
The marijuana will remain potent and will not lose much of its flavor and aroma. Without curing, the shelf life will be short - up to several months.
Additional Information
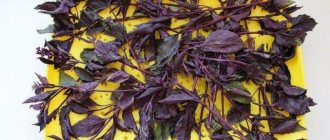
I didn’t precisely measure the volume, I just cut up the shoots and leaves, rinsed them under cold water in a colander and laid them out on a napkin to dry. Dried for 5 minutes. at the lowest power. The last time I tried to dry the branches of the bush (a remedy for constipation), 5 minutes. It turned out to be not enough, I added 5 more, and then 10 more. As a result, they crumble like leaves. And most importantly, the leaves retain their natural color. In the 1st photo - parsley, in the 2nd and 3rd - basil, in the last one - a remedy for constipation.
Water bath
Among the extreme ways to dry cannabis, this is considered the most decent. Losses in taste, power and time are kept to a minimum. It will take only 20-30 minutes to prepare the product.
The cone will have to be pre-compressed, for which you can use a lighter. After rolling out the inflorescence like dough, you need to finely chop it. The next step is to place a pot of water on the stove. Place a plate of cannabis on top of the pan, and then turn on the stove.
As a rule, the use of a water bath is resorted to by growers who want to take a first sample while the remainder of the harvest is dried under standard conditions. This method is good because the marijuana is guaranteed not to dry out or burn.
In the oven
This method is considered classic. If it is necessary to dry a small amount of herbs, an ordinary oven is used. Its advantage is that it releases heat to the plants slowly and evenly. Typically the oven is not lit specifically to dry the herbs, but rather the heat from after cooking is used. The temperature inside the structure should not exceed +60 °C. The main disadvantage of this method is the inability to adjust the temperature and improve air circulation. Kilns are also used when large quantities of herbs need to be dried.
Storage
If the dry grass crumbles easily in your hands, this means that it is ready and you can store it. Keep plants only in dry areas with good ventilation. It is best to place them in airtight glass jars. You can also use wooden or ceramic containers. Write on each of them what kind of herb is stored there and the time of its collection.
Now you know how to properly dry herbs for tea and seasonings for the winter. Remember that if the temperature is too high, plants lose their beneficial properties. Properly dried grass does not change its color, and the smell becomes even more intense.
What to do to prevent dill from turning yellow when dried
Reasons why a plant changes color:
- Excess moisture . If the greens are cut early in the morning or in the evening, when dew has appeared, then this provokes the appearance of a dark color on the branches. The right time for collection is a dry, sunny day.
- Washing the culture in warm water . Before drying, greens collected at the dacha or purchased at the market must be washed. But this must be done at a water temperature no higher than +20°C. Otherwise, the dill will turn yellow after drying.
- Drying in the sun . Exposure to ultraviolet radiation leads to overdrying. Because of this, some of the vitamins will be destroyed, which will affect the color of the grass.
Overdrying is the main cause of yellowed leaves. Microwave, oven, electric dryer also lead to color change. Don't leave greens unattended and stir them frequently as they dehydrate. In this case, yellowing will be avoided.
Dried dill
Dry in the fresh air
If the weather outside is good and it’s hot in the summer, then it would be right to dry the dill without additional equipment - you won’t have to pay for electricity or gas. The method works both in the country and at home.
It is recommended to use pallets with a perforated bottom - plastic or metal. If you don’t have such a pallet on your farm, it’s very easy to make a replacement. The gauze needs to be pulled over the top of the box so that there is a void inside that allows air to pass through.
What to do:
- Spread the dill in a thin layer over a tray or cheesecloth.
- Leave for several days in a dry, shaded place.
We recommend: Eternal shine: how to properly clean gold and diamonds
You should not lay it out in the sun if you want the dill to remain green. Overheated in the sun on a hot day, it may well turn yellow. In addition, thick branches can dry out on the outside and remain damp on the inside. And this will inevitably lead to the formation of mold, and all the work will go down the drain.
In rainy weather, it is worth bringing the pallets into the house or at least under a shed - just not in the garage, otherwise the greenery will become saturated with the smell of gasoline.
Extreme methods for quickly drying hemp
For those who really can’t wait to taste the harv, they have come up with ways to dry it in just a few hours. Of course, you shouldn’t expect much from the flavor and aroma bouquet.
But if the priority is the effect rather than the pleasure of the process, you can resort to extremely fast drying. In addition, this option is suitable not only for inflorescences, but also for leaves.
Drying plants in a basket or on a perforated surface
Some flowers and herbs dry quickly at room temperature in low-humidity homes. To do this, line the bottom of a wicker basket with a paper towel and spread the herbs in one layer. Air will circulate freely around the plants and help them dry out.
You can also use some kind of perforated surface, for example, a kitchen oven rack. To ensure air circulation, it can be placed on 2 supports. You need to cover it with a towel on top and you can lay out the herbs in a thin layer. The towel will serve here as a collector of small dried fragments.
A clothes drying rack covered with a fine linen cloth also works well.
This is the best method for drying red clover, calendula and chamomile flowers.
Beneficial features
The benefits of mint are as follows:
- positive effect on the nervous and cardiovascular system;
- elimination of stress and insomnia;
- normalization of the digestive process;
- relief from nausea and vomiting;
- regulation of venous and arterial circulation;
- preventing increased intracranial pressure;
- treatment of infectious and colds;
- getting rid of skin problems: fungi, itching, mycosis and various inflammations;
- providing pain relief for migraines;
- relief of PMS symptoms;
- weight loss and cellulite correction.
How to get the maximum amount of harvest
Correct lighting
As a rule, 100-150 W of light is enough for one cannabis bush to fully realize its yield potential. If it is not enough or the lamp is too far from the plant, it will begin to stretch upward, trying to get as close to the lamp as possible. In this case, the bush will grow tall, but not branchy. The lower branches will receive little light, which will lead to the formation of small and loose inflorescences. You shouldn’t hope for a bountiful harvest in such a situation.
Placing the lamp too close to the cannabis will also negatively affect its development. The plant will experience light or heat burn, which can kill it completely. It is necessary to install the lamp at a distance of about 30 cm. Most often, growers simply put their hand to the top of the bush and, if after 10-20 seconds it becomes very hot, then the lamp must be raised.
It is also worth mentioning the spectra of light. The predominance of blue will be favorable for the growing season, and the predominance of red for flowering.
Suitable pot volume
No productive cannabis strain can reach its potential in a small pot. Only a developed and healthy root system can ensure rapid growth of the above-ground part, as well as its high productivity. It is very important that the plant feels free and comfortable in the pot.
For most autoflowering plants, a 10-15 liter pot is sufficient. For large photoperiod varieties, 30-40 liters may not be enough.
Top dressing
Proper feeding of a marijuana bush can also have a positive effect on productivity. During the growing season, the plant needs a large amount of nitrogen. It acts as the main “building material” for plant tissues.
During the flowering stage, the grower should give the cannabis more phosphorus, which is responsible for the formation of inflorescences. The nitrogen concentration should be reduced. Hemp also needs potassium throughout its life.
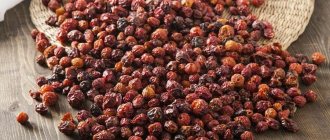
How to dry berries
It is enough to simply prepare dried chokeberries, strawberries, raspberries, black currants, rowan berries, bird cherry and blueberries at home. They (except black currants) can be dried either in the sun or in an oven. To do this, prepare ripe berries (except raspberries; for drying it is better to take not quite ripe berries of garden and forest raspberries, since ripe ones become limp when dried), preferably collected in warm sunny weather, and lay them out for drying on a tray covered with paper, and place it on balcony or any other ventilated place and turn the berries over every day. Or place the prepared berries on a baking sheet lined with baking paper and place in a slightly preheated oven. First, dry the berries at 40-45 °C, and when they are dry, dry them at 60-70 °C. Shake the tray with berries periodically while drying. All this time, the oven door should be slightly open. Usually the berries dry out in 2-3 hours. To check their readiness, squeeze several berries in your fist: well-dried berries should not release juice. Place the finished dried berries in jars with tight-fitting lids. BY THE WAY, dried berries retain their medicinal properties, and chokeberry berries also lose their excessive astringency. To reduce the drying time for berries, use the microwave. Place the prepared berries in small portions between two pieces of cloth and dry them in the same way as greens (the drying method is described just above). Please note that since berries contain more liquid than greens, the drying time will have to be increased. However, it is better not to do this right away, but to dry it in several stages, checking readiness. Some berries, for example, rowan and bird cherry, can be prepared in powder. It is very comfortable. The powder is easier to store: it takes up less space and is less susceptible to spoilage, and its range of use is somewhat wider than that of dried berries, which are traditionally used only for brewing berry teas and preparing compotes or jelly. To prepare powder from rowan or bird cherry berries, blanch the prepared berries (each type separately!) in salted boiling water for 1 minute, and then dry well in the oven (using the method described above) and grind in a coffee grinder to a fine powder. Store this powder in a hermetically sealed jar. Rowan berry powder can be mixed into sauces, jelly, cookies, and confectionery to add a piquant and sour taste. And from bird cherry powder, it is also called bird cherry flour, delicious pies are baked. You can also make tasty and healthy drinks from such powders. To do this, just brew 1-2 tsp. powder with 1 cup of boiling water and let it brew a little. Be sure to dry barberry berries in the fall. In the Caucasus, dried and powdered barberry berries are served as a seasoning for many oriental dishes, especially kebabs. Why don't we follow the example of our Caucasian comrades?
RECIPE RATING
Natasha is a super drying option. Cool.