How to install an overhead stainless steel sink and attach it to the countertop - installation and installation
The sink is a very important attribute in the kitchen. There are a large number of types of these products, one of which is the overhead sink. Several methods can be used to attach it. In addition, you cannot do without special knowledge and tools.
The main feature of overhead sinks is their successful combination with various kitchen designs. The obvious advantages are the low cost and ease of installation of the sink.
As for the disadvantages, these include the small thickness and space between the cabinet. The presented products can be used for a set that is composed of separate modules, and the sink is not a single part of the work area. This type of sink should be installed in the corner of the room.
Installation rules: all the nuances of installation
So, we purchased convenient plumbing fixtures that fully meet the owners’ needs in practicality and appearance. By the way, stainless steel sinks are popular for kitchens today. Firstly, they are affordable, light weight, and durable to use.
The universal color “metallic” can be combined with a variety of color schemes in the room.
Installation is quite simple, there are only two stages:
- Assembling the sink cabinet;
- Installation of an overhead stainless steel sink on a cabinet.
The sink is an indispensable attribute of the kitchen. You can easily install it yourself - you do not need to have special knowledge and skills.
Dimensions
Overhead sinks can be produced in various sizes. All of them are standardized to the perimeter dimensions of manufactured kitchen sink cabinets. The most popular sizes include:
Overhead sinks are a very convenient product to install and use. Thanks to the wide range, every housewife will be able to choose the best option for her kitchen set. The reasonable price allows almost anyone to purchase the product.
What is the name of the food waste disposer for the sink - how to install and choose
Types, sizes and manufacturers of corner sinks
Types of kitchen faucets: which one is better to choose
Manufacturing and assembly process
Let's focus on the most common cabinet design - a direct one for an overhead sink. Before making a cabinet for a kitchen sink, make an accurate drawing with calculations of the dimensions of each part. The sketch will depend on the dimensions of the selected sink.
Drawing
Necessary parameters for the sketch:
- width of the structure (from 400 to 800 mm);
- the dimensions of the sidewalls remain standard: bottom depth – 530 mm, height – 814 mm;
- the total width of the doors is equal to the width of the cabinet;
- the height of the doors is calculated based on the height of the structure and the width of the façade planks;
- the length of the facade strip is equal to the width of the sink, and the width is 150 mm;
- the length of the spacers and the lower plinth is equal to the width of the bottom, and the width of these elements is 80 mm.
A parameter such as the width of the bottom depends on the width of the entire structure with a double deduction of the thickness of the material. For example, if the thickness of the chipboard is 14 mm, and the total width of the structure is 800 mm, then the width of the bottom is 800 - (14x2) = 772 mm.
Important! Calculate the doors very accurately, otherwise they simply will not close or there will be an unsightly gap between them. To correctly calculate the doors, subtract the width of the lower plinth and the facade strip, which is attached above the doors, from the total height of the structure. That is, 814 - (80+150) = 584 is the height of the doors
That is, 814 - (80+150) = 584 is the height of the doors
To correctly calculate the doors, subtract the width of the lower plinth and the facade strip, which is attached above the doors, from the total height of the structure. That is, 814 - (80+150) = 584 is the height of the doors.
To calculate the width of the doors, divide the width of the cabinet by 2 and subtract the thickness of the end edges on both sides (this is approximately 2 mm). Also subtract the gaps between the doors and adjacent modules (2x2 mm per door).
Expert opinion Maria Vasilievna Mikhailova Manager of a furniture store. Knows everything about comfort and interior design
In addition, deduct an additional 2mm for installation. The calculation for given dimensions looks like this: 800/2 - (2x2) - (2x2) - 2 = 390 mm - this is the width of one door.
Cut lumber and mill doors for fittings according to the dimensions strictly specified in the drawing.
Assembly
In order for the cabinet to serve for a long time, it is recommended to treat the joints of the parts with silicone to prevent moisture from entering. Make all connections using furniture screws.
Structural assembly diagram:
- connect the sides of the cabinet to each other with upper spacers (one is attached flush with the upper ends of the sidewalls, the second is 25 cm lower, on the opposite side);
- secure the lower plinth on the front side;
- mount the bottom of the sink (it should lie clearly on the baseboard and be perpendicular);
- secure the façade strip above the doors;
- fasten the hinges into the prepared holes on the doors;
- Screw the mating parts of the door hinges to the sides.
When installing doors on a cabinet, make sure that they are secured at the same height. Decorate the cabinet with paint or self-adhesive film.
The bulk of the work is done, all that remains is to install the sink.
Installation of overhead sink.
Direct installation of an overhead sink can be carried out in two ways: using sealant and using self-tapping screws. Installing an overhead sink using only sealant is possible only if the sink is light. If the overhead sink is heavy, it should be secured with self-tapping screws.
After the sink cabinet is assembled, special fasteners should be attached to the module. They may be included or must be purchased separately. The fasteners are L-shaped plates with oblique holes. You will need 4 of these fasteners.
Attach the fastener to the top edge of the cabinet from the inside and make a mark in the oblique slot with a pencil. Remove the mounting plate. Step back 5 mm above the bottom of the mark and screw in a self-tapping screw no more than 16 mm long. Install the mount onto the screwed-in self-tapping screw. Repeat the procedure with all the mounting plates, distributing them evenly across the cabinet. In this case, the height of the holes for the screws should be the same everywhere.
Before installing a countertop sink on a cabinet, it is recommended to attach a siphon and mixer to it, as it is more convenient to do this on an uninstalled sink.
Next, you should coat the upper ends of the walls of the module under the sink with a layer of sealant, this will save the material of the cabinet from swelling and deformation caused by moisture.
Then comes the installation of an overhead sink on the cabinet. This must be done carefully so as not to touch the sealant. The screws on the fastenings are shifted until the overhead sink is completely pressed against the cabinet. When tightening the fastening plates, a small amount of sealant may be released; this should be wiped off with a dry cloth.
The final stage of installing an overhead sink is connecting the siphon to the drain pipe, connecting the flexible faucet connection to the water supply and installing the doors on the cabinet under the sink.
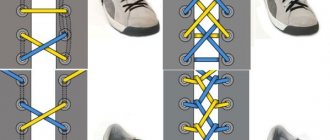
Here is another very simple way, from forum readers, how to quickly and efficiently fix an overhead sink in its place without any special fastenings, and most importantly, very simply. A simple freehand sketch shows everything clearly.
Also on the topic, we are pleased to present you with a detailed excursion into the historical eras of kitchen sinks of different styles.
Useful little things
Finally, here are some useful tips that will come in handy with various fastening methods.
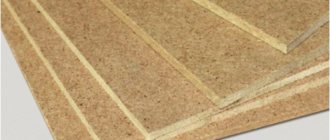
- Untreated ends of plywood or chipboard will quickly swell. They must be protected from moisture in any way. Usually paint, varnish or drying oil is used; The minimum number of layers of paint and varnish is three.
The photo shows a special primer for protecting the ends of wood. For our purposes it is quite suitable.
Hint: in order not to wait several days for the coating to dry, it is better to use nitrocellulose-based paints and varnishes. Each layer dries in no more than half an hour. Do not forget about ventilation of the room: the fumes are toxic.
- It is also better to oil the block that is placed under the edges of the sink. Wood is less hygroscopic than chipboard, but it may very well rot.
- It is advisable to use screws with an anti-corrosion coating - yellow or silver. Otherwise, over time, rusty streaks may appear on the walls of the cabinet.
What you need to install a sink
To attach the sink correctly, you need to assemble a minimum set of tools. To seal the seams, you will need silicone sealant, which will protect the surface of the furniture from moisture.
Installation accessories:
- electric drill or screwdriver;
- a set of drills with a diameter for fastening;
- screws and other fastening products;
- screwdrivers in a set with different sections;
- masking tape to protect furniture;
- ruler and device for level measurement;
- sealant for sealing joints.
Before installation, it is recommended to clean the space and remove excess. For convenience, all communications should be secured to the stand in advance. After fixing the sink, this stage will be problematic. The installation location will depend on the location of the water pipes and sewerage. If space permits, it is not recommended to place the cabinet next to the refrigerator and heating appliances.
General points
There are several modern technological approaches for installing a kitchen sink, which are selected depending on its form factor and connection features, the material of the bowl, the layout of the kitchen space, and the location of the furniture in it. Please note that:
- It is not recommended to place washing equipment near the hob and refrigerator. This unspoken rule of the “triangle” is associated both with energy (fire, water and cold are incompatible) and with optimal aesthetic perception;
- The sink should be located next to the work table, on which preliminary cutting and preparation of food is carried out for further cooking. Therefore, if the kitchen area allows, the hostess’s workplace is divided into 2 zones - for doing dirty work and a clean one, where ready-made dishes are finally served;
- When designing the placement of the washing bowl, take into account its connection to communication lines (water supply and sewerage). The simpler (smoother) and shorter the inlet/outlet lines are, the lower the consumption of pipes, fittings, loss of water pressure and the likelihood of drain blockages.
Self-installation: different types of installation
How to install a countertop sink
A standard countertop kitchen sink is usually made of stainless steel. At the beginning of its installation, you first need to connect the mixer, since this design is already installed with a mixer. Upon purchase, a set of fasteners is provided with the sink. They need to be attached to the cabinet from the inside and made notes. Then screw the short screws so that they protrude from the other side, and treat the ends with sealant.
Having carried out such preparatory work, you need to apply the sink to the screws already screwed in and tighten them until they fit completely. It is better not to touch the excess sealant until it is completely dry, but wait until it dries so that you can easily remove it with a knife. Then you can connect the sink to the water supply and sewerage system.
Countertop sinks can come in a variety of shapes and sizes, and also have several bowls with different depths, which allows you to choose a sink to suit any interior design
How to install an undermount sink into a countertop
The main principle of installing a built-in sink is that you need to first cut a hole in the countertop. Installation of a mortise structure into a countertop - stages:
- Marking, depending on the shape of the sink.
- Cutting a hole in the tabletop.
- Treatment of joints with sealant.
- Fastening the sink with glue or clamps.
- Connecting communications.
These processes are described in more detail above. Usually the kit includes everything needed for mounting.
Mounting a mortise structure requires special skills and especially careful work, so in some cases it is better to contact a specialist to install it
How to install an undercounter sink
The process of installing a kitchen sink below the level of the countertop is quite labor-intensive. It requires the presence of a manual milling machine with special attachments, since sinks made of natural or artificial stone are usually installed in this way.
The principle of installing a sink under a countertop is the same as for other models of mortise sinks, but pay special attention to the joints, carefully treating them. The only difficulty when installing this product is drilling holes for the fastener, but this can be easily dealt with by purchasing special drills
The only difficulty when installing this product is drilling holes for the fastener, but this can be easily dealt with by purchasing special drills
How to install a sink on the same level as the countertop
Installing a sink into a countertop at the same level means mounting them in such a way that they are in the same plane without seams or joints.
With this installation method, the sink is installed on top in a special groove cut into the countertop. It is fastened using fasteners, having previously thoroughly treated the fastened areas with sealant.
For such installation of sinks, only models with flat, smooth edges are suitable; usually information about installation methods is indicated on the product labeling
What determines the quality of our work?
Any installation of an overhead sink begins with studying the template configuration. The more complex the shape of the sink, the more effort will have to be made to cut the appropriate hole. The slightest mistake can lead to damage to the tabletop.
For a good craftsman, high-quality installation of a mortise sink does not depend on its model, shape and material from which it is made. Today in fashion:
- round sinks made of stainless steel and stone;
- double sinks with two drains in a variety of materials;
- built-in and surface-mounted granite sinks.
One of the popular models of sinks is a bowl made of granite chips. It looks solid, washes well, and lasts a long time. Its installation is more difficult than installing sinks made from other materials.
If there are no holes for installing such a sink, then installing a granite sink turns into a filigree work. Sometimes there are holes, but they are too small and you have to cut them out additionally.
Our craftsmen do an excellent job with this work, using special drills with a “diamond” crown and other tools. To determine how much it costs to install a kitchen sink, you need to know what material the master will have to work with.
The sink itself is quite heavy, so installing the sink into a kitchen countertop is done with great care so as not to drop or break expensive plumbing fixtures. More and more people are installing a convenient and practical double sink in their kitchen. It is usually made of stainless steel, so it is easy to clean and is not “afraid” of chips if you accidentally drop the plate into the sink
But there are other models - marble, granite or quartz. Installing these “stone” double sinks is similar to working with a granite sink
It is usually made of stainless steel, so it is easy to clean and is not “afraid” of chipping if you accidentally drop the plate into the sink. But there are other models - marble, granite or quartz. Installing these “stone” double sinks is similar to working with a granite sink
More and more people are installing a convenient and practical double sink in their kitchen. It is usually made of stainless steel, so it is easy to clean and is not “afraid” of chipping if you accidentally drop the plate into the sink. But there are other models - marble, granite or quartz. Installing these “stone” double sinks is similar to working with a granite sink.
Unlike a conventional sink, installation of a countertop sink with a double sink includes two drains. This turnkey sink is installed by our specialists and delivered to the owners in working condition.
Installing a round sink in the kitchen or bathroom is no less popular. Like other models, it can be made from a variety of materials
The laconic geometric shape attracts attention and looks great in any interior.
The installation of any models of built-in or counter-mounted sinks is a little complicated by under-counter installation of the sink, because you have to work in an inconvenient narrow space.
Before you ask how much it costs to install a kitchen sink, tell our operator which model you want to install. By inviting a specialist to install a sink, you can be sure that a qualified technician will come to you.
By calling us and ordering any plumbing service, you will be convinced that we work not only efficiently, but also quickly. The best specialists of our company will go to fulfill your order.
Installing a sink with self-tapping screws
Such fasteners are easy to use and durable. Stages of work:
- Assemble a table or cabinet. Their height should be comfortable for the housewife to work with.
- Fastenings must be installed on the cabinet. It is better to purchase L-shaped plates with oblique slots from a hardware store. You will need 4-5 plates.
- Place the fasteners on the inside of the cabinet in the center of each wall of the underframe at the top. Mark the location of the slot with a pencil. Drill a blind hole for a self-tapping screw 5 mm above the mark. Screw in the screw and install the fastener on it. Repeat the operation with all fasteners on all sides of the base under the sink. The height of the holes for the screws should be the same everywhere.
- Assemble the sink. Before installing the overhead sink itself on the base or cabinet and securing it, you need to assemble it completely - secure the siphon and mixer in their places, install gaskets. This is done in advance, since the standard height of the cabinet after the final installation of the sink makes it difficult to properly install the siphon and other drainage devices.
- Coat the ends of the walls of the cabinet (underframe) with silicone sealant. This will save the cabinet material from deformation due to moisture.
- Installing a sink: the sink with the siphon and mixer attached to it is turned over and inserted into the cabinet. The fasteners are placed on self-tapping screws and moved along the slot. This presses the sink against the cabinet.
- The installation of an overhead sink is completed by connecting the siphon to the drain pipe in the kitchen. Assemble the siphon and connect it to the sewer pipe carefully so as not to break the thread.
- Before installing the doors on the cabinet, you need to check the sink for leaks. To do this, you need to fill the sink with water. If water does not begin to ooze out at the connection points with the siphon and mixer, then everything has been done efficiently.
- Install the door to the cabinet.
Types of overhead sinks
The advantage of this material is that it can be successfully combined with almost any kitchen design. Overhead sinks are one of the most popular sink options. Their advantages are obvious:
- low cost;
- ease of installation of the sink.
The disadvantages include:
- relatively small thickness;
- gap between the cabinet.
Overhead models are placed on the cabinet and secured. This is extremely easy to do, especially if the height of the structures is standard.
Important. Such sinks are best suited to sets of separate modules, where the sink is not part of a single work area covered by a common countertop. Installing an overhead sink is preferable in corner kitchens
where the headset is located in an L-shape, and the height of the modules is standard
Installing an overhead sink is preferable in corner kitchens. where the headset is located in an L-shape, and the height of the modules is standard.
The kitchen is a place where the family spends a lot of time together, where neighbors, relatives, and friends drop in for a cup of tea. Therefore, every detail of the interior is so important, creating coziness and comfort. How to install a countertop sink in the kitchen? What type of equipment to choose and install so that it lasts for a long time.
Both elements (cabinet and sink) are important. Place and location in the kitchen depends on:. Place and location in the kitchen depends on:
Place and location in the kitchen depends on:
- planning;
- preferences of the apartment owners;
- location of other types of furniture (in the same row with them, in a straight, corner version, or separately).
The design of the countertop is the basis for the sink. Its internal area is used to maximum benefit. It is not designed for a large number of shelves; its main purpose is to accommodate sink communications (corrugated hose, siphon) and trash cans. You can place a small shelf for detergents in it.
The surface-mounted sink is less popular today than the mortise sink.
There are certain rules during installation:
- To prevent excess moisture and deformation of the material, open areas are treated with: special mastic; silicone sealant.
- To prevent the structure from deteriorating due to leakage, it is necessary to securely tighten all the nuts using silicone sealant during installation: a corrugated pipe for water drainage; siphon; mixer
- Installed near the wall, since there are pipes in it: for drainage; cold and hot water supply; from the washing machine. water from other equipment (filter that purifies water).
The cabinet has 3 walls, so it is not rigid enough. To do this, create stiffening ribs (“kerchiefs”, wooden or metal corners, fixed in the four corners of the cabinet from the inside). This issue can be resolved by bolting the walls to other furniture or screwing them to the wall.
The cabinets are made in a variety of colors, which allows you to choose them to suit any interior style.
Kitchen overhead models are available in a wide range of types, sizes and shapes. Which model to choose for the kitchen? To select it you need to rely on:
- dimensions;
- layout;
- material of manufacture;
- prices;
- own preferences.
One of the popular types is a stainless steel sink. It is different:
- popularity;
- simplicity and elegance;
- ease of installation;
- durability;
- strength.
Stainless steel kitchen sink
Ceramic
Ceramic is popular and in demand
The product has the following advantages:
- durable;
- stainless;
- durable.
A stone sink will be appropriate in any interior style.
Selecting a location
First you need to find a suitable place to install new equipment.
Where not to place
Experts recommend that before installation you familiarize yourself with the places where you definitely cannot install an electric refrigerator.
Under the window
If you study the manufacturers' requirements for the use of equipment, you will notice that many of them do not recommend placing it under windows. The body of the device should not be exposed to direct sunlight, as this will cause it to deteriorate.
Near a heat source
There are several heat sources that refrigerators cannot be installed near.
Battery
In an apartment or private house where there is heating, special batteries are installed. Some people decide to place household appliances near them, but this should not be done. Under the influence of high temperatures, the housing will begin to quickly collapse.
Radiator
In many apartments you can see heating radiators on the walls, which are responsible for heating the room. In winter they are hot, and therefore it is better not to place anything near them.
Oven
In some kitchens, in addition to gas stoves, there are special ovens used for preparing baked goods. During operation, such ovens generate a lot of heat, and therefore it is contraindicated to place refrigerators near them.
Plate
The stove is an indispensable device in the kitchen, as most dishes are prepared with its help. Refrigeration equipment should be located at a distance of 100-120 centimeters from the gas stove.
Other
There are other appliances that can generate heat during operation. These include convectors, infrared heaters, heating stoves, and electric stoves.
Next to the sink
Some people decide to place the refrigerator close to the sink. Experts do not recommend installing it in this location due to the following factors:
- high humidity, due to which the case will quickly deteriorate;
- high probability of water getting on equipment.
When choosing a suitable location, you need to consider the location of the outlet. Equipment must be connected to grounded sockets that are connected to special stabilizers. They help equalize the voltage and prevent the connected refrigerators from burning out.
When choosing a place to install a refrigeration chamber, pay attention to the features of the floor covering. It must be smooth and highly durable
If the floor is uneven, you will have to install special pads under the legs of the device so that the body does not wobble.
Exploitation horror stories
The two most common misconceptions during operation:
I'll get an electric shock when the disposer is running
accidentally sucks your hand into the hole and tears off your fingers
What can you say about this? Firstly, as mentioned above, all electrical connections must be made through an RCD.
You are not afraid when you wash your hands or dishes under hot water from a running water heater. The same applies to wall-mounted boilers.
Well, the start button has no electrics at all. Everything runs on air pressure.
Regarding injuries. Let's explain it on our fingers
Mistake #25 Make no mistake, the disposer does not work like a garden shredder for grass and plants.
There are no sharp blades inside it. There is a smooth rotating disk with cams on the edges.
When lowering leftover food, the cams throw them onto a stationary perforated ring around the perimeter (like a grater). It turns everything into a homogeneous mush.
That is, placing your fingers in the center of the hole in the shell will not cause them to be cut off. The distance to the rotating parts is chosen with a margin (about 20cm).
To reach them, you will need to stick your entire palm inside and somehow manage to bend it.
If you still have a psychological barrier, then there are special pushers for safe work with the disposer. They can come as a set or be purchased separately.
In general, to summarize all of the above, if your budget allows you to purchase a household waste shredder (today prices for good models start at 20,000 rubles), buy it without hesitation.
Proper installation and following our simple tips will forever rid you of a bunch of bad-smelling garbage in the kitchen. Plus you will never have such awkward situations with the opposite sex
https://youtube.com/watch?v=L_0b356dfNw%3F
Specifics and models of wall-mounted sinks
The latest modern trend in sink installation is to mount the unit to the wall surface. This type of arrangement is one of the most familiar and favorite among Russians, since this type of installation has worthy and significant advantages. By installing the sink on the wall, you will save the desired meters of space, and the space under the sink is very convenient to use and keep clean.
Before you begin installation work, choose the model of wall-mounted sink that has the most ergonomic design. A separate model has specific design aspects, which, of course, affects the method of its installation. Therefore, it is so necessary to have at least some knowledge about the installation and specifics of connecting the device to the general water supply system.
A wall-hung sink above the washing machine is an excellent solution for a small space
An interesting solution is to install a sink above the washing machine; this saves precious space in the bathroom.
Wash basin
All types of ceramics and polymer concrete are quite fragile, which, willy-nilly, has to be compensated for by the significant thickness of the bowl walls. The practical consequence is solid weight: when you turn the tap or mixer handle, the sink does not move and does not come off the edges of the cabinet. That is why the standard mount for the washbasin is often not included in the factory configuration.
Sealant
The easiest way to prevent a sink from moving horizontally is to seal it with silicone sealant; It also seals the seam between the washbasin and the back wall.
A couple of tips regarding choosing a sealant:
- It is worth purchasing not a universal one, but a plumbing one. As a rule, this type of sealant contains antibacterial additives that prevent the development of fungus and the appearance of black spots on the seam.
- It is better not to buy the cheapest types of silicone sealants from little-known manufacturers. In our case, a high degree of adhesion to a smooth surface is important. It is adhesion that is primarily affected by price: cheap sealants adhere to difficult surfaces much worse than expensive ones.
High-quality sanitary sealant from Ceresit
Nageli
Most washbasins are equipped with mounting grooves designed for fixing to brackets. As a rule, these grooves fit exactly at the ends of the side walls of the cabinet. In order to prevent horizontal movement of the sink, it is enough to provide the cabinet with several protrusions in the appropriate places.
How can I do that?
- Wooden dowels are seated with glue in pre-marked and drilled holes. A nuance: it is better to make dowels of variable diameter, thinner at the bottom and thicker at the top. The instructions are due to the fact that the thickness of the laminated chipboard in the walls of a standard cabinet is only 16 millimeters, and a thick dowel with significant lateral force can easily be torn out along with the meat.
- Improvised dowels can be made by screwing screws into the ends of the walls (with pre-drilling, of course). Previously, two plumbing gaskets for screw mixer taps are put on each of them; If it is necessary to reduce the outer diameter, the rubber is trimmed with a sharp knife.
For such fastening, the grooves in the washbasin must be at the ends of the walls
How to avoid mistakes during installation
To drill into a wall to mount a sink, you need to choose the right tool based on the finish of the bathroom. For tiles, a feather drill bit is suitable (it will leave fewer chips). To drill through concrete, you need to set the drill to impact mode and select a carbide attachment.
The presence of a hammer drill is preferable, since when drilling a wall made of concrete or brick, the applied forces are several times less.
To avoid damage to communications and leaks, it is necessary to choose flexible hoses with union nuts for connection to water pipes.
Before installing the sink, secure the drain siphon from below using rubber seals and a corrugated hose.
If, after checking the tap, it turns out that the connections are not tight enough, they need to be disassembled. Then put a braid of combed flax over the thread or use FUM tape (5-6 turns). After this, it is necessary to reassemble the structure and check the tightness.
By observing all the above requirements and the sequence of actions, you can be sure that the sink and cabinet are correctly connected correctly.
Important! Before installation, check the quality of the gaskets and, if defects are found, immediately replace them with better ones.
Connecting the siphon to utilities
When installing a sink, special attention is paid to installing the siphon. First you need to secure the outlet, for which a mesh, a silicone or rubber gasket, and a clamping screw are placed in the drain hole
The use of a gasket is an indispensable condition, since its presence creates a tight connection.
During its installation, you need to make sure that it fits as tightly as possible and fits the drain of the plumbing fixture without the slightest displacement or gaps. First, you should make sure that the gasket is installed correctly, and only then tighten the clamping screw, thereby connecting the siphon and the outlet.
Next, the end of the outlet pipe, made of corrugated tube or hard plastic, is connected to the sewer socket. When connecting to a sewer pipeline, seals must be used, the function of which is performed by rubber gaskets or cuffs for corrugated pipes.
Installation
We lay out the tools and accessories in advance so that they are at hand. It is also advisable to decide on the mixer and siphon so that everything is installed at once, otherwise it will be difficult to install later. How to attach a stainless steel sink to a cabinet? This is not difficult if you have already completed the assembly of the frame itself.
- L-shaped fasteners are installed, either included in the kit or purchased separately.
For fastenings, it is better to purchase L-shaped plates with oblique slots at a fastening store. You will need 4-5 plates.
During the assembly process, make sure that all holes are at the same level. We invite you to read: How to choose a countertop sink and a suitable faucet?
We invite you to read: How to choose a countertop sink and a suitable faucet?
Before installing the overhead sink itself on the base or cabinet and securing it, you need to assemble it completely - secure the siphon and mixer in their places, install gaskets.
This product provides additional fastening of the sink to the cabinet in the kitchen.
The fasteners are placed on self-tapping screws and moved along the slot. This presses the sink against the cabinet.
Take care of the accuracy of the work and reliability.
If water leaks out, the system is assembled incorrectly.
The sink is secured to the cabinet with fasteners and a sealant. This is the most reliable method, quite durable.
So the question of how to install a stainless steel sink on a cabinet has been resolved. If the work is done correctly, it can stand for a long time.
Many people attach the sink to the countertop. There are options when, when ordering kitchen furniture, the need for a hole in the countertop for installing plumbing is specified. Then there will be little work involved in installing the sink.
If there is no specially allocated space on the countertop, then you will have to do everything yourself.
- Mark the contours on the surface with a pencil. Take into account the margins from the edges (5 cm). Take measurements for the bowl.
Remember that the gap from the edge of the countertop to the side of the sink must exceed 50 mm. If this distance is less than 50 cm, then the sink needs to be deepened.
To make a hole in the tabletop you will need an electric jigsaw.
To avoid chipping on the front surface, choose the opposite direction of the tooth.
Stepping back a couple of millimeters from the edge of the hole, we apply the silicone in a thickness just above the side of the sink.
The sink needs to be inserted into the hole and the edges should be pressed firmly so that the silicone strands take the shape of the sink and left for a few minutes.
So, having looked at how to attach a stainless steel sink to a cabinet with fasteners and to a countertop, you will notice that doing this is not as difficult as it seems.
https://www.youtube.com/watch?v=Ndnm8yp-fLs
The most difficult thing is to make the hole correctly. If it turns out to be larger than expected, the paws will not be able to hold the sink.
3 more important tips
Do you want to connect the sink yourself correctly? Don't forget 3 more points:
- It is better to replace rubber seals with silicone sealant. Rubber will not provide a tight fit and does not have a sufficient service life, while the sealant will fill all the gaps and cracks;
- It is better to connect sinks made of natural or artificial stone together to prevent falls and damage;
- Fastening the sink to the countertop or module with self-tapping screws is carried out exclusively by hand. Using a tool may create too much tension, which may damage the structure.
How to install an undermount sink
Mortise sinks are designed for installation in a countertop, which emphasizes the integrity of the furniture ensemble, covering all its constituent elements with a continuous sheet. To correctly mark the location for cutting the installation opening without disturbing the aesthetics of the kitchen unit, you need to use a marking template. Its functions can be successfully performed by cardboard packaging, in which a built-in kitchen sink is often sold. Followed by:
Lay out the template on the countertop, temporarily securing it with adhesive tape or tape. Trace the outline of the planned opening with a pencil. If there is no template, then the shell of the sink itself is used for marking. It is turned over, applied to the tabletop and traced. From the resulting line, they retreat inside the contour so much that after cutting it out, the bowl has a slight backlash in the opening. Drill a hole on the insertion line so that the jigsaw file fits freely into it. Smoothly moving the jigsaw along the contour, make a circular cut. To prevent premature loss of the sawn part and jamming of the file, periodically screw the screws into the cut slot. They will perform the function of temporary fastening, wedging the removed fragment of the tabletop. Insert the sink into the manufactured opening and check that all elements match each other. Additional pruning may be required. Treat the end of the opening around the entire perimeter with a moisture-resistant sealant. This will protect the hydrophilic material of the solid tabletop from swelling if water accidentally gets on it. Glue an elastic seal along the bottom edge of the kitchen sink. It must be included with the product or purchased separately. It is a good idea to additionally cover the seal with sanitary silicone on top. Now finally insert the sink into the cut opening. Correct its position relative to the outer contour outlined during preliminary marking. Lightly tighten (not all the way) the included brackets
Add sealant to possible voids between the edging of the sanitary bowl and the countertop. Screwing in the fastening screws from below, carefully press the sink. For better adhesion of the bracket tenons to the tabletop material, you can lightly tap them with a hammer
The operation of putting the sink in place should be carried out in stages: the corners are attracted, but not completely; the middle fasteners are tightened; again, starting from the corners, the sink is pressed completely. In this case, the excess squeezed out sealant is carefully removed with a damp cloth.