Leather gloves are a stylish accessory that perfectly complements your look, giving it elegance and completeness.
Often gloves are chosen as a gift, but in this case a certain problem may arise. Without trying on, a leather product may turn out to be too big
or little.
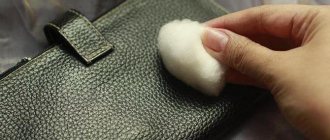
What to use on gloves?
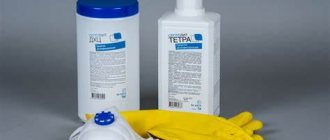
Take a flannel cloth or cotton pad, soak it in a special cleaner and wipe the dirty areas. Advice! Salamander foam with orange oil is perfect for these purposes. Then wipe your gloves
paper towel and treat them with a special water and dirt repellent.
Interesting materials:
How to put a picture on MI Band 5? How to put your own picture on Mi band 4? How to install Russian language on Mi band 5? How to send Call me back to MTS? How to get points on Ozone? How to add text to PDF? How to watch movies online on PS 3? How to translate the keyboard into English on Samsung? How can I remove the PIN code on body 2? How to reduce video quality on YouTube?
Features of working with leather
If the gloves are slightly too small, you can try stretching them at home. But if things are large, then eliminating such a problem is much more difficult. Special studios will help you solve it efficiently. True, it will be quite expensive. If finances do not allow you to do this, then you can try to shrink the leather product at home.
Before you begin this procedure, you should familiarize yourself with the basic rules of working with leather.
- You can reduce the product at home by only 1/2, maximum one size.
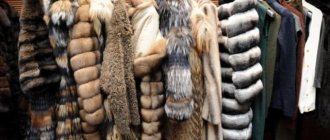
- If the gloves are lined with fur, then this is almost impossible to do.
- Only products made of genuine leather are subject to shrinkage, and not products made of dermantine.
If the gloves are made of kid, then they require more delicate handling due to the thin layer of leather.
Option number 6. Short leather cycling gloves
Step 1 . You should start with a pattern. Find one ready-made on the Internet or make it yourself. Here is an example of a finished pattern for fingerless gloves (there are also parts that will be sewn between the fingers, but we’ll talk about them later).
Bicycle gloves pattern
In our example, the palm circumference is 18 cm (that is, size S). When creating a pattern, be sure to consider the size ratio!
Left and right parts
Step 2 . When calculating the size of the pattern, adhere to the following rules:
- along the line of the pads, the width of the glove should exceed the width of the hand by 3 cm;
- the width of the thumb hole should be 2.5 times greater than its width (otherwise it will be difficult to remove the glove);
- Each “finger” of the glove should be twice as wide as the finger of the hand.
It is important to correctly calculate the size of the pattern
Step 3 . Take an A4 sheet of paper, fold it in half and cut out a pattern from it.
Leaf folded in half
To determine the size, you can measure the circumference of your palm (see photo).
The circumference of the palm is measured
The resulting value must be checked against the size table below.
Glove size chart
Step 4 . Prepare everything you need for work:
- skin;
- handle;
- buttons, as well as a button installer;
- ruler;
- needle, thread;
- scissors (you can also use a stationery knife);
- awl;
- hole puncher;
- marker
Tools and materials
Leather, buttons, button installer
The thickness of the skin should be 0.8-2 mm, and it itself should be quite elastic. The paint or outer covering must be durable (otherwise the leather will rub off on the steering wheel) and not slippery. Our example uses 1.5mm leather.
Leather thickness - 1.5 mm
Step 5 . Try on the paper pattern to make sure the measurements are correct. It is important that the seam meets along the line of the index finger and thumb.
Trying on a pattern
Make sure the dimensions are correct
Step 6 . Everything is fine? Start transferring the pattern onto the leather. Remember that you are making 2 gloves, so trace both pieces.
Lay out the pattern to its full width and trace around the wrong side of the leather with a pen. Try to ensure that the material does not fold at this time and lies flat.
The template is outlined with a pen
Step 7 . Cut out future gloves, fold them, check that nothing protrudes anywhere and that all the lines meet correctly.
Future gloves are being cut out
Step 8 . Mark 3 more parts - they will be sewn between the fingers. All parts must have different lengths:
- 1 – 20x50 mm, between the index and middle;
- 2 – 20x45 mm, between middle and nameless;
- 3 – 20x47 mm, between the ring and little fingers.
Parts that will be sewn between the fingers
Step 9 . Cut out all these parts - 2 pieces each.
There should be 2 pieces of each part.
The photo below shows all the pieces needed for the gloves.
Set of blanks for gloves
Step 10 . Mark lines and holes for subsequent sewing of seams. It’s great if you have a sewing machine that can sew on leather—this will make the work much easier. In this case, simply stitch the necessary parts together.
Hole marking
Step 11 . Start by marking out the rectangular pieces. Make holes in increments of 3-4 mm, departing 2-3 mm from the edge. Use a marking wheel for this and then an awl. If you don't have a suitable tool, you can use a regular ruler.
Marker wheel
Step 12 . Mark the holes in the gloves themselves. The workpieces should not move or move apart.
Marking holes on gloves
Holes are created
Step 13 . Once you have finished marking, start stitching the parts. You can sew the leather from the wrong side if it is thin and soft. But if the thickness of the material is more than 1 mm, it is better to sew directly from the front side - this way the seams will not protrude, press or interfere with your fingers.
Start sewing from the bottom, from the thumb. First, secure the thread from the inside.
The thread is attached from the wrong side
Step 14 . Start flashing. Try not to make unnecessary gaps between the holes, stretch the thread well. The parts should not move or wrinkle.
Firmware
The thread should be well stretched
Step 15 . Go to the end of the line, secure the thread and go back. That is, the needle goes through the holes in a “dotted line”, after which it returns back, closing the gaps.
Reach the end of the line
The thread needs to be secured
More photos of the process
Step 16 . Having reached the beginning, fasten the thread, bring it to the inside, trim and carefully glue the tip so that it does not stick out. Then stitch the area between your index finger and thumb.
The part between the thumb and index finger
If you try, the seam will turn out neat and even.
Smooth and neat seam
Step 17 . Try on the stitched part. Check whether it is comfortable for your fingers and whether you have marked everything correctly.
Step 18 . Sew the rest of the product. Take a rectangle (1), bend it in half with the outer surface inward, insert it between your middle and index fingers. As a result, a “triangle” should form on the index finger.
Sew on a rectangle
Sewing process
Sew all the parts if nothing protrudes anywhere (and if it protrudes, first trim off the excess).
All parts need to be sewn
Cutout at the top of the glove
Step 19 . Sew the seam (in both directions, as before), secure the thread, trim off the excess. Then sew on the other side.
Cutout at the top of the glove
Stitched on the other side
Stitched on the other side
Step 20 . Sew the remaining 2 parts in the same way. When finished, try on the finished gloves. Do your fingers bend, the seams don’t get in the way, does your hand feel comfortable? So that's great! After some time, the skin will stretch a little and the gloves will take the shape of your hands.
Gloves are being tried on
Fingers should bend freely
Seams should not interfere
Step 21 . Mark where the button will be located, cut a strip of material at the top. The width of the strip is 10 mm (in accordance with the size of the button).
Cut a round hole for ventilation 2-3 cm below the knuckles (with a clenched fist), retreating 1.5-2 cm on the sides.
Hole for better ventilation
Step 22 . Put on a glove, tighten and mark the location of the button.
Next, take care of the button
Step 23 . Use a hole punch to make 2 holes for the button parts. Secure the buttons using a special installer or, for example, a hammer with a pin.
Attaching the buttons
Inside view
Alternately connect the elements of the upper and lower parts of the button. Secure with button installer.
Button installer
Using the installer
Pinned button
Bottom of the button
Attaching the bottom of the button
Finished bottom part
Step 24 . Place the button parts on top of each other and check if everything works. Open and close the button several times in a row.
The functionality of the button needs to be checked
Step 25 . To provide additional ventilation, make a semi-circle perforation above the cut hole. Use a hole punch. The pitch between the holes is 1-1.5 cm.
Holes are made with a hole punch
Additional perforation on the glove
Do the same with the second glove.
Sew the second glove in the same way
Homemade cycling glove
It turned out stylish and comfortable
That's it, the cycling gloves are ready! But remember that if you like to ride in the sun for a long time, then be prepared that such a “bicycle” tan will soon appear on your hands.
You may get a “bicycle” tan on your hands.
Ways to reduce skin size
There are cases when gloves made of genuine leather stretch so much that it becomes necessary to reduce the size. For these purposes you will need ordinary water. There are three main ways:
- Gloves are soaked in soapy water for no more than an hour. The skin should be thoroughly wet and soft; they should not be soaked overnight.
- The second method also involves soaking the skin, and after it dries, it is enough to treat it with a solution of castor oil and ammonia. Dry the product naturally; hair dryers and other heating devices are excluded.
- You need to soak the product for 30 minutes in hot water, wait until it dries and treat it with baby cream.
The main task in the procedures for reducing or increasing the size is to be careful, otherwise things can be irrevocably damaged and will have to be thrown away. Considering the high price, such extravagance is unforgivable. Using these simple recommendations will not require much time or significant financial costs, and for the most part it will be completely free, since all the necessary ingredients are available in any home.
Where can I go to get my gloves reduced?
If you don’t want to experiment with a thing or have doubts that you will get a decent result, then you need to contact a specialized studio. Choose only those that work with leather items.
Here they can offer or recommend two main methods. The first is the chemical effect on the skin structure. The second method is simply to alter the product to your size.
DIY oriental dance belt
What is a comb?
How to stretch gloves using cream?
For this purpose, it is necessary to smear the surface of the gloves with a small layer of rich cream (you can take a regular one for children). After the cream has been applied to leather gloves, you must immediately put them on - the product becomes soft and stretches easily in a matter of seconds.
You can also use glycerin instead of cream, but this product is less effective - the product stretches just a little. This is due to the fact that glycerin is slightly less absorbed into the skin than cream.
Constructing a pattern of short gloves
It all started with finding the right pattern. Unfortunately, nothing on short fingerless gloves was found on the Internet. There were only patterns for models with long fingers. Well, this defect had to be corrected on our own. With the help of old gloves, a lot of calculations and recalculations, I made my own pattern, although it didn’t work out the first time.
The main pattern turned out to be fingerless gloves (plus 3 more parts for sewing between the fingers, they will be discussed below).
I have size S (palm circumference 18 cm).
You can draw the pattern yourself, you just have to take into account the size ratio.
Pattern size calculation:
- The width of the glove along the line of the pads is 3 cm larger than the hand
- The width of each “finger” of the glove is 2 times wider than the finger of the hand
- the space for the thumb should be 2.5 times wider than the finger (if it is too narrow, it will be difficult to remove the glove)
We cut out the pattern from a sheet of A4 paper folded in half.
You can determine the size by measuring the circumference of your palm along the pads, as shown in the photo.
We check the resulting number with the size table.
Men's gloves
| Size in cm | 20 | 22 | 23 | 24 | 26 | 27 |
| XS | S | M | L | XL |
Ladies gloves
| Size in cm | 16 | 18 | 19 | 20 | 22 | 23 |
| XS | S | M | L | XL |
Bringing shine back to gloves
To restore the appearance of the accessory, it is necessary to treat it with castor oil or glycerin. Apply the product in a thin layer and rub into the material. The oil makes the skin elastic, shiny, soft. The substance restores the shine and effectiveness of things well. If you don’t have castor oil, glycerin will do as hand cream. After applying the product, wipe the product with a dry cloth or paper napkin.
If there are scratches or minor damage on the accessory, they can be hidden by aerosols produced by the manufacturer of leather shoes and clothing.
For dark gloves, coffee grounds are a great help. Apply to the defect site and rub into the material. Use a sponge to remove the grounds.
You can restore the shine of white gloves with bread crumbs or Vaseline. The products are applied to the product with a cotton swab, then washed off with a dry towel. Orange peel or drying in the fresh air will get rid of the unpleasant odor. Multi-colored products will be restored by egg white. Beat it until foamy and apply. After drying, wipe the gloves with a cotton swab dipped in milk or sunflower oil.
Option No. 8. Waterproof gloves from a bag
These gloves will come in handy for doing some dirty work. They can be made from any package.
Step 1 . Prepare everything you need - thick film (for example, a garbage bag), a stationery knife, an electric soldering iron and a marker.
Step 2 . In our example, we use a regular garbage bag.
Using a trash bag
Step 3 . This bag is already two-layer, so there is no need to fold it in half.
The package is placed on a flat surface
Step 4 . Place the bag on a flat surface, place your palm on it, fingers spread. Trace your hand with a marker, retreating about 5-7 mm from it.
The hand is outlined with a marker
Step 5 . Trace the outline with the tip of a heated soldering iron. This way you will burn through the film and connect both layers in parallel. Don't forget to place cardboard under the film first.
The circuit is traced with a hot soldering iron
Step 6 . Circle everything except the bottom - cut a line there with a stationery knife. The finished glove can be easily removed from the film.
The line is cut from below with a knife
On a note! Instead of a soldering iron, you can use an old knife, heating its tip over the fire. You can make as many of these gloves as you like at one time.
Trying on a finished glove
Make the cuffs long enough to protect the sleeves from splashes.
How to shrink leather gloves at home without damaging the leather?
In order not to spoil the item, you must strictly follow the instructions for reducing the size of leather gloves.
Method No. 1
Make a solution of monolithic soap in water at a temperature of about 40°C. If you don’t have such soap, you can use regular shampoo without strong fragrances. After this, simply wash your gloves in this water. Then, without squeezing them, place them on a terry towel to absorb excess moisture.
This method is suitable for gloves made from pigskin or suede.
After this, dry in a horizontal position in a warm place.
Dry only in a horizontal position to avoid deformation of the skin.
Method No. 2
The easiest way is to wet the gloves with very hot water. After this, they must be dried as described above.
To prevent the skin from changing its structure and becoming dry, it is necessary to lubricate the surface of the gloves with a thick layer of moisturizing cream of dense texture. You can also use clear shoe polish.
Method No. 3
This option is only suitable for dense products with fairly thick leather. It is necessary to fix a small amount of water in a saucepan, where the glove will completely fit. When it starts to boil, dip your gloves into the pan for a few seconds. Then dry and treat with olive oil on a dry surface.
If there are doubts about the quality of a leather product, then this method can only aggravate the situation.
Method No. 4
This option is suitable for thin products made from husky. It is strictly forbidden to dip them in water, so you can dip them in gasoline. Then take it out, dry it slightly, place it on a horizontal surface, and wipe it with a soft cloth. Sprinkle talcum powder on top, remembering to do it on both sides.
Method No. 5
This method is the simplest, but to achieve the effect you will have to repeat the procedure several times, each time trying on the glove. You need to take liquid fish oil (not encapsulated) and thoroughly wipe the leather product with it. This should be done only with oil that does not have a pronounced odor. Otherwise, the gloves will give off a foreign odor later.
What to do if gloves shrink after washing
The ideal shape of gloves is often disrupted by washing. Prolonged soaking and use of high temperature water provokes a decrease in size. You can carefully stretch it, but do it in the transverse direction, otherwise the accessory will come apart at the seams.
To stretch the leather, wrap the product in a towel soaked in cold water for 3 hours. Then pour a small amount of cologne or alcohol into the inside and put it on. The hand should remain in the glove until the liquid dries completely.
Baby cream will help increase the size of the product. It should be applied to the inside of the item if there is no lining. If there is fur inside, it will not be possible to adjust the size of the gloves. Glycerin stretches the skin well after washing, you need to lubricate your hand with the product and put on a glove.
If the accessory has shrunk in the finger compartment, the size will not be restored.
To ensure that leather accessories retain their original appearance for a long time, wash and store them correctly. Keeping gloves in your closet is of great importance. Do not pull plastic bags over the top, you risk inviting mold. The skin does not like direct sunlight or excessive heat, as it will lose color and stretch. The best option for storage would be fabric bags or cases; they maintain normal temperature, do not form condensation, and do not allow moths to pass through.
Leather gloves delight us with their quality, softness and warmth. But over time they become dirty. Some people wonder if leather gloves can be washed or if they only need to be cleaned. Today we will advise you how to wash leather gloves.
Stretch gloves using eau de toilette
One of the most popular methods for stretching gloves to the required size is called eau de toilette. It can be safely replaced with regular (cheapest) cologne. A small amount of this alcohol-containing product is poured inside the gloves, and then carefully pulled onto your hands.
It is enough to walk around in leather gloves for several minutes (at least 15) so that they can completely take the shape of your hand. After this procedure, the next time you will be able to put them on without any difficulty.
A few notes:
- Leather tends to stretch, so even if you made a slight mistake with the size initially, everything may not be so critical.
- It is advisable not to wet the gloves. Water can stain their hands. And if you get caught in the rain on a bicycle and ride for some time, the gloves will then take the shape of your hands on the handlebars.
- If you ride a lot and under the sun, a “bicycle” tan appears on the back of your hand, which will only go away in winter.
Option No. 7. Fingerless gloves (mittens) made from socks
Step 1 . Find suitable socks, ideally these should be knee socks. Choose some interesting pattern that will look nice on your gloves. For example, stripes like this.
Prepare knee socks with an interesting pattern
Step 2 . Cut the entire foot of the sock in a straight line (right above the heel). Set the bottom part aside; you won't need it.
Cut off the foot of the sock
Step 3 . Place your hand on the sock trim (as in the photo below), mark where your thumb is located (usually about 5 cm from the top edge of the glove).
Trimming by hand
Step 4 . Armed with scissors, make a slot for the thumb (13 mm is enough).
A vertical cut is created
Step 5 . Try on the future glove by inserting your thumb into the slot. If you need to enlarge the slot, you can do it at this stage. Also, give it an oval shape.
Trying on a glove
Step 6 . Fold the cut edge of the glove inward by about 1 cm. Using tailor's pins, secure the hem, then sew with a zigzag or knit stitch. Or do it by hand using running stitches.
The hem of the glove is sewn
Step 7 . Hem the edges of the thumb hole. Tuck them inside by about 0.5 cm, and hem the resulting hem with running stitches.
Cut the slots for the thumb
Step 8 . Make the second glove in the same way. During production, try on the mitts from time to time so that they turn out identical.
Ready-made mitts from socks
Video - How to sew fleece mitts
Option #3. DIY knitted gloves
The next option we'll look at are these cute knitted gloves.
Knitted gloves pattern.pdf
The pattern of such gloves looks like this.
What does the pattern of such gloves look like?
The outer lines are 4 mm wide (these are allowances). The lines that align on the glove and thumb are highlighted equally or have the same color.
In our example, an overlock type sewing machine was used; the author sewed with one needle, removing the thread extender. Thanks to this, the overlock stitch turned out to be quite narrow. The material used is two-thread Loop footer.
Step 1 . First, attach your thumb to the glove. Connect the section highlighted in green on the pattern.
The slice highlighted in green is connected
The base of the finger is sewn
Step 2 . After this, sew the base of the finger to the glove.
Step 3 . Connect your finger as in the photo below.
Thumb connects
Finger connection
Step 4 . Bring your top fingers together. Cut out a strip of 2x55 cm along the grain thread.
- The thickness of the strip can be increased if the fabric is thick. But in our example, the knitwear is relatively thin.
- You can make a strip from pieces of fabric, but in this case the seams should be in the places of the membranes.
Take the strip and start connecting your fingers with it, starting from the top of the index finger and ending with the top of the little finger. Sew at the base of the fingers the entire width (that is, 2 cm), tapering towards the top. In the photo you can see that at the base the strip is flush with the cut, and at the tops it protrudes beyond the edges.
Fingers are connected by a strip
Protruding edges trimmed
Step 5 . Do the fitting. If everything is fine, trim the protruding edges of the strip.
Step 6 . Machine stitch one side to join the strip to the pattern. On each membrane, bend the next finger (this will create a straight line) and sew a line.
The stitching is done on a machine
Opposite sections are collected with needles
Step 7 . Gather the opposite sections with needles so that when laying a stitch, you don’t catch anything unnecessary on the tops.
Step 8 . Go around the other side in the same way.
The other side does the same
The seams should hold the parts together well.
Step 9 . Check the security of the seams. If the stitching is done poorly and holes appear somewhere, lay another stitch on top to eliminate the defect.
Step 10 . Fold the bottom of each glove twice, then sew a straight machine stitch.
The bottom of the gloves is turned up
Another photo of the finished gloves
Step 11 . If the knitted gloves were made as a gift, package them beautifully.
Looks good on the hand
Nicely packaged gloves