Obviously, the zipper type fastener is known to everyone and is very popular in all its applications and manifestations. These are clothes and shoes, bags and cases, and a lot of other equally useful things. Do you know what underlies its operating principle?
Few people know that the idea for its implementation was given to the world by an ordinary bird. More precisely, a bird's feather. Even more precisely, the principle of connecting the elements of the pen into a single plane. This is an alternating interlocking of feather fibers, ultimately forming a single whole. The same thing happens in ordinary “lightning”. When it is fastened, the elements of one edge engage with the elements of the other edge using a lock or, in other words, a “slider”.
The elements can be plastic or metal staples or teeth, one end attached to a strip of fabric. The plastic version can be molded (called a “tractor”) or twisted (“spiral”).
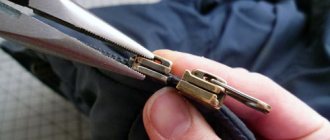
The weakest link of this entire fastening device is usually the lock, or “slider”. Its malfunction can manifest itself in the breakdown of the “tongue” - the device that we pinch with our fingers. The mechanism that holds the slider closed may break, and then it will come unfastened. In addition, the malfunction can manifest itself in the divergence of the halves of the zipper when trying to fasten it. In the latter case, many advise pressing the halves of the lock closer to each other.
Types of runners on a jacket and their markings
To buy the right dog, look at the back of the old one. There is a number and a letter engraved there. Helpful notes regarding the number:
- the numerical indicator of standard sliders varies from 3 to 10;
- steel lightning may be outside the specified range, exceed it, or vice versa;
- the number is not just a number, it is the width of the slider in millimeters (if you can’t see the engraving, measure the width of the slider).
The letter component of the marking is also indicative. Its meanings:
- X – cast and one-piece zipper, number of locks: 2;
- L – the clasp cannot be undone, number of locks: 1;
- N – one-piece type zipper, number of locks: 2;
- D – the zipper opens completely, there are 2 locks with 2 connectors;
- A – the lock design does not provide a connector;
- B – there is a connector, number of locks: 2;
- C – there is a connector, number of locks: 1.
The dog itself, or more precisely, its shape, serves as a kind of . You can use it to find out the type of lock. For a twisted zipper, the traditional slider has the shape of an oval, for an iron zipper it has the shape of a triangle, for a tractor zipper it has an oval or trefoil shape. There are also products of other shapes, but they are less common on the market than the classic versions.
Important! If you don’t have the old dog, just take the jacket with you to the store. An experienced seller will be able to “by eye” choose the right type of slider. As a last resort, he will do this experimentally.
What is needed to replace the dog?
During the work you will need the following items and tools:
- needle;
- threads;
- new slider;
- screwdriver;
- pliers or pliers;
- nail scissors.
In some cases, the list is replenished with new limiters (metal staples are better) and glue (universal, colorless, strong, without acetone and vinegar-based additives). In other situations, it is possible to cope with the task without scissors, a screwdriver and thread with a needle, only with the help of a pawl, pliers and a clamp.
Step-by-step DIY replacement process
Method one:
- take pliers and bite off or remove the upper slider lock (a limiter that prevents the pawl from arbitrarily falling out of the zipper; the plastic one is bitten off, but the metal one is unbent and removed);
- put the slider on the zipper (it may be tight, you shouldn’t rush and pull, you need to move carefully, slightly rocking the pulley from side to side and from top to bottom);
- putting on the slider, lower it down;
- We take a new metal bracket-limiter and install it in place of the old clamp;
- so that the bracket fits well, squeeze it from the sides with pliers or a side cutter;
- in a similar way we change the second upper limiter located on the other side of the jacket;
- we try to fasten the zipper using a new slider;
- if it dangles, sits too loosely, then carefully squeeze it from 2 sides with pliers (you don’t need to apply excessive amounts and force and leave too little gap, otherwise the slider simply won’t be able to work or will begin to tear the fabric).
Important! It is imperative to change the latch on the second side of the jacket, which, at first glance, is in no way connected with the slider, since contact between the pawl and this limiter still takes place. This happens when the zipper is zipped all the way. And if there is a small limiter on one half and a large one on the other, this may later cause the lock to diverge or the slider to fly out.
Method two:
- remove the retaining bracket and the old slider;
- Using scissors, cut the top edge of the zipper a little (just a little and as close to the beginning of the teeth as possible);
- put on the dog;
- install a new retaining bracket;
- change the limiter on the 2nd side of the jacket;
- Use buttonhole stitches to sew up the incision that was previously made on the zipper.
This method is good because it facilitates the process of threading the zipper slider . Its disadvantages are also obvious: you will have to make an incision, then sew it together, which in the future can cause premature failure of the zipper (it will begin to tear further, creep along the previously planned cut and holes from the needle).
Subtleties of replacing a zipper slider on a jacket
Useful notes and tips:
- if the dog does not want to put on, then slightly increase the distance between its flaps using pliers (do not forget to squeeze them back after successfully putting them on);
- sewing stores mostly sell black zippers; you can try to paint them, but most likely this will lead to an increase in the size of the pawl and a reduction in the size of its flaps, and in the future the painted areas in contact with the teeth will begin to rub off and peel off unsightly ;
- In order for the new slider to be easily put on and move well, before starting manipulations with the pawl you need to lubricate the zipper (plastic ones are rubbed with dry soap, iron ones - with oil);
- the slider will fit into place faster if you hold it at a slight angle while putting it on;
- if the limiter goes beyond the edge of the jacket, then carefully pry it off with a screwdriver;
- the principle of working with twisted lightning as a whole is not much different from the options proposed above, except that instead of the limiter you can install a second pawl;
- If you didn’t buy a metal fastening bracket in advance, then instead of it, sew the same point on the edge of the zipper multiple times (this will lead to the formation of a large “bump” that a normally compressed slider will not be able to get over).
Causes of lock malfunction
If a problem arises with the dog, also called a slider or slider, you should not immediately resort to the help of repair shops. This problem can be solved independently at home. First you need to figure out what is wrong with the fastener. Depending on this, further steps need to be taken. The main reasons why it may break:
- the dog slid off the teeth;
- the slider in some place does not fasten or unfasten the zipper, but simply pops out on one side of it;
- the fastener comes apart or the slider gets stuck;
- When fastening a piece of clothing, the pawl does not fasten, but slides off the fastener.
In this case, you need to repair the pawl or replace it with another copy purchased in accordance with the desired type of zipper. When the teeth of the fastener are not damaged, this will be the best solution, since there is no need to replace the whole thing. The clasp is replaced with a new one if the teeth are partially torn out.
Is it possible to make a dog yourself and install it?
If the tongue of the pawl falls out, but the slider itself remains in place, then replacing the slider can be postponed until later. You just need to find an object that, after a few manipulations, will become suitable for use as a tongue. It could be a paper clip, a bobby pin, or a hairpin .
The sequence of steps for making a dog yourself:
- bend 1 side of the paperclip (if you are using a bobby pin or a pin, then not only bend it, but also use pliers to shape it into an unfinished circle or oval, one edge of which is bent slightly to the side and forms an “L”);
- insert the workpiece into the hole in the tongue;
- scroll so that the end of the workpiece is as far as possible from the edge of the paper clip;
- fasten a wool thread to a paper clip (it is thicker than sewing thread, so it fits better);
- Using a hook, wrap the yarn around the entire paper clip;
- At the end of the process, complete the tying with a fixing knot.
The use of thread is caused by the need to soften the improvised tongue, decorate it with the color of the zipper and provide additional protection to the hands. If the listed nuances are not on the agenda or there is simply no time, then it is quite possible to do without winding, that is, simply insert a paper clip or a bobby pin into the hole in the slider.
Important! If the slider breaks down on the street and you don’t have any office supplies or a hairpin at hand, then remove the keys from the ring and use it together with the tongue of the pawl.
With large dogs, you can do without a metal piece - a paper clip or a bobby pin. It is enough to purchase a lace of the same color as the zipper . In addition to this, you will need: side cutters, decor (optional) and a lighter. Beads, keychains and metal balls with holes are suitable for decoration.
Sequencing:
- insert the lace into the hole of the dog;
- cut off excess;
- string decor on a rope;
- tie the ends in a knot;
- Use a lighter to burn the ends to prevent them from unraveling.
Additionally, you can form a decorative knot that does not bear any practical load approximately in the middle of the threaded lace, and then put on the beads. An option that does not use decor at all, provided that a contrasting rope to the jacket is used, also looks aesthetically pleasing.
What to do if the slider tongue breaks off
Many people have faced this situation. When fastening a zipper on a boot or jacket, a tab comes off and remains in your hands. This usually happens when something gets into the slider and it gets jammed, or if the zipper works very hard. If the fastening on the pawl has not broken off, then a regular paper clip, a pin or a piece of fairly strong thin wire will help to get out of the situation for a short time. In the future, you can either make a decent tongue from scrap materials (for example, use a small keychain), or replace the pawl.
When should you repair rather than replace?
The problem requires drastic measures if some of the cloves fall out or are bent .
The first failure usually haunts owners of plastic zippers, the second - iron ones. By the way, a plastic lock is generally a very unreliable design. Especially if it is placed on a child's jacket. In this case, parents will have to deal with torn pins and the appearance of a broken bend, which will not allow the dog to work normally (the row of teeth itself bends). Therefore, if possible, do not purchase things with this type of lock or immediately after purchase change it to a more practical metal version.
Important! You cannot do without sewing in a new zipper even if the fabric part of the lock has broken (its correct name in case you go to a store: textile tape), but broken fasteners are not the basis for immediate drastic measures. Almost all zipper elements are replaceable.
also worth considering the root cause of what is happening . If the situation arose because the lock on the jacket began to come apart, and you pressed the pawl with a tool over and over again, but after some period of time it stopped working normally again, and when you next tried to solve the problem, you squeezed the slider too tightly with pliers, which is why it cracked, then it’s not the dog’s fault. Even after installing a new one, you will soon encounter the lock coming apart again. Therefore, in order to wear outerwear normally, you will have to remove the old zipper and replace it with another one.
How to sew gloves from knitwear
How to sew a zipper into a skirt yourself
How to avoid zipper breakdowns for longer
In order for the fastener on shoes or outerwear to last longer, it is advisable to occasionally clean them from adhering dirt and particles of fabric. An old toothbrush is perfect for this purpose.
Lubricating the teeth prevents jamming and premature wear of the zipper. To do this, you can run a piece of paraffin or wax candle over them several times. A very good lubricant is ordinary graphite. It is enough to draw along the teeth several times with a pencil lead. This work should be done carefully so as not to stain your clothes.
You need to wean yourself from pulling the tongue if the zipper does not work right away. It is better to lower the slider down, straighten the edges with teeth, remove foreign objects from the clasp and, slowly, fasten it again.
If you follow these simple rules, the zipper after repair can last for a very long time.