Rhinestones should be glued onto gel polish using a thick base or top coat, extension gel, base product with acrylic powder, or special glue. In all cases except the last one, the layer must be polymerized. In the process of inlaying, tweezers or a wax pencil, dots, an orange stick, and toothpicks are used.
For a manicure, you can glue plastic decor for 5-8 days, but for long-term wear - glass pebbles or Swarovski. They are laid in a pyramid, stripes, “shirt”, “chain mail”, the free edge or holes are highlighted, and the pattern on the nails is shaded. When making corrections, the decor is removed by soaking, with nippers or a scraper, but sometimes you first have to work with a hardware cutter.
General algorithm for gluing rhinestones onto gel polish
Glue rhinestones onto gel polish as follows:
- Choose decor and design. There are a lot of options, they depend on the color of the coating, the shape and length of the nails.
- Get a manicure. You need to shape your nails, remove excess cuticles, clean out the sinuses, and wipe with a degreaser.
- Coat the surfaces of the plates with primer. It is also used on ends.
- Apply a thin layer of base and dry it. The product is used for all nails.
- Paint them with gel polish. For color density, this is done 2 times, after each time the hand is sent into the lamp.
- Apply the compound on which the pebbles will be attached. There is no need to dry it yet.
- Place the rhinestones on your nail and press them tightly. This is followed by another drying (in air or in a lamp - depending on the type of fixative).
- Use a thin brush to coat the spaces between the stones and around them, using the top coat. And polymerize again.
It doesn’t matter whether you glue rhinestones onto the base or the top; craftsmen use both means. The main thing here is the quality of liquids and the size of the decor. The products must have a thick consistency and have good adhesion. If you take a top and small rhinestones, it is better that it is without a sticky layer.
It doesn’t hurt to follow a few recommendations from nail experts:
- moderation in the use of large stones, which can not only make the design vulgar, but also cause physical discomfort;
- selection of rhinestones in accordance with the size and shape of the nails, the color of the coating;
- choosing decor according to age - young girls prefer light transparent stones, while older women can pay attention to bright shades.
How to choose stones
Rhinestones come in a variety of shapes, sizes, and are made from acrylic, glass of various qualities, and artificial crystals. They all have their pros and cons:
- Plastic ones are cheap, the elements are easier to glue, since they are light. There are many colors and shapes of this material. But they quickly lose their “sales appearance” and can fall off long before the manicure needs to be corrected. Therefore, acrylic decor should be chosen by beginning craftsmen or in cases where it is needed for a short time.
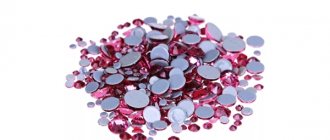
- Glass ones are more expensive, they are also varied, they shine brightly, and do not fade with time and household chemicals. If you lack experience, it can be difficult to attach them, but the decor holds up well. Sometimes it is difficult to remove.
- Swarovski. These rhinestones are artificial crystals. They shine brighter than glass ones in any light, and are firmly fixed due to the features of the reverse side. The only downside is the price.
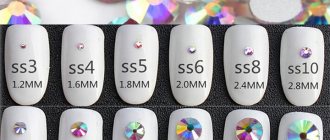
Decor sizes vary from 1 mm to 2 cm. They are round, square, oval, and teardrop-shaped. For a beginner, the first ones are the easiest to use. There are also charms - figured rhinestones. Many types of decor have a flat second surface for reliable gluing, but “broths” do not have this. They are small round beads.
The outer surface of rhinestones can be edged or smooth, like pearls. Another important characteristic is transparency or translucency; there are also stones completely devoid of these qualities. All of them can be shiny or matte.
What kind of glue is needed for rhinestones?
There is a special glue for rhinestones that can be bought in cosmetics stores. There are water-based and epoxy-based products, the latter are more reliable. Famous brands:
- Fabric glue,
- Irisk,
- "B-6000"
- "Monolith",
- Rio Profi,
- UNO,
- Domix,
- Ice Nova,
- Patrisa Nail,
- Klio Professional,
- NailGlue
You can also use an adhesive that is not intended for nail art; it is only important that it is transparent and remains so after drying. Use, for example, “Moment”. Fixing agents will not cause harm to the nail plates, since they do not contact the surface, but the polymerized coating.
Rhinestones - what kind of decor is this?
One of the most popular decorative elements is rhinestones; if glued correctly, they will last more than 3 weeks. You can buy them in stores with manicure supplies.
To make your manicure look expensive, don’t skimp on consumables. Many beginners order stones on AliExpress, but this is not worth doing. It is quite difficult to find quality products in Chinese stores. Better pay attention to famous Russian stores:
- ru,
- Odiva.ru.
On these sites you can purchase diamond chips, voluminous rhinestones, and even special sets for beginners. Rhinestone sizes vary from 0.8 to 8.4 mm.
Important: Only decorative cold-fix rhinestones are suitable for nails. They can be made from various materials.
What are rhinestones made from:
- Acrylic is the most common and cheapest material, but it fades quickly.
- Glass is more reliable than acrylic, but is inferior to crystal in shine.
- Crystal rhinestones are very expensive, but they are worth it, because they are durable, shine well and are not afraid of chipping. Swarovski rhinestones are made from crystal, mined and cut using a special technology, they are already approaching precious stones.
Such manufacturers of rhinestones have proven themselves well:
- TNL,
- Lianails,
- Konad,
- Preciosa.
For an unusual design - the shape and size of rhinestones
Classic rhinestones are round, but other shapes can be found on sale: oval, drop, triangle and square.
Other options for shiny elements:
- broths are small metal beads of different colors. It is more convenient to distribute them over the entire nail with a fan brush;
- pixie - crystal chips imitating broken glass;
- hemispheres look like pearls or cat's eyes;
- charms are more complex designs for design in the form of various figures, such as snowflakes, bows and stars.
All these decorative elements are glued in the same way as rhinestones.
How to attach rhinestones to gel polish and with what
You can attach rhinestones to gel polish using:
- thick top or base;
- base product mixed with transparent acrylic powder;
- special glue or means for extensions onto tips;
- transparent gel to strengthen nails and create length.
What to attach rhinestones to on gel polish depends on their type and size. For round and small broths, the first 2 options are preferable. Large and medium ones are best placed on glue and extension gel or a base with powder. Additional fixation with a top coating is required, but not on the stones, but next to them.
Watch the video on how to attach rhinestones to gel polish:
You can glue rhinestones onto gel polish using tweezers with sharp tips or pick them up with a thin brush. A moistened orange stick and toothpicks can be helpful. They also move the decor already transferred to the nail to the desired place. But the most convenient way to work is with a rhinestone stick in manicure, which is called a wax pencil.
To pick up a bead, you simply need to touch the tip of the tool to its surface. And when the rhinestone is on the glue or wet base or top, it will easily detach from the pencil. There are also dots of different sizes, that is, rods with metal balls at the end. But they can only move the decor on the nail.
How to secure
To attach rhinestones to gel polish, you need to:
- Prepare your nails. They are filed down, the keratinized part of the cuticle is removed, wiped with a degreaser and treated with a primer.
- Use the base. It is applied to all nails, including those with rhinestones, and polymerized.
- Use gel polish in 2 layers, which are dried sequentially. If the color is dense, you can apply it once.
- Mix the base and acrylic powder to create a thick transparent composition. It is applied to the surface where the pebbles will be and is not dried yet.
- The rhinestones are transferred to the nail plate and embedded in the material with a stick. They will be fixed after polymerization.
- Then the finishing coat is applied. It is necessary to avoid getting it on the rhinestones, but the space next to them is especially carefully coated with a thin brush. All that remains is to dry your nails.
You can also fix rhinestones on gel polish for a long time using glue:
- First, a manicure and preliminary nail preparation are performed.
- Cover them with base and dry.
- They apply a flower bed and also polymerize it.
- The nails are covered with a finish.
- After drying it, glue is applied.
- Rhinestones are placed on it.
- The glue should be allowed to air dry for the time specified in the instructions.
- Top coat is applied around the rhinestone with a thin brush; the product is also used on the entire surface where there are no stones.
- The hand must be placed in the lamp.
The glue thickens quite quickly, so it should be used with sufficient experience. If the rhinestones are large and have a flat bottom surface, the fixing agent can be applied to it, and not to the nail. But this method is not suitable for broths.
How to properly glue onto a matte top
You can correctly glue the decor onto the matte top using any of the above methods. A thick base, including one mixed with acrylic, a topcoat, and glue are also suitable as a fixing agent. But after drying the flower bed, you can immediately coat your nails with a matte finish in 1 layer and polymerize. Then any of the fixing agents are applied pointwise, rhinestones are placed in these places and pressed down.
If you used a base or top coat, you need to place your hand in the lamp. The glue is air dried for the required time. Then a matte finishing agent is once again applied to stone-free areas and polymerized.
How to make with iron-on stickers
You can make rhinestones on your nails using thermal stickers, on which the decor has already been applied in the form of a finished pattern:
- The first step is to perform a hygienic manicure.
- Then the nails should be degreased.
- You need to apply a base coat with a sticky layer on them and dry it.
- A thermal sticker is applied to the nail and smoothed with a heat press from the middle of the plate to the edges.
- You should wait until the material cools down and sets well.
Sometimes the decor does not correspond to the full size of the nail plate, but is only a narrow strip. Then they first apply gel polish, then topcoat, dry, and only then use thermal adhesive.
How to apply step by step: diagrams
Step-by-step instructions for applying rhinestones depend on the method of their arrangement:
- A pyramid. First, the bottom row of the figure is placed on the fixing agent if it “grows” from the base of the nail. Then the next lines of pebbles are glued in turn, gradually reducing their number.
- Wave. The decor is located in 2 vertical rows parallel to each other. Next to each rhinestone from one path there should be a gap between the stones of the other. And if you connect them with an imaginary line, you get a wave.
- French. The free edge is highlighted with rhinestones, forming a smile line. If your nails are long, you can lay them tightly in several rows (double French) or scatter them over the entire area, but without violating the main principle of this design.
- Lunar manicure. Pebbles outline the holes. But you can also fill this entire space with them.
- A shirt. Rhinestones are placed like buttons on clothes. That is, along the center of the nail and at some distance from each other.
- Geometry. Intersecting lines and figures are laid out from rhinestones on any part of the nail.
- Chain mail. The nail is covered with rhinestones in several intersecting rows so that the entire nail is decorated. There should be equal spaces between the stones.
These are the simplest schemes. In fact, any complex designs can be made from rhinestones, combining different sizes and colors. They do it as their imagination dictates and the length of their nails allows. But first the largest stones are attached, then the small ones. Another important point is that they must be applied sequentially. If you try to squeeze another pebble between the others already glued, there may not be enough space for it.
What pattern should I use with rhinestones?
Before you start covering, think through the smallest details about the future pattern. It's better to start with the classics:
- French - you can simply decorate the strip with stones or make a double French;
- chain mail is a variant of the pattern in which the entire nail plate is covered with rhinestones. But decorate only one nail, otherwise the manicure will turn out vulgar;
- a pyramid of rhinestone elements at the base of the nail;
- shirt - rhinestones arranged like buttons on clothes;
- geometry - lines of sparkling details that intersect or run parallel - looks impressive on nails;
- crown - rhinestones are laid out in an arc along the edge of the nail hole.
There are many options; in general, the placement of rhinestones depends only on your imagination. The main thing is not to combine several large elements of the same size in one composition; it is better to arrange them with smaller elements.
How to apply rhinestones to gel polish with a pattern
Rhinestones should be applied to gel polish with an image on top of a dried top coat, that is:
- Complete the drawing.
- Dry it entirely, if small, or each new part.
- Cover the nail with top coat.
- Polymerize the layer.
- Apply the selected fixative.
- Place rhinestones on it and press them.
- Place your hand in the lamp or let the glue air dry.
- Apply another layer of finishing agent, avoiding the surface of the rhinestones.
- Dry the coating in a lamp.
Rhinestones should be applied so that the design underneath does not disappear; the stones should emphasize it. You can outline the image with small bouillons or pixies, glue the decor as the eye of an animal, dew on a flower, decorate the wings of a butterfly, etc.
Iron-on stickers with rhinestones
You can make your life easier by using iron-on adhesives (appliqués) with rhinestones. In fact, these are ready-made designs made of rhinestones, laid out on a special thermal film. It is transferred to the nail using a heat press or a special thermal applicator for rhinestones.
To glue thermal rhinestones you need:
- Prepare your nail (it should be clean and smooth).
- Apply the sticker to the nail, heat it up and iron it with a heat press or soldering iron applicator.
- Wait 3 minutes until the glue cools down.
This method saves time, plus the stones last longer. However, it requires additional equipment.
How to remove rhinestones from gel polish
There are several ways to remove rhinestones from gel polish:
- Soaking. They use special gel polish products that are effective in softening the top and base. You need to soak a cotton pad in the liquid, apply it to the surface of the nail and put a silicone cap on top or wrap it in foil. After 10-15 minutes of exposure, the rhinestones are removed with an orange stick. Then you can start removing the rest of the coating, since the first portion of remover will not reach it.
- Liquid for dissolving glue. It works in the same way as in the previous case. But the method is used when fixing rhinestones with glue.
- Nail clippers, pusher, scraper. The method is good for large and medium-sized stones. They are separated from the surface mechanically. You need to be especially careful with the scraper so as not to damage the nail.
- Using a hard file with 100 grit abrasiveness. And after removing the stones, the remaining coating is soaked using the first method.
Step-by-step layout procedure
If you have completed the main manicure and secured the main background with a top coat, then you can proceed to gluing the decor. It is better to apply them on two nails - no more. The pattern can be symmetrical - it will turn out both beautiful and practical. In addition to the rhinestones, prepare thin pliers. You can apply rhinestones using an orange stick, but this requires some skill.
You can immediately buy a ready-made kit for gluing pebbles. It already contains rhinestones of different colors and sizes, special glue, and orange sticks. The shelf life of the finished manicure will directly depend on how you care for your hands. For example, after creating this beauty
It is advisable to have as little contact with water as possible during the day.
It is worth listening to other tips that will help your manicure last more than three weeks. Although masters do not recommend wearing the same coating for more than two weeks, the natural nail grows back and the manicure no longer looks so aesthetically pleasing. In addition, the coating begins to overload the nail, you can break it.
- Wear protective gloves when performing any household chores.
- Hot water will steam your nails, and rhinestones may fall off quite quickly if they were poorly glued.
- Rhinestones can come off along with the coating if you applied the main layers of varnish poorly: the free ends were poorly sealed, or went beyond the nail.
If you handle your manicure carefully, it will delight you with its appearance for a long time. When you need to remove pebbles, it is better to go to the salon. There they will be removed for you with a special pusher; in particularly difficult cases they will be cut off with a file.
It is worth remembering that if you do not give natural nails
grow and take a break from gel polish, then their top layer will thin out, they will become brittle and will constantly flake off. Even if you have strong nails, you don’t need to constantly overload them with rhinestone designs.
How to remove rhinestones from gel polish with a machine
You can also remove rhinestones from gel polish with a manicure machine:
- First, wear safety glasses to prevent debris from getting into your eyes.
- Use a cutter that looks like a nail head and use it to remove the coating around the rhinestones.
- Remove stones with a scraper or nippers.
- Remove the remaining coating using the nozzle provided for this purpose.
This method is optimal for rhinestones deeply “recessed” into the material, which cannot be immediately picked up with a hand tool. But you should work very carefully so as not to cut the nail with the sharp edge of the cutter.
Schemes for laying out rhinestones
The location of the stones on the nails can be anything. If you do not have the necessary dexterity, experience and artistic abilities, you can use one of the standard schemes for laying out decor:
- Location at the base of the nail. This design is decorated with one or more rhinestones, a crescent is highlighted in a lunar manicure, and laid out in a “pyramid” - a triangle.
- Longitudinal lines: one or several (“shirt” - an arrangement of three or four stones at a distance from each other, like shirt buttons).
- Transverse lines: single or several.
- Diagonal.
- Simple geometry - shapes: rhombus, oval, triangle, heart.
- French manicure with rhinestone inlay.
Below are the simplest schemes that even a novice master can master.
Glue for rhinestones on nails: how to use so that it lasts for a long time
You can successfully use glue for rhinestones on nails throughout the entire shelf life if you follow certain rules:
- Don't apply too much. Otherwise, the product will end up on the surface of the stones and they will become cloudy.
- To shake off excess liquid from the brush, use a lint-free cloth slightly moistened with a cleanser. If you need little glue, you should use an orange stick.
- Do not wipe the brush or applicator on the neck of the container. In this case, the glue will dry there, making it difficult to close tightly and then open the bottle.
- To preserve the properties of the product, it should be stored at a temperature of no more than 20 degrees, far from sources of fire. You must also ensure that the bottle is not exposed to direct sunlight.
Watch the video on how to glue rhinestones on nails:
Types of rhinestones for nails
Rhinestones for nails are a decorative element that imitates precious stones. The cosmetics industry today offers nail art masters and their clients many types of products made from different materials, different configurations, colors, and textures.
Based on the material from which the pebbles are made, they are classified as follows:
- plastic. Inexpensive, easy to use. Disadvantages: unpresentable appearance, fragility to wear;
- glass. They shimmer better than those described above, but cost a little more;
- zirconium. Decor made from cubic zirconium (not to be confused with natural stone - zircon). Expensive, they look as impressive as possible due to their reflective properties: many facets of the stone allow the manicure to shine;
- faceted artificial crystal. The most famous jewelry made using this technique are Swarovski Kristal Pixie crystals. Crystal chips will decorate a monochromatic, colorless design and will become an effective addition to the gradient;
- natural rock crystal. The most expensive material, used for inlaying marigolds in elite salons, decorates the manicures of show business stars and high-ranking persons.
Comment! Choosing the most expensive product is not always clearly beneficial.
In the case of artificial and natural crystal chips, no one will distinguish a natural creation on the nails from a well-cut synthetic analogue.
Nail pebbles are heterogeneous in shape, which affects the ease of working with decorative elements and the practicality of wearing. The decor is available in the following configurations:
- round form. Classic broths are a component of Kristal Pixie crystal chips from Swarovski;
- flat-round. Visually they resemble half of a small ball: the convex side shines with small edges, the flat side allows you to firmly attach the pebble to the nail plate;
- fully faceted. Small elements, tightly seated by the master on the adhesive material.
In addition to the types described above, there are marigold stones that have the outline of a rhombus, square, circle, polygon, etc. in a planar projection. Many craftsmen consider cone-shaped stones that repeat the shape of a peak with a pointed tip to be the most effective.
Comment! A beautiful arrangement of rhinestones on nails is determined by the artistic abilities and taste of the artist, the shape, size, and material used to make the decor.
The most common mistakes
Not everyone likes the design with rhinestones, but the reason for this is often mistakes when performing a manicure:
- in style, when the decor itself is chosen incorrectly;
- during the gluing process, if due to errors the result does not correspond to the desired one;
- with the wrong choice of stones and base for their fixation;
- wearing a manicure, which leads to the rhinestones quickly peeling off.
In style
Rhinestones lose their attractiveness and make a manicure look ridiculous if:
- Use several large stones at once. The design looks bulky and visually weighs down your hands. If you are laying out a composition of rhinestones, you should take only 1 large one and a scattering of medium and small ones.
- When choosing decor, do not take into account the color of the gel polish. Only white, silver or golden stones can be called universal for any shade. Colors must match the tone of the coating.
- Use large rhinestones on short nails or create complex designs with them. This visually makes the plates massive and shortens the fingers.
- In addition to a manicure with rhinestones, wear a lot of rings and bracelets on your hands, especially with inserts. This makes the whole look vulgar.
- Glue rhinestones onto stained glass gel or cat's eye. These types of coatings are very bright; the addition of rhinestones will also make the image provocative, with an excess of shine.
- A mature woman should stick cheap plastic pebbles. It looks inappropriate, like “from someone else’s shoulder.”
In progress
Mistakes in the process of gluing rhinestones will lead to the fragility of the decor and can immediately ruin the appearance of your hands:
- Fixation of stones literally at the end of the nail. This area is too mobile, the rhinestones will cling to everything and may become damaged or crack, so you should make an indent of 1-1.5 mm from the edge.
- Gluing the decor close to the cuticle. Over time, you will have to move it away with an orange stick; pebbles can interfere with this, they are easy to scratch.
- An attempt to glue additional decor between the already attached rhinestones. This will disrupt their fixation and may ruin the entire composition.
- An attempt to press on the pebbles transferred to the nail with a finger, and not with auxiliary tools. Sebum and sweat will prevent the decor from adhering well to the coating.
- Applying finishing agent to the surface of stones. This will attach them more firmly, but the decor will fade.
- Incorrect application of top at the end of the job. It is correct to first coat the areas between and around the rhinestones, and lastly, at the cuticle. Otherwise, the product will flow under the skin and the nail architecture will be damaged.
When choosing a material
In order for the manicure to last longer and maintain a presentable appearance, it is important to choose the right rhinestones and the compositions involved in the design:
- For wearing for 3 weeks, it is better to take glass stones or Swarovski. Plastic ones will fly off faster and may fade.
- Large and medium rhinestones need to be inspected to make sure there are no defects. If there are cracks or chips, this does not contribute to long-term wearing of the design.
- The top and base used as a base for decoration should be thick. Liquid formulations can cause elements on the nails to float.
- The quality of the gel polish also matters. If it does not dry well, curls or cracks during polymerization, coating defects will lead to peeling of the inlay elements.
- If you cannot work quickly with rhinestones, it is better to choose a top coat, a base with acrylic powder, or a strengthening gel over glue. The first product may dry out while the pebbles are being placed on it, and then their fixation will be unreliable.
In care
Manicure care also affects its quality and durability; the following mistakes are possible:
- the use of large rhinestones when working intensively with your hands;
- trying to pick something with your nails;
- performing household chores that involve using water and household chemicals without wearing gloves;
- self-careful filing of nails.
To prevent the decor from separating from the coating, while wearing it, you should coat the areas next to the rhinestones with topcoat 1-2 times and polymerize it.
Rhinestones can make your nail design even more attractive and stylish. But they can easily ruin a brilliant manicure or the most beautiful color of nail polish. Measurement is very important here, as well as the sequence of actions when fixing the decor. If it is correct, it will hold out until correction.
Glue selection
If you want to make a fashionable manicure with rhinestones, first of all you should decide what and how to stick them on, and what fixing agent to choose. So, how to glue rhinestones on your nails? It is best to use special glue. It is often sold complete with rhinestones. Its composition is identical to that on which false nails are attached.
If you don't have glue on hand, you can use clear varnish.
Use a special adhesive gel (click to enlarge)
This is done as follows:
- cover the nail plate with clear varnish;
- lay out decorations;
- After a couple of minutes, apply another layer of varnish and let the manicure dry thoroughly.
But a manicure done in the described way is unlikely to last long. Moment glue and its analogues are also suitable for gluing glitter. Its main advantage is quick drying. This ensures that the decoration will not “move” anywhere and will remain for a long time exactly where it was fixed. Since they are glued to a layer of varnish, the penetration of dangerous elements into the nail plate is excluded.
By watching the video you will learn more about glue:
Specialized stores also offer liquid rhinestones, but their use requires special equipment and training for a specialist to work with it.
When choosing the most suitable method for gluing decorations, you should remember that the most important thing is to be careful in your work.
Application process
Now we will apply gel polish with rhinestones on the fingers that we did not cover with gel polish in the previous process.
We will need small rhinestones, an orange stick, and colored gel polish that will be used in the nail design. If you decide to decorate one nail on both hands, then first, for convenience, we decorate the nails not simultaneously, but one by one. We file the nail plate with a soft file and degrease it with alcohol.
Cover with primer and dry. Apply the first layer of colored gel polish and dry. Then we dry the second one too.
We apply it with a top coat, do not dry it, and start laying out the rhinestones. We attach the first one at the very top of the nail in the middle, then clearly down one by one in a straight line, pebble by pebble. Then the next row, then the third on the other side of the first and so on to the edges of the nail on both sides of the center line. If you need to adjust the rhinestones, do it with something thin, a toothpick, for example. After finishing laying out the pebbles, dry the resulting layer in a lamp for two minutes.
Next, you need to paint the gaps between the rhinestones with a top coat, for which you use a very thin brush, trying not to get on the rhinestones and not spoil their shine.
Then dry in a lamp for two minutes. If you are not sure of a good result, repeat again and dry. Wipe with alcohol and your manicure is complete. See what the gel polish with stasis looks like in the photo.
Expert advice
- It is not recommended to cover the rhinestones completely with topcoat; it is enough that they are applied to the topcoat and the gaps are painted over;
- The top on which the pebbles are applied must be thick, otherwise the pattern will not work out and may blur even before it is polarized;
- If you want to lay out the entire surface of the nail, then start from the center, as we described in the “chainmail” pattern. If the pebbles are of different sizes, then lay out the larger ones first and again start from the center;
- If you decide to apply pebbles with glue, you must be confident in your skill, since you can correct a pattern that has not yet hardened on the top, and the glue “sets” instantly and you have no room for error;
- To design nails with stones, it is better to use glass ones, but plastic ones are also possible, although they are duller and do not look as beautiful as rhinestones;
- pebbles measuring 1.5-2 mm will look good even on short nails. Do not use very large pebbles;
- If you want to use rectangular, square or other stones rather than round ones, remember that they should be in harmony with the pattern on the clothing or jewelry. Therefore, it is still better to use round rhinestones;
- Such a manicure with nail design will last from 15 to 20 days, if the technology was followed during application, and care was taken when wearing it. There is no need to file the nail plate, thereby disrupting the “sealing”. For household work, use gloves and do not use hot water;
- remove the stones with a manicure pusher one by one. If the pebble cannot be removed, then it is cut off with a nail file.
If you follow all the advice of manicurists, then even at home, you will be able to design your nails with ease.
Tips for manicure at home
- First of all, you need to remove old nail polish (if any): to do this, you need to soak your nails in a vessel with warm water for a couple of minutes. This will soften the cuticle. You can remove regular nail polish with nail polish remover.
- The next step is to push back the cuticle. To do this, apply lotion or cuticle oil at the base of the nail to soften it. Then gently push back the cuticle with an orange stick, which has antibacterial properties. You should not cut the cuticle, as it protects your nails from infection.
- Then you should polish your nails and, if necessary, give them the desired shape. It is advisable to avoid reciprocating movements, as this weakens the nail plate and leads to its delamination.
- The edges of the nail can be made square, round or tapered, or choose a combination of square top and oval edges. Nails with a rounded shape, reflecting the shape of the cuticle and slightly extended beyond the edges of the fingers, will look stylish and discreet.
- Apply the base layer of varnish starting from the cuticle and moving the brush in one stroke to the end of the nail. In three passes, the polish should cover the entire nail. Then the finger must be placed in a UV lamp for at least 2 minutes so that the composition dries completely.
- Before applying colored gel polish, you need to stir it directly in the bottle. Do not shake the bottle of varnish while doing this, as this will create bubbles and the varnish will not be smooth when applied. It would be correct to take the bottle between your palms and quickly turn it back and forth, then the pigment will be distributed perfectly evenly.
The top also serves to attach rhinestone crystals: you need to carefully pick them up with the thin end of an orange stick and stick them on the nail plate covered with the top. Attaching heavy rhinestones in accordance with the design is quite difficult for beginners, so it is better to do a test manicure using small crystals. Dipping the stick in water and dabbing excess moisture onto a cotton ball or cotton pad will help the rhinestones stick to the tool more easily.
If during the application of varnish it gets on the skin, you can remove it with an orange stick, but in no case should you place such smudges under a lamp to dry.
Why don't they hold on?
It becomes awkward when, in an attempt to give a hand, beautiful nails lose rhinestones
Thus, the length of time that rhinestones stay on nails is of particular importance.
Each manicurist has his own tricks and subtleties that show a class of skill that can only be acquired through experience.
In many cases, when clients complain about quickly crumbling rhinestones, either not very durable glue is used (in the case when the master uses glue for fixation), or the master simply misses one of the important technological points.
There can be many such shortcomings, ranging from the lack of a sufficient amount of topcoat on the nail plate when pebbles begin to be placed on it, to insufficiently thorough treatment of the edges of each crystal with topcoat, which is a very painstaking procedure.
In any case, when performing such a complex manicure in a salon, it is worth asking about the terms for which the master can give a guarantee. If you don’t have one, you should look for another salon, and in the case where the crystals have fallen off during the warranty period, you can contact a specialist for correction.
Correction with glitter for overgrown nails
There are several ways to get rid of this problem:
- Use a durable varnish, for example, “Phenom” from the Jessica brand, used without drying in a UV lamp to paint over the free area of the nail at home;
- Apply a version of the manicure called “lunar”: draw a semicircle in the shape of a lunar disk on the regrown nail as carefully as possible, this coating looks stylish, moreover, “lunar manicure” is among the top of the latest season;
- Make a manicure correction, in which a semicircle of glitter and metallic varnish is formed on the regrown area;
- An interesting solution could be to cover the overgrown part of the nail with small rhinestones or beads - bouillons, while the manicure becomes visually more advantageous, and there is not even a hint of the correction of the overgrown area.