Our grandmothers knew very well how to starch a shirt so that it would retain its freshness and shape longer. Nowadays, few people bother themselves with additional care for their clothes, but limit themselves to regular machine washing. But on especially special occasions, when everything must be perfect, starching is simply necessary.
Starching increases the wear resistance of things, preserves their appearance and shape
The use of starch products not only gives things a more elegant look, but also significantly extends their wear life. Starch protects fabric from abrasion and dirt. It traps dust and sweat and then effortlessly washes off with them. Shirts and blouses do not have to be rubbed hard or soaked for a long time in hot water with aggressive chemicals.
It is important to understand that clothes made from natural fabrics, when starched, to some extent lose their main advantages - breathability and hygroscopicity. Starch impregnation prevents natural ventilation and air access to the skin, which reduces the feeling of wearing comfort. Therefore, it is recommended to starch clothes not constantly, but from time to time.
It is not necessary to starch the item completely, it is enough to strengthen individual parts that should keep their shape well
To starch a shirt at home, some use ready-made store-bought solutions or sprays, but the simplest and most affordable remedy is homemade, made from potato starch. Rice and corn are weaker, and you will have to take 1.5 times more of them than potato.
First method. Washing process
Add starch. If you are going to use a powdered product, you will need to mix it with water before applying. Add 4 tablespoons cornstarch to a bowl or jar with 500 ml (1 liter) water. Then stir everything until you get a uniform mass.
Finally, pour the mixture into a spray bottle to apply it. You can use the amounts of water and starch recommended above, but you should check the product label for instructions before mixing as they may vary slightly.
First of all, you will have to wash the shirt. Before doing this, unbutton your clothes, including the buttons on the sleeves and neck.
- Apply a small amount of detergent to stains with a cloth to remove them before putting them in the washing machine, or use a stain pen.
- Then use a delicate or regular wash cycle, depending on the washing instructions, the amount of stains and the strength of the fabric. Finally, place it on a hanger and let it dry.
Don't put your shirt in the clothes dryer if you don't have to, or at least refrain from using high heat when drying.
Preparing laundry
Before carrying out the starching procedure, it is necessary to wash the shirt. Washing is carried out in the usual way using powder and conditioner.
It is important to use the correct temperature conditions so as not to damage the product, and thereby extend its service life.
White items must be washed separately from colored items. Cotton white shirts need to be treated separately from synthetics and chiffon because they require pre-soaking and double rinsing.
After washing, the shirt should be inspected for any remaining stains; if any, they must be removed and re-processed in the machine.
If you starch a stain, it will sink deeper into the fibers and make it more difficult to remove.
Starching procedure
Place your clean shirt on the ironing board. Place the garment on the board with both front halves hanging to the sides and the back half laying flat on the surface. First, apply the starch to the front of the shirt.
- Spray starch onto the front of the shirt.
- Apply starch in thin, even layers over the entire surface of the shirt.
- Wait a few seconds for the clothing to absorb the product.
- Then quickly iron the T-shirt at the recommended temperature depending on the fabric.
- If a specific temperature is not specified, high heat should be used to cook the starch.
Repeat the same steps on the back of the T-shirt. Turn the shirt over on the ironing board and apply a thin, even layer of starch on top. Iron the main part of the shirt thoroughly, then apply the product to the sleeves and iron them. Finally, scratch the collar of your shirt.
After finishing the procedure, take the clothes to dry and let them air out a little before hanging them in the closet. This will give the starch time to adhere to the fibers of your shirt and plump it up, creating the desired texture and appearance of your freshly ironed garment.
Synthetic starching agents
In hardware stores you can purchase ready-made compositions for starching textiles. There are 2 types of such household chemicals:
- starching sprays (Chirton, Dalli duo, etc.) are used for ironing, they allow you to add elasticity to individual areas of the shirt, making it easier to smooth the fabric;
- Washing gels are used for complete starching of large items (sheets, skirts, etc.).
Instead of starch, they use chemicals (carboxymethylcellulose, etc.), which, when ironed, behave in the same way as a potato or corn food component. The film dissolves easily in water the next time you wash it. Most household chemicals contain flavoring additives.
Using Corn Starch
Prepare the mixture. You can make your own starch mixture by adding some cornstarch or cornstarch and water.
- Mix half a tablespoon of cornstarch and two cups of water.
- Mix until you get a uniform substance.
- Pour the mixture into a basin or laundry bin.
- Add warm water until the container is almost full.
You should have enough water in the bowl or laundry to allow the shirt to move freely. Otherwise, your clothes will be stiff and unusable. If tap water is hard, use distilled water. If it is soft, there will be no problems using tap water.
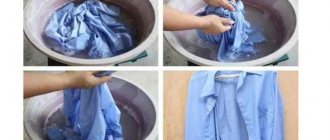
Place the shirt in the basin. If it's a colored shirt, turn it upside down. Then put it in water and turn the starch into fabric. Finally, squeeze the clothing to get rid of excess water. Remember that it is best for you to wash only one T-shirt at a time.
You can also starch the shirt in the washing machine rather than soaking it by hand.
- Place the shirt in the washing machine.
- Wash clothes during the normal wash cycle and stop before the final rinse.
- Then pour the mixture into a fabric softener dispenser or directly into water.
Do not pour the mixture or leave it in the dispenser during the entire wash cycle, otherwise the machine may clog over time.
Hang the shirt to dry. Place the shirt on a hanger and let it dry until it is just slightly damp. When finished, remove it from the hanger. Iron your shirt collar while it's damp to remove any unwanted wrinkles. If your shirt is made of delicate material, do not make the iron too hot.
Errors you need to know about
- Dilute starch only with cold water. When warm, it clumps into sticky lumps.
- Dilute starch concentrate only in water at room temperature, no higher than 20 degrees.
- Don't overdo the dosage. Prepare the concentrate correctly. If you starch things in too thick a solution, you risk ruining the product.
- Iron starched laundry slightly damp. If the item is dry, immerse it in cool water again, rinse lightly and dry again.
Try starching your bed linen a little. You might like the new feeling of cleanliness.
How do you like the article?
Mixing starch with vodka
Prepare your T-shirt in advance. For best results, wash your shirt well and dry it completely before applying any type of starch.
Washing will remove dirt and grime that can affect the durability of the starch and also remove its ability to protect the fibers of your clothing.
- Create a mix. Vodka can be an excellent tool for cleaning, disinfecting and ventilating a room.
- You can also use it to make starch at home.
- Mix 1/3 cup of vodka with 2/3 cup of water. Mix the liquids well and pour the mixture into a spray bottle.
- For this, any type of vodka without any additives is used.
Place the shirt on the ironing board. Make sure the front side is facing up.
- Select the highest temperature that the type of fabric can withstand.
- Spread the mixture evenly over your clothing.
- Then iron the inside thoroughly, then the neck, cuffs, sleeves and the rest of the shirt.
- The back of a shirt wrinkles more easily than the front. So make sure your back is completely on the ironing board.
Hang your clothes. Carefully place the shirt on the hanger. Make sure it is out of contact or very close to other clothing. Let it dry overnight and then put it in the closet where it usually is.
Adviсe:
- Not all materials can be starched. Clothes made from natural fibers, such as cotton, are ideal for this purpose, while clothes made from synthetic fibers may look worse. In the latter case, it is better to iron only the shirt. Another example of a material that does not need to be starched is silk.
- If the process does not go well, you can also take the shirt to the dry cleaner to resolve the issue.
Sweat and stains stick to starch, not dirty clothes. Thus, starching a shirt can make cleaning easier and minimize property damage.
Advantages and disadvantages of starched clothes
Such things have a number of significant advantages:
- Starching reduces the rate of wear of fabric, since the substances used to treat clothing compact the fiber structure.
- Washing starched items is easy, since all the dirt is absorbed by the starch particles. Stains do not eat into the fabric, and the substance is washed off along with the dirt.
- Shirts become snow-white, and the yellowness disappears as the white starch thickens after ironing.
- As a rule, starched items do not wrinkle because the material becomes quite dense.
- The aesthetic side is complemented by the fact that things smell good and have a pleasant crunch.
The only drawback of processing things this way is that the shirts do not allow air to pass through well due to the starch layer. Therefore, it is not recommended to wear them to active parties; it is better to limit yourself to infrequent festive feasts.
You should not starch fitted shirts, as the body’s thermoregulation is disrupted due to insufficient air conductivity.
Photo instructions on how to starch a shirt
Useful tips
Every housewife who wants to try to update something must learn a few simple rules. Recommendations from experienced housewives:
- Do not starch your underwear. It will not allow air to pass through;
- You should not process black and dark things. White streaks may remain on them;
- You can achieve a better effect by adding table salt to the solution;
- a heavily wrinkled shirt must be ironed before the process;
- treated items should not be kept in the cold;
- artificial materials are not processed, their fibers do not retain starch.
It is possible to preserve the newness of any item by starching. After the process, the item will not only look chic and get dirty less, but also last longer.
Soft option
Pour a liter of water into two enamel saucepans. Add 1 teaspoon of starch to the first one. Mix the solution thoroughly.
The second container is placed on the gas stove. It is necessary to bring the water to a boil, then add the solution to it.
Boil the resulting mixture for 3 minutes. This option is chosen for cambric shirts.
Recipes for preparing the composition
Typically, starch refers to a substance obtained from potatoes. However, powder isolated from rice and corn is suitable for processing shirts. The effect of each type of starch is the same.
Potato
This version of starch is considered the most accessible and widespread. This base is used for processing various materials. At the same time, to improve the appearance of the shirt, it is recommended to add a small amount of salt to the potato starch.
Rice
Rice starch is more expensive than potato starch. And the effect of both substances, as well as the recipe for preparing the mixture intended for treating shirt collars, are the same.
Corn
Corn starch is rarely used for processing clothing. This is due to the fact that this substance is not used on dark shirts. After such a procedure, streaks appear on such products.
What things should not be starched?
The following things should not be starched:
- Underwear. Reduced breathability and ability to absorb moisture reduces the hygienic properties of linen. And it can even cause the development of fungal and bacterial infections.
- Sports and summer clothes. These items are not treated with starch solution for the same reasons as underwear.
- Synthetic items. Synthetic fibers do not change their properties when processing starch, that is, the procedure will be useless.
- Items decorated with embroidery. Embroidery threads may stick together when exposed to starch solution.