If you want to repair a cooler with your own hands, surprising your household or co-workers, read our material. Here are the typical causes of breakdowns of household and office dispensers, as well as ways to eliminate these faults. And if you want to receive the title “master - golden hands,” then take 15 minutes of time and read the article to the end.
Hot water tap does not flow
If you open a hot tap and the water barely drips or does not flow at all, you need to replace the bottle. But if cold water flows from a hot tap, then in this case you need to:
- Wait 15-20 minutes until the heat exchanger radiator heats up and try to get hot water again.
- Check the power supply - the dispenser may have been disconnected from the network, and without electricity it only dispenses cold water.
- Turn on the fuse - when overheating, the cooler is disconnected from the network, de-energizing the heating circuit.
What to do if there is a full bottle on the cooler and it is plugged in? Of course, contact the specialists from the service center. In this case, repairing coolers yourself is impossible. The technician will have to disassemble the device, remove the broken or clogged heat exchanger, wash it and put it back in place. Along the way, he will check the wiring and change the fuses. This work cannot be done without a special tool.
Even the most experienced craftsman will not be able to make a dispenser at home. Therefore, do not waste money on calling specialists - immediately take the cooler to the service center.
To what temperature does the cooler cool the water?
The reservoir of the device is divided into two halves. In one, the water can be heated to +96°C, and in the other it is cooled using a compressor or electronically using the Peltier principle. In the first case, models are produced with floor installation, and the water temperature drops to +5°C. The electronic model is compactly installed on the table, but the water is not cooled below +10°C.
The name of the device for changing the temperature of water in bottles comes from the English “cool”, which means “cold”. The first device was called a cooler because initially it could only dispense cool water. Modern equipment brings it almost to a boil and the speed of this action can compete with a kettle.
Water does not flow from a cold tap
If lukewarm water flows or drips from the “blue” tap, and not what you expected, try again in 20 minutes. Perhaps the cooler did not have time to cool the liquid. But what to do if neither cold nor warm water flows from the tap? To repair this problem, do the following:
- Unplug the device or raise the temperature on the refrigerator. Sometimes a cold pipe freezes, cutting off the flow of fluid.
- Turn on the water supply and listen to the hum of the compressor. If the stream starts flowing, but the device does not “purr” like a refrigerator, you need to call a technician. Only a specialist can repair the compressor.
- If the compressor hums, but no water drips, change the tap or dispenser needle. These components may not be replaceable. In this case, you will have to buy a new cooler.
To change the needle (rod) of the dispenser, just remove the bottle from the cooler, unscrew the broken unit from the mounting hole, and screw in a new part. Fixing a faucet is another matter. This work requires special skill, so we will consider it separately.
When to contact specialists
Without the help of specialists you can cope only in two cases. The rest are already serious damage, and without experience in eliminating them, you can only cause even more harm.
Sometimes you can’t do without the help of specialists
There are reasons for leaks that require specialist intervention:
- In winter, if the room is not heated, the hot water tank may crack.
- If the water from the tanks is not drained and the dispenser is moved, there is a possibility of damaging the internal tubes.
- Failure of faucet parts requires its complete replacement.
When the cooler is used by a certain circle of people, familiarize everyone with the instructions for use. This will guarantee that the device will work properly for many years. In case of free access in public places, appoint a person responsible for the unit so that he regularly checks its condition and carries out preventive maintenance.
September 29, 2019
Save and share information on social networks:
We recommend reading
Kettle with Wi-Fi
How to fix a cooler faucet with internal threads
To change a clogged tap with internal thread, you need to follow the following plan:
- Unplug the device and remove the water bottle. You will have to partially disassemble the supply line, and this work should only be done with the electricity turned off and the water tank removed.
- Remove failed fittings. To fix a faulty supply line, you need to remove the shut-off device from the pipe. To do this, turn the shut-off fitting counterclockwise, moving it out of place, and twist the broken assembly from the threaded fitting or fitting.
- Buy replacement parts based on the brand of your cooler. Some models support mug pressure, others - hand pressure. If you are not sure that you understand the characteristics of your valve, take it with you to the store and show it to the consultant.
- Before replacing a part that comes into contact with drinking water, it is worth washing it inside and out. Therefore, wash it in a solution of soda or soap, under a strong stream of hot water.
- Put on gloves, pick up the washed fitting, screw it onto the thread, turning it clockwise.
Finally, you need to check how the liquid flows from the new valve. To do this, place a bottle on the cooler and open the valve. At the very beginning, air will come out of the pipe. The water will appear a little later, at first it drips in a thin stream, and then flows in a wide stream. Wait for a steady stream and close the valve. Your dispenser can now be plugged into a power outlet.
Using the same scheme, you can repair a device in which hot or cold water drips from the tap with the valves closed.
Equipment cleaning instructions
The cooler is cleaned sequentially. First, preparatory work is carried out, including draining the water and disassembling the device. Then the external cleaning is carried out. Then the insides must be disinfected and the work is completed by a final rinsing of the unit.
Before starting work, it is advisable to read the manual included with the device. Perhaps the features of your model will be revealed there. It is also necessary to disconnect the device from the network.
But if there are no instructions, then you need to know the main thing - the use of organic solvents and abrasives is prohibited. Do not use steam cleaners or pressure devices.
Preparatory stage
It is necessary to drain the water from the device. To do this, remove the tank with drinking liquid from it by turning it counterclockwise. After waiting for the liquid to cool (if it was heated), open the taps. The level that they do not take is lowered using a valve by removing the plug from it. Usually it is located at the bottom. But you can also look from the side. To ensure that every drop of water comes out, the cooler is tilted in different directions.
Drain all water before cleaning
There is no need to disassemble the unit down to the bolt. But all removable parts are dismantled. At a minimum, the device is freed from the drip receiver and taps. Some models require a screwdriver.
Now you can start cleaning the cooler.
Read in detail how to clean a thermos from plaque
External disinfection
All external cleaning of the device comes down to thoroughly washing the surface with a sponge and soapy water. The foam is removed with clean water.
To avoid flooding everything around, it is better to carry out the operation at home in the bathroom, placing a rubber mat under the device.
You can add a little ammonia or iodine to the solution. This will enhance disinfection.
Removable parts
It is not recommended to place removable parts in the dishwasher and clean them there. All disconnected parts must be handled by hand. This is done with the help of brushes and pipe cleaners to reach all hard-to-reach places.
When working, use available disinfecting solutions. You can use the same ammonia or iodine. Or make a mixture of citric acid and water. Hardware stores sell special compounds for such purposes at a reasonable price.
Upon completion of cleaning, as well as disinfection of external surfaces and removable parts, everything is rinsed well with clean water. Then you need to wipe everything dry. To do this, use a lint-free rag or paper towels.
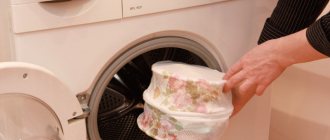
Find out how to properly clean your washing machine from debris, mold, and scale.
Cleaning from the inside
Cleaning solutions will help you wash the inside of the cooler. They are made independently either according to a folk recipe or from chemical components purchased in a store. The simplest one is a mixture of citric acid and water. The product acts like 3 in 1. It softens plaque, disinfects surfaces and eliminates unpleasant odors.
The composition is poured into the cooler
200 grams of acid are dissolved in 10 liters of water. The device is connected to the network and wait until it heats up the composition. The unit can then be turned off and left for 6 hours. After this, the liquid is completely drained and the container is rinsed with clean water. The operation can be repeated if desired.
After any cleaning, a dry run must be carried out before use. Bring the water to maximum temperature, let it sit and drain all the liquid.
Vinegar is more powerful than citric acid. For 10 liters of water you need to take one liter of vinegar. And then the algorithm of actions, as in the previous recipe.
There is a more aggressive product that can deal with scale in a matter of minutes. This is store-bought “Antinakipin”. It is diluted in water as indicated in the instructions, but instead of six hours after boiling, it is left for only 20 minutes.
Guanopolyset is a polymer antiseptic that does not contain chlorine, as well as adelgids. In small quantities, harmless to humans. According to the instructions, it is mixed with water and poured into the device. The switched on device must work for at least a day. During this period, open the taps several times, bleeding a little liquid. This is necessary for their cleaning and disinfection.
After 24 hours, the liquid is removed from the container and the unit is thoroughly washed with clean water to remove any foreign taste.
Instructions for descaling a kettle with vinegar
How to replace taps with external threads
If your valve stops supplying water or starts leaking when the valve is closed, proceed with the following plan:
- Turn off the device and remove the bottle. A cooler that is turned on cannot be repaired even in theory.
- Remove the back panel by unscrewing the screws with a Phillips screwdriver.
- Locate the silicone tube connecting the faucet to the faucet that is dripping water.
- Feel at the point where the fitting and the silicone pipe meet for the lock nut that presses the faucet to the body.
- Unscrew the locknut from the threaded fitting, turning it counterclockwise. If there is not enough space in the housing, then try fixing the nut and unscrewing the tap, but be careful not to twist the silicone tube. After unscrewing the nut, pull the tap, removing it from the silicone tube.
- Now, to fix the cooler, you will need a new faucet. Take the old valve and go to the store with it. Consultants will help you choose the same model.
- Don't forget to clean the valve before putting it back in place. If you don't do this, you may get an intestinal upset.
- Installation of the valve begins with unscrewing the locknut. It is put on a silicone tube, after which the valve is inserted into the hole in the housing. Then the tube is pulled onto the valve fitting and tightened with a lock nut. That's it, your cooler is now repaired and ready to go.
If these manipulations are too complicated for you, call the experts at home. They will repair a dispenser whose “spouts” are leaking water, without taking the device to a service center.
Exploitation
Use is carried out based on the instructions and certain requirements:
- Install the unit on a smooth surface, the distance from it to the wall should be no less than 10–20 meters.
- Protect the device from damp rooms and from sunlight.
- Do not place near heating, heating or electrical devices.
- Before use, wait two to three minutes to ensure that the reservoirs are completely filled with water.
- The power line to which the cooler is connected must have a grounded contact.
- The bottle must be in an upright position. First remove the hygienic film and then turn it upside down with the lid.
- If the structure has not been used for a long time, it should be cleaned using cleaning products. This is necessary to avoid contamination.
Periodic monitoring of the fluid level is recommended. When it ends, you need to install a switch. At the moment when new products are in place, it is advisable to wait some time for the internal system to be completely filled. And only then start turning it on.
Water does not drip from the tap, but flows from somewhere inside the body
You came for water and found yourself in a puddle. What to do in this situation? How to fix a global leak? Let's figure it out together. And we’ll start with the reasons for this breakdown:
- Most often, a puddle under the cooler is caused by a not tightly closed drain valve. Repairing such a breakdown is more than simple - you need to tighten the plug a couple of turns, turning the plug clockwise. If the leak cannot be repaired, remove the bottle, twist the cap and buy a new one.
- The second most common cause of leakage can be a defective bottle. What should you do in this case? Of course, remove the questionable container and put another one in its place.
- Very rarely, the cause of a breakdown can be a burst pipe. To find such a defect, you will have to open the housing and wipe all the pipes with a dry cloth (or toilet paper). If a wet spot appears on the paper, then there is nothing to do here - call a specialist. Such a defect can only be repaired by a specialist.
- Sometimes the heater coil may be the cause of the leak. It happens that the storage tank bursts in the cold and begins to drip. This happens if the dispenser was stored in an unheated room without necessarily draining the liquid. The radiator can only be replaced at a service center. It is impossible to repair such a breakdown with your own hands.
Before replacing the bottle, do not forget to disconnect the dispenser from the electricity. Also, drain the hot water by cooling the disconnected heat exchanger. Otherwise, you will have to change not the bottle, but the device itself. Wiring burned out from a leak is very difficult to repair even in a service center.
What to do if the water stops flowing altogether, reasons
Sometimes the water dispenser does not dispense water. The liquid stops flowing for the following reasons:
- the sticker on the neck of the bottle has not been removed or has been partially removed;
- an air lock has appeared;
- the water supply tube is pinched;
- There is a foreign object stuck in the system.
The empty container is removed. Install a new bottle after removing the label. The cork is removed by shaking the container. At the same time, open the tap, holding it until water flows. Foreign objects from the pipes and gaskets are removed after unscrewing the panels. You can open the case yourself only in situations where the warranty period for the dispenser has expired.
The faucet leaked after replacing the bottle
It happens that just yesterday a working faucet begins to drip immediately after replacing the bottle. The cause of such a breakdown in 9 cases out of 10 is a hygienic seal forgotten on the neck of the bottle. If you forget to remove the paper sticker from the neck before changing bottles, the remaining seal will end up in the silicone tube or get stuck in the faucet lock assembly.
To fix this problem, you need to remove the bottle, dismantle the tap, rinse the silicone tubes and valve, and reassemble the device in the reverse order. There is no need to change the shut-off assembly and tubes. To flush the internal water supply, lower the end of the silicone tube into a bucket and place a half-empty bottle on the stem.
Would you like iced tea or...
I remembered after this post: A knife that heats up and marketers that heat up
About 12 years ago, I worked in a computer store in a warehouse. The task was quite simple: an order comes from a client, you need to find one or more items in the warehouse and bring it for pick-up. The rest of the time the tasks were minimal and it was possible to get tea/coffee. There was no cold water in the warehouse, only a kettle and a tap, which meant we had to wait until it cooled down. As always, while this is happening, work arrives, you forget about your seagull, and when the time comes, it is already cold. Sometimes I brought a bottle of water, but it’s a waste of time, you need to make a detour to go to the store and it’s expensive, especially considering that it wasn’t just me who used it, who would ask permission?)) This is generally a separate topic for conversation, taking food without asking.
After the weekend, when I went to work I came across a processor cooler, or rather just a radiator without a fan, no one knew where it came from or what to do with it, there was no marking, kit or box, and the inventory didn’t give anything, we shouldn’t have such a position . Don't throw it away. For some time he just lay nearby on the table, and attempts to find out his fate led nowhere (cameras were difficult at that time, the quality was poor and they did not always work for recording). In another rush, I pour myself some tea, thinking that I won’t drink it again, while I’m sitting my eyes fell on this same radiator, it looked something like this:
I remember exactly that it was two-section, and the number of copper tubes was from four to six. The thought came to mind: “after all, these things cope well with hot processors,” what if we try to cool tea with it? I wiped it off from dust and placed it in a mug for a couple of minutes. And I clearly underestimated the capabilities of these towers! When I took the radiator in my hand, it was close to hot, but when I tried the tea, it turned out to be almost cold, the tower took almost all the heat from the tea. Empirically, I determined the time it takes for the tea to be brought to the desired state; ~20 seconds is enough. After several shifts, when I came to work, I didn’t find the radiator, no one knew its fate...
alban85
3 years ago
Dispenser noise is too loud
What to do if the dispenser does not flow, dispenses both hot and cold water without a hitch, but makes noise like an airplane? How can I fix the noise? We won’t bore you - this is easier to do than it seems at first glance. After all, the source of dispenser noise is the vibration of the compressor installed with a slight or significant distortion relative to the horizontal.
To remove noise, place the device body level. This work does not require much effort - most floor-standing models have adjustable legs that allow you to change the height of each corner. And desktop models can be placed on a rubber mat or rubber pads of the required thickness can be placed under the corners of the dispenser.
If the source of noise is a constantly boiling dispenser heat exchanger, replace the device’s thermostat before water vapor explodes the tank and storage tank.
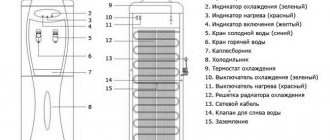
General provisions
| Designation in the figure | Name |
| 1 | Bottle installation location |
| 2 | Green cooling indicator |
| 3 | Red heating indicator |
| 4 | Yellow power indicator |
| 5 | Cold water tap |
| 6 | Hot water tap |
| 7 | Collection container for drops |
| 8 | Cooling system |
| 9 | Cooling thermostat |
| 10 | Green cooling switch |
| 11 | Red heating switch |
| 12 | Cooling radiator |
| 13 | Network connection wire |
| 14 | Drain valve |
| 15 | Grounding |
As you can see from the given structure of the water dispenser, the faucets are indeed precisely the part with which a person who decides to drink from the cooler comes into contact. Consequently, the requirements for it must be special.
The needle falls out or breaks
This kind of breakdown occurs more often than dispenser owners would like. After all, it is possible to repair the needle only on some models that allow dismantling the stem or the entire bottle receiving unit. Replacing the needle involves completely dismantling the bottle receiver. This part is rotated in the mounting socket and pulled up when the slots of the bottle receiver come out of the mounting sockets (at this moment you will hear a characteristic sound). After this, the old part is thrown away, and a new unit with a working needle is put in its place.
If you don’t want to deal with broken needles, buy a bottom-loading dispenser. Such a device does not have a bottle receiver and a rod that pushes the shut-off valve into the bottle cap.
Principle of operation
After the main points of the design types have been sorted out, you can proceed to the general provisions of the operation process.
How is the water heated in the device?
To begin with, water in the required quantity fills a special compartment from the main compartment, which is intended for cooling and heating. When these containers lose a certain volume of liquid, they are refilled in new proportions.
This method is good because boiling is not carried out (maximum 98 degrees Celsius), which means that the beneficial properties and taste are not lost. Heating occurs due to a built-in heating element - a standard system similar to the operation of a kettle and similar inventions. The element itself can be either internal or external. This is determined relative to the reservoir.
How the water in the device is cooled
This aspect can be divided into two, namely electronic and compressor. The second of them is most similar to the process of operation of a refrigerator. To prevent the destruction of the ozone layer, a refrigerant is used, thereby ensuring environmental safety. In addition, here we can emphasize the speed and speed of temperature decrease.
The first system mentioned is equipped with two wafers, which, in fact, are semiconductors. One of them heats up during the supply of electric current, and the other cools down. Therefore, different degree measurements are obtained.
The washing machine is broken
Life hack, it may be useful to someone, but I’m not sure it will work on all washing machines. My wife started washing, the machine stopped with half a tank of water and issued E03. The forums said: 1. The pump is broken 2. The outlet pipes are clogged 3. The water level sensor is broken. There are instructions for everything about everything, how to disassemble and repair. I got lazy. First, unplug it from the socket and shake it, turn it on, the error goes away. Turned it on. 5 minutes and the error appeared again. My wife has already sat down to look at the new washing machines being delivered. And I... and I remembered my plumbing past. He pulled the drain hose out of the canal, took in more air and blew three times. The washing machine responded with bubbling in the tank. Well, the air has flowed, which means the water will flow. I turn it on, there is no error, I put it on spin and I hear water flowing into the channel. That's it, the machine has spun out and is already humming for the second wash.
gromt
4 years ago