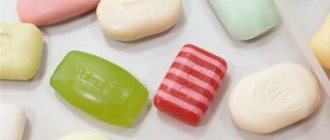
From the arsenal of professional makeup artists, concealer has long migrated to the cosmetic bags of all girls who are partial to makeup.
Believe me, if you choose the perfect corrector, you may not even need foundation: it will be enough to precisely apply the correctly selected corrector. How not to make a mistake with your choice? Take our test and find out which best-selling concealer is perfect for you.
Take the test
What is a corrector?
It’s easy to guess about the basic purpose of the corrector, even if you’ve never held this product in your hands: the name speaks for itself. The corrector solves minor local problems related to skin tone: hides pimples, redness and age spots, disguises dark circles and bruises under the eyes, and evens out skin color.
© yslbeauty
Return to contents
How to use window putty, features and rules of application
Before you start working with fresh putty, you need to get rid of the layer of old material. To do this you will need a thin spatula or a sharp knife. A construction hair dryer will heat up the putty, make it softer and simplify the work of removal. If the dry paste does not give in, there is no need to apply force, as the glass may be damaged. After the old putty is completely removed, the glass is removed and the surface of the frame is well cleaned with sandpaper.
The clean window frame is ready for further processing. Before applying the paste, the wooden surface is impregnated with a deep penetration primer. This is necessary so that the oil component does not penetrate into the wood.
The glass is inserted into the frame and secured around the perimeter with several small nails. A sausage is rolled out of the putty, which is placed at the joint between the glass and the frame. You can also use a knife with a wide blade or a rubber spatula for application. The sealant is applied to the tool. Without lifting it from the surface, the paste is carefully leveled to cover all the cracks. All windows are processed in a similar way. Once the putty is dry, it can be sanded and painted.
How is corrector different from concealer?
© Makeup.ru
Corrector and concealer are tonal products that are often confused with each other. And there are several reasons for this: firstly, they actually partially duplicate each other’s functions. Secondly, some cosmetics manufacturers do not distinguish between these categories, releasing one product to disguise all minor skin imperfections - and call it either a concealer or a corrector. But in fact there is a difference between them.
© yslbeauty
1
The concealer is designed primarily to cover larger areas of the face: to hide dark circles and dark circles under the eyes. The corrector can also be used for this purpose, but it best copes with more serious local imperfections: masking pimples, acne marks, small scars.
2
The concealer has a lighter texture and the shade is closer to the natural skin tone. At the same time, the corrector can be either nude or colored: yellow, green, orange and even purple (we will tell you more about the functions of this category of products below).
© yslbeauty
3
The corrector dries out the skin, while the concealer, on the contrary, contains moisturizing components.
4
The concealer's covering power is not that high, so covering up a pimple with it will be problematic. But the corrector, due to its dense and thicker texture, copes with this task easily.
5
The corrector is applied before the foundation (or instead of it), and the concealer is applied on top.
© Makeup.ru
You can read more about the functions and features of the concealer in this material.
We recommend reading:
- Correction class: essential concealers for this summer
- How to apply concealer on your face: step-by-step instructions
- The best concealers for the face: rating
Return to contents
How to choose putty for wooden windows?
Window putty is used to waterproof joints, securely fasten glass, and hide minor defects. The product is a paste made from various components. Sold ready-made or dry. You can also prepare the putty yourself by choosing one of the existing recipes. When choosing a sealing composition, you need to pay attention to the following properties:
- moisture resistance for operation in any weather;
- plasticity for filling the smallest gaps;
- water resistance;
- resistance to temperature changes and sunlight;
- lifetime;
- fast hardening to hold glass;
- absence of harmful impurities in the composition;
- good adhesion.
When planning to carry out work on sealing wooden windows in the cold season, pay attention to the temperature indicated on the packaging.
Choose a sealant that can work down to -200 C. A silicone compound is best for fungus and mold, but when it dries, such putty will shrink a lot.
Types of face correctors
Choose the appropriate proofreader format depending on the task you face.
Liquid corrector
© Makeup.ru
The most popular format: liquid correctors are loved primarily because they are easy to use.
- As a rule, the kit includes a convenient applicator, like a lip gloss, with which it is easy to apply the corrector both to spots and to larger areas.
- Many of the liquid concealers can be used around the eyes to hide dark circles under the eyes. However, make sure that the corrector is not too dense in texture and does not get caught in small folds of the skin. If dark circles are too noticeable, apply the product in layers: first spread the corrector in a translucent layer and blend well. Allow the product to absorb and apply a second coat.
© maybelline - Liquid correctors are produced in different colors, from pink to green: these are intended for color correction of the skin.
- Sometimes you can see the inscription “reflective corrector” on the packaging; they are used in the area around the eyes to hide small swellings, or used instead of a highlighter.
Corrector stick
© Makeup.ru
The second most popular format of concealer, which is very convenient to take with you: it definitely won’t smear in your bag, and you can use it to disguise an inopportune pimple even in a taxi on the way to a party. This product has a creamy texture, so it spreads quickly and easily over the skin and is perfect for girls with dry skin.
© maybelline
To hide a pimple or a small scar, proceed according to the following scheme: precisely apply the product to the problem area, wait until it “settles” on the skin a little (20-30 seconds), and then blend the edges with your fingers or a sponge. Apply a little powder on top to seal the result.
Pencil corrector
© Makeup.ru
The corrector pencil has a high density and dry texture; antibacterial components are often added to its composition, so this product is ideal for girls with oily and problem skin. In addition, this concealer has the highest staying power. In addition to its main function, such a pencil also takes on several others.
© lancome
- Using a corrector pencil, you can visually enlarge your lips: apply a nude pencil, slightly extending beyond their contour. If, on the contrary, you want to make your lips a little smaller, outline them strictly along the contour.
© Makeup.ru
- The pencil can be used instead of a primer for the eyes or lips: shade the entire surface of the lips with corrector, and apply bright lipstick on top - the shade will be more saturated and the lipstick will last longer. Do the same if you use bright shadows.
© Makeup.ru
- You can use a corrector pencil to highlight the area under the eyebrow to visually lift it.
© Makeup.ru
- Line the mucous membrane of your eyes with a pencil to make your eyes look more wide-open.
© Makeup.ru
Cream corrector
© armanibeauty.ru
Concealer has a creamy consistency and is usually sold in small jars or palettes of four to six colors: they are useful if you need to solve several different skin problems. In general, cream correctors are universal (they are even used to correct the shape of the face), they have a fairly dense consistency and high covering power, so they can be used to disguise scars and dark spots.
© lorealmakeup
Cream correctors can be applied to different areas of the face with a brush, sponge or even your fingers. Best suited for normal to dry skin, may be too rich for oily skin.
Foundation corrector
©Getty
On occasion, it can replace foundation, as it has a similar consistency. Choose a shade according to the same rules that you follow when choosing a foundation: it should perfectly match your skin tone.
© lorealmakeup
Dry corrector
© nyxcosmetic.ru
Not the most common concealer format, which, however, is ideal for oily skin, as it has a mattifying effect. Use to correct redness or age spots: in the first case, a corrector with green pigments, in the second, with purple pigments. Apply regular powder to match your skin tone on top.
© lorealmakeup
If you can't decide on the type of corrector, take our test.
Take the test
Return to contents
Stationery putty
Putty or proofreader is a tool used in office work to correct errors in written or printed paper text. After drying, it looks like a white stripe that completely covers the mistake made. The product was born in 1956 thanks to the American Bette Nesmith, who a few years later formed a company called Liquid Paper, which means “liquid paper”. Initially, the gadget was an ordinary watercolor-tempera, which was used to cover up blemishes with a brush. Subsequently, the composition of the corrector was improved many times.
Attention! Putties differ from each other both in the method of applying the correction layer, the type, and its composition.
By type of putty there are:
- Liquid. Inside the container with liquid corrector there are often balls that help to better agitate the solution. They are also found in the form of handles.
- Dry. Offers appeared on the market relatively recently and are a tape housed in a plastic case, onto which a layer of dry corrector is applied.
How to apply concealer to the face: step-by-step diagrams
Concealer can be used for different purposes, and the techniques for applying it certainly vary. We'll tell you about the basic techniques that will help you use face corrector.
© lorealmakeup
Corrector for the skin around the eyes
There are several techniques for applying concealer under the eyes. You can use the corrector to draw thin lines diverging from the inner corner of the eye, or put several dots under the lower eyelid.
© Makeup.ru
© Makeup.ru
But you should always adhere to one method of shading the applied product: correctly shade the corrector in the shape of an inverted triangle, and not stretching it towards the inner corners of the eyes. Please note that the corrector should be either skin tone or slightly lighter.
© Makeup.ru
Our video tutorial clearly shows how to apply concealer correctly.
How to cover up bruises and dark circles under the eyes?
By following these simple rules, you can mask dark circles under your eyes on your own.
© lorealmakeup
- If the dark circles under the eyes are too noticeable, use a yellow, orange or pinkish shade of corrector, apply a corrector on top of a tone lighter than your skin, or immediately treat the area with foundation.
- To hide dark circles, also use a color corrector. If you have fair skin, use pink, medium skin tones will suit peach, dark skin tones will suit orange.
- Apply color corrector in the same way as a regular nude or concealer.
How to hide wrinkles with a concealer?
The corrector is also indispensable if you want to disguise fine wrinkles. There are three basic rules of use.
© lorealmakeup
1
When creating age-related makeup, first use a moisturizer and let it absorb properly.
2
Then apply a concealer 1-2 shades lighter than your skin color under your eyes to hide dark circles and crow's feet in this area (remember the inverted triangle rule!). Choose a water-based liquid concealer that won't settle into creases: after using it, your skin will look more even.
3
Apply the same corrector to the bridge of the nose, to the “tick” above the upper lip, to the corners of the mouth below, to the dimple above the chin. Blend thoroughly with a damp sponge before the product has time to be absorbed.
© Makeup.ru
Apply the corrector with a thin brush (or a thin applicator, for example, like Giorgio Armani High Precision Retouch) directly inside the wrinkle, on the area where the shadow falls. Lightening this area will visually smooth out the wrinkle.
How to hide a pimple with concealer?
To disguise acne, it is better to use color correctors; they better neutralize redness.
© lorealmakeup
1
Use a brush to apply cool-toned green concealer directly to the pimple or redness.
2
Lightly press the pigment with your finger and blend its borders. Wait a minute for the corrector to “settle” on the skin.
3
Apply a foundation that suits your skin tone all over your face.
© Makeup.ru
Return to contents
Types of liquid putties
Liquid correctors are produced in the form of small bubbles or cans, which differ in the methods of applying the composition. It could be:
- brush;
- spatula;
- foam applicator.
The main components of any correction fluid are PVC, calcium carbonate, purified gasoline, titanium dioxide, but they all differ in the base, which can be:
- One. Non-flammable, not dangerous to use, odorless, freezes at low temperatures, and takes a relatively long time to dry.
- Alcohol. It dries quickly, does not freeze in winter, is flammable, and has a pungent odor.
- Emulsion. Dries quickly, has no odor, is resistant to low temperatures, and is not flammable.
When the composition dries inside the container, it is revived by adding a few drops of water and zinc white (gouache). If the corrector is not at hand, you can make it from PVA glue and zinc white (gouache). Mix dried gouache and PVA in equal quantities to form a thick sour cream and apply to the area that needs masking.
Corrector color palettes: how to use
Color correctors are products that help solve several problems: mask redness, dark circles under the eyes, age spots and other minor skin imperfections. To find out which one you need, read our instructions.
© lorealmakeup
Purple corrector
- Lilac tones neutralize yellowness, so a concealer of this color will help to cope with a dull complexion (in this case, apply the corrector to the entire face) and hide small age spots. Be sure to spread foundation on top.
- In addition to the fact that lavender corrector removes yellowness, it also gives the skin radiance.
- If you are severely sunburned, apply a corrective primer with blue pigments to your face. It will help soften the effect a little.
- If you have dark or tanned skin, do not use a cool-toned product: it is unlikely to improve the situation.
© Makeup.ru
Yellow corrector
- Yellow correctors are ideal for neutralizing and brightening purple and blue spots, so use them to correct dark circles under the eyes and fine spider veins.
- They are also suitable for covering dark scars and acne marks.
- If you don't have a yellow concealer on hand, try using a foundation with a yellowish undertone: it can also cope with slight redness.
© Makeup.ru
Pink corrector
- Conceals dark circles under the eyes: hides blue, green and violet colors. Dark circles of these colors are most often found in people with fair and medium skin tones. Therefore, if you notice that small veins around the nose or dark circles under the eyes look greenish, feel free to correct them with a pink corrector.
- If you have pale skin, choose a salmon shade; peach is more suitable for olive or tanned skin.
- On pale skin, a pink concealer will also help hide age spots.
© Makeup.ru
White corrector
White corrector is quite rare. As a rule, they are used to dilute foundations, concealers and correctors of too dark a shade in order to ultimately obtain a suitable color.
© lorealmakeup
Green corrector
Green is the best color to neutralize redness, so this concealer is ideal for covering up pimples, spider veins, and a reddish complexion. To cover up more serious blemishes (like sunburn), mix green concealer with foundation and apply to problem area. If you have a reddish complexion, use a green color correcting primer.
© Makeup.ru
Orange corrector
The most important correction product for dark skin. Orange concealer hides age spots, brownish circles under the eyes and other dark spots. It will also help to slightly lighten the dark nasolabial folds and the area in the corners of the lips, and neutralize dark circles under the eyes.
© Makeup.ru
We clearly showed how to use the color corrector palette in this video.
Return to contents
How to prepare putty for windows, the best recipes for homemade sealants
For those who don’t want to bother with preparing window putty at home, there are ready-made products that can be purchased at any hardware or hardware store. These include:
- "Gamma" is a Russian manufacturer of inexpensive putty, which can be worked with within the temperature range of -50–+400C. The paste sets quickly and does not crack after drying;
- “Dobra” is a product based on vegetable oils, plasticizers and fillers. It has such characteristics as resistance to precipitation, moisture does not shrink and is non-toxic;
- Leinölkitt is a paste based on linseed oil. Designed for wooden windows.
Leinölkitt window putty
If you want to save money on sealing compound, you can use homemade recipes. There is nothing difficult about making window putty with your own hands. The main thing is to choose a recipe that suits the specifics of the window design, as well as your individual parameters. There are compositions that are relatively easy to prepare, but will not last long. The latter will require a little work, but after completion of the work, you can be sure that the window structure will not need repair for a long time.
Recipe No. 1: using linseed oil
A high-quality mixture that is used both for domestic purposes and by craftsmen. The putty contains chalk and linseed oil. The paste seals any cracks well, is easy to use and will last at least a year. The components for the product are sold in hardware stores. You can take chalk in pieces or powder. The second option is preferable.
- Chalk (if in pieces) is crushed using a grater or wrapped in cloth and broken with a hammer.
- Flaxseed oil is added to crushed chalk in a 4:1 ratio. On average, 10 tbsp is taken per serving. l. chalk and 2.5 tbsp. l oil.
- The mass is thoroughly mixed to a dough-like state.
The readiness of the mixture is checked by rolling a ball. If it holds its shape, the putty is ready; if it blurs, you need to add more chalk. The paste in this recipe turns out to be yellowish. You can make it white using purified linseed oil or by adding dye when you crush the chalk. If you don’t have linseed oil, you can replace it with drying oil, but be prepared for an unpleasant odor.
There is another recipe based on the same ingredients. Half a glass of flaxseed oil is brought to a boil. Pour 0.5 cups of cold oil into the container and add hot oil to it. Pour crushed chalk or limestone into the liquid and mix everything well. The paste can also be colored by adding dyes. It is recommended to use the putty immediately or store it in a tightly closed container.
Recipe No. 2: tar and ash
Window putty based on ash and tar has been tested for years and has proven itself to be a strong and durable material.
- The tar is placed in a metal container, placed on the stove and simmered over low heat for 2 hours. After this it is cooled.
- Wood ash is sifted several times and ground to a powder.
- Both components are combined and mixed well.
- The consistency should be dense, and the mass should not stick to your hands.
To make putty for windows you will need tar
. Tar putty is black in color, so it is not suitable for sealing white windows. But in utility rooms, a garage, a barn or on dark frames it will be indispensable. The paste penetrates well into all crevices and is resistant to moisture and sun. The ash present in the composition has a beneficial effect on wood, protecting it from destruction. You need to start covering immediately after preparing the composition, because... it hardens very quickly.
Recipe No. 3: with sand and flour
For the recipe, you need to take river sand of the finest fraction. The cost of such putty is minimal, and the necessary ingredients are always on hand. The paste is used if urgent repairs are needed and nothing else is available. Unlike previous products, the putty is not as flexible and durable.
- The sand is sifted, washed and dried.
- In a 1:1 ratio, flour and sand are combined and mixed until a homogeneous mass is formed.
- Gradually add water and mix. The consistency should be pasty.
It is better to use this composition indoors, then it will last for several years. On the outside, a more plastic material is used.
Recipe No. 4: vegetable oil and talc
Window putty with vegetable oil is an excellent option to make its use waste-free. It is necessary to use the sediment formed at the bottom of the bottle with unrefined vegetable fat.
- Carefully separate the sediment from the clear oil.
- Talc is gradually poured into the liquid in a 1:1 ratio until the consistency required for work is obtained.
- After receiving the composition, use it immediately.
If talc is not available, it can be replaced with decorative cement, putty or sand. This paste turns out to be plastic and is well distributed over the surface of the frame.
Recipe No. 5: multi-component putty based on white lead
Pasta according to this recipe requires a little more effort and time to prepare, but the result will exceed all expectations. The putty works well, and windows with it will last at least 3 years. To prepare you will need:
- lead white - 10 parts;
- chalk powder - 5 parts;
- linseed oil - 7 parts;
- beeswax - 3 parts;
- ocher or umber - 3 parts.
To make your own putty, you will need honey powder.
Melt the wax in a water bath. Without removing it from the heat, pour in the linseed oil and stir. Cool the composition and add chalk and ocher and mix. Add lead white and give the composition a uniform consistency. Transfer the paste to a suitable container for storage and cover. This putty is suitable for treating several wooden windows. Store the container with the composition in a cool, dark place.
Advantages and disadvantages of homemade window seals
Homemade putty is cheaper than store-bought sealants. Most of the components are found around the house or sold in stores for pennies. Also, the composition of the paste is selected individually, based on the operating conditions of the window, the type of frame and its condition. Do-it-yourself window putty also has disadvantages. This is the fragility of some compounds. You should only work with homemade sealants in warm, windless weather. This is not entirely convenient if it is cold outside and repairs need to be carried out urgently. Otherwise, such mixtures are beneficial, especially for work in the country house or utility room.